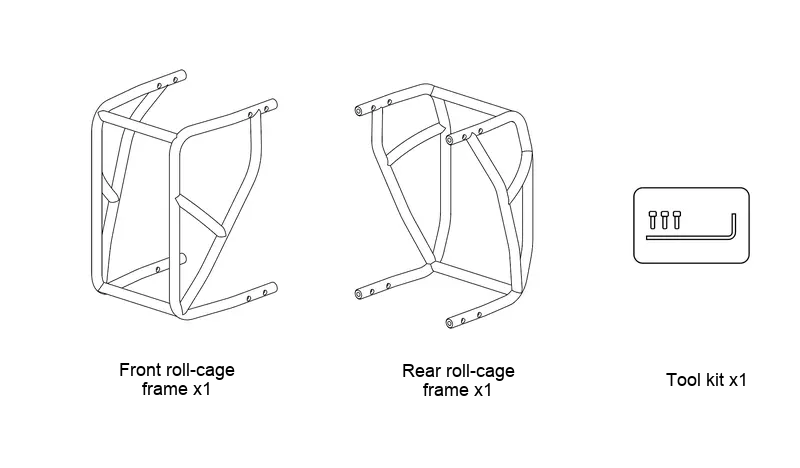
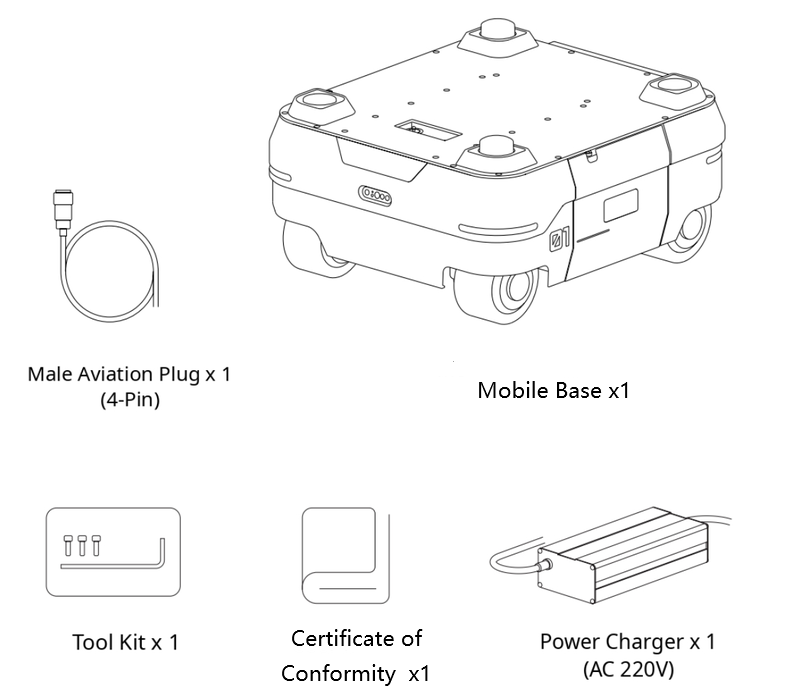
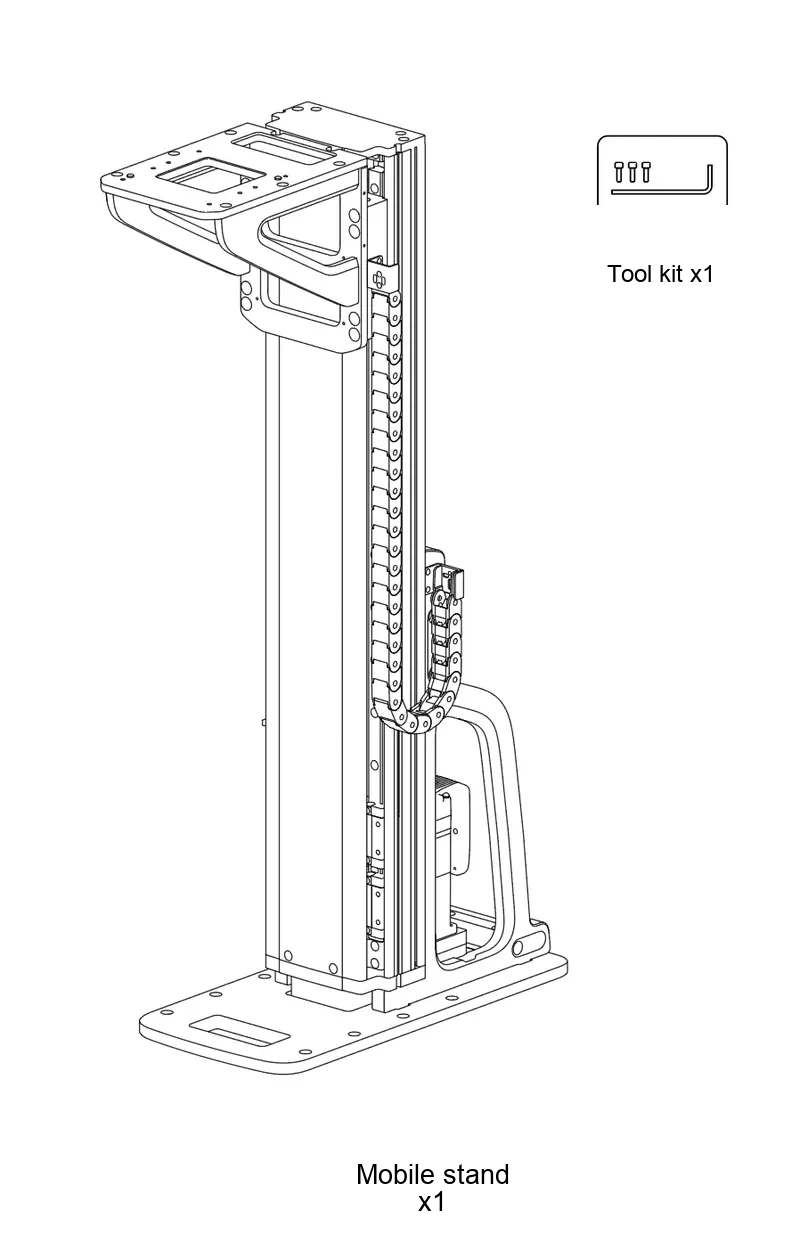
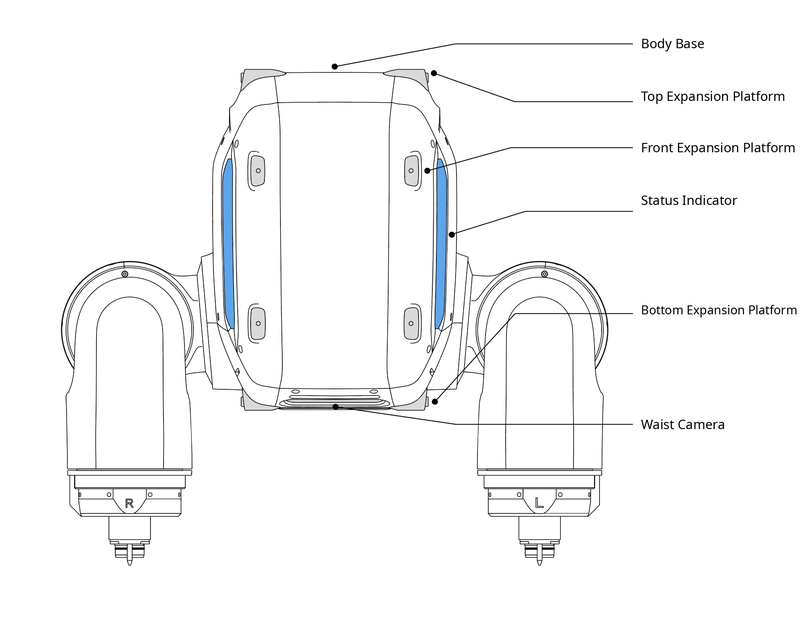
﻿##  Version History

<table style="display: table; width: 100%; table-layout: fixed; border-collapse: separate; border-spacing: 0; border: 1px solid #e5e7eb; border-radius: 10px; overflow: hidden; box-shadow: 0 2px 8px rgba(76, 29, 149, 0.08); margin: 12px 0 20px;">
  <thead>
    <tr>
      <th style="background-color: #6d28d9; background-image: linear-gradient(90deg, #6d28d9, #2563eb); color: #ffffff; padding: 12px 18px; font-size: 15px; font-weight: 700; border: none; width: 22%; text-align: center;">Update Date</th>
      <th style="background-color: #6d28d9; background-image: linear-gradient(90deg, #6d28d9, #2563eb); color: #ffffff; padding: 12px 18px; font-size: 15px; font-weight: 700; border: none; text-align: left;">Change Description</th>
    </tr>
  </thead>
  <tbody>
    <tr>
      <td style="width: 22%; padding: 18px; text-align: center; vertical-align: middle; background-color: #f6f1fe; border: none; border-right: 1px solid #ede9fe;">
        <div style="font-size: 20px; font-weight: 700; color: #5b21b6; letter-spacing: 0.5px;">2026-11-05</div>
        <div style="display: inline-block; margin-top: 8px; padding: 2px 12px; border-radius: 999px; background-color: #7c3aed; color: #ffffff; font-size: 12px; font-weight: 700;">Latest</div>
      </td>
      <td style="padding: 16px 22px; vertical-align: middle; background-color: #ffffff; border: none; line-height: 1.8;">
        <div style="margin-bottom: 8px; font-size: 16px; font-weight: 700; color: #1e3a8a;"><span aria-hidden="true">🚀</span> Updated for Main Controller V2.7</div>
        <div style="margin: 6px 0;"><span style="display: inline-block; min-width: 44px; margin-right: 10px; padding: 1px 10px; border-radius: 999px; background-color: #dcfce7; color: #15803d; font-size: 12px; font-weight: 700; text-align: center; line-height: 20px;">New</span>Section 4.6: Web-Based Robot Control</div>
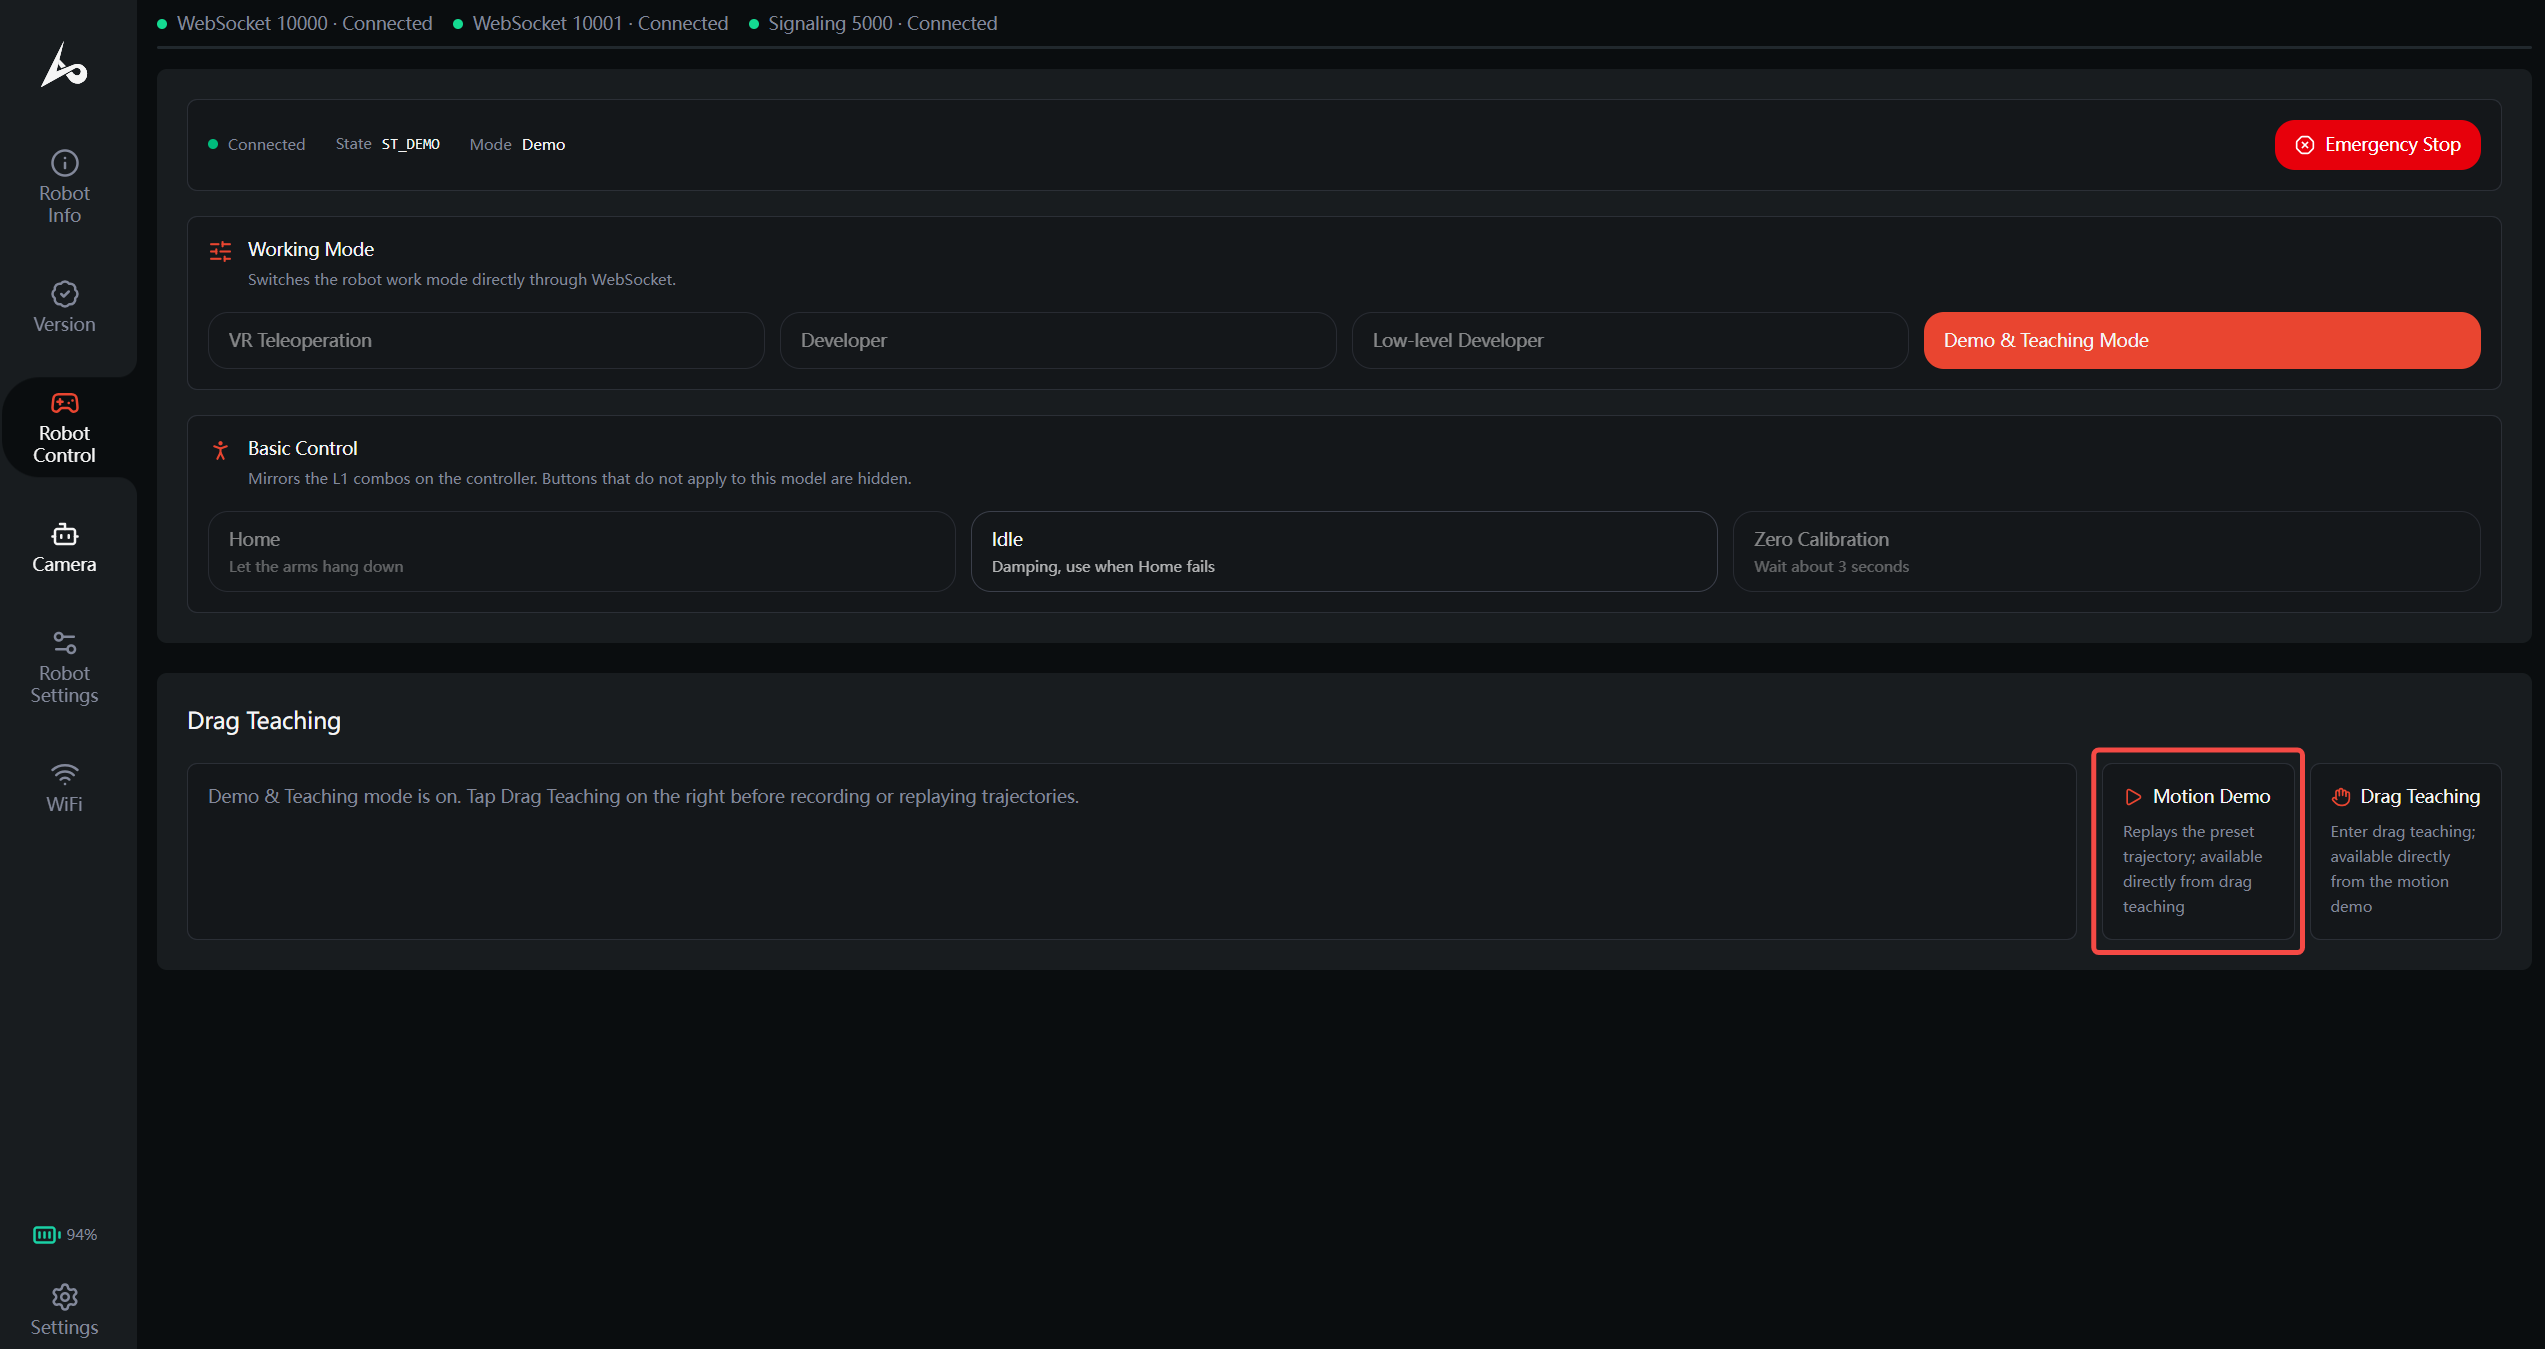
        <div style="margin: 6px 0;"><span style="display: inline-block; min-width: 44px; margin-right: 10px; padding: 1px 10px; border-radius: 999px; background-color: #dcfce7; color: #15803d; font-size: 12px; font-weight: 700; text-align: center; line-height: 20px;">New</span>Drag teaching: Added the Hand Guide state in Motion mode (section 4.2.2) and drag teaching on the robot management page (section 4.6.3)</div>
        <div style="margin: 6px 0;"><span style="display: inline-block; min-width: 44px; margin-right: 10px; padding: 1px 10px; border-radius: 999px; background-color: #dbeafe; color: #1d4ed8; font-size: 12px; font-weight: 700; text-align: center; line-height: 20px;">Updated</span>Section 5.2: Teleoperation Commands</div>
      </td>
    </tr>
  </tbody>
</table>


<!-- Previous version history (hidden from public view)
| v1.5   | 20261010 | yuna |  Updates for Main Controller V2.6.3 and Remote Controller Firmware V1.1.0<br>- Updated section 4.2: Screen Information<br>- Updated section 4.2.1 to distinguish the remote controller battery level, the robot battery level, the current mode, and the current state<br>- Added section 4.2.2: Remote Controller Modes and States<br>- In section 4.3, added how to enter the Show state in Motion mode, its switching restrictions, and a safety notice before running a demo<br>- Updated the steps in section 5.3.2 for switching the robot to Teleoperation Mode |
| v1.4   | 20260912 | damon |  Add a section on remote controller firmware upgrade |
| v1.3   | 20260910 | yuna |  Information updates for the Main Controller V2.3.22 and VR device teleoperation software V8.4.1 upgrades<br>- In section 4.5 (remote control commands for Sole/Wheeled-Legs robots), added instructions for Wheeled-Legs auto-recharge<br>- In sections 4.4 and 4.5 (Remote Controller Mode Switching), added the backward cycling function<br>- Updated the operating procedure and video in section 5.3.3 (starting the teleoperation applet within the VR device)<br>- Added section 6.4: Remote Teleoperation Configuration<br>- Updated the online upgrade procedure and video for the VR device app in section 7.2 |
| v1.2 | 20260810 | damon | Information updates for the main controller V2.2.11 upgrade   <br>- Added section 6.3: Robot connection to external internet<br>- In section 7.1 (robot body firmware upgrade), added more detailed instructions regarding the motor driver firmware  <br>- In section 5.3.3 (starting the teleoperation applet within the VR device), changed the logic of the teleoperation program's interactive interface  <br>- In section 5.4 (during teleoperation), changed the home key combination to X+A   <br>- In sections 3.2 (mode descriptions and usage flow diagrams) and 3.5 (meaning of indicator lights), added descriptions related to demo mode    <br>- In section 3.2, added a manual takeover function during inference on the actual robot   <br>- In Section 1.2 Product Specifications, the CPU of the Development Expansion Module has been changed to Intel Core Ultra.|
| v1.1   | 20260717 | damon |  Updates for Main Controller V2.1.24 Upgrade and Corrections of Previous Errors |
| v1.0   | 20260518 | damon |  Initial draft. |
-->


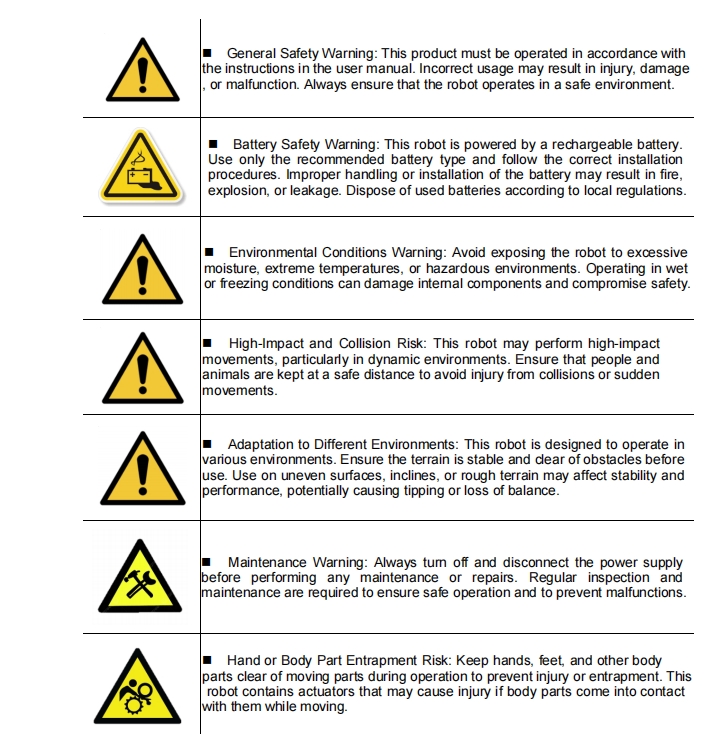
##  Safety Notice

To ensure the safety of both users and the robot, please read the following precautions carefully before use: 
1. Professional Use Only:This product is intended for professional use. Individuals under 18 are not advised to operate the device. The operation should only be 
performed by persons with relevant technical knowledge or under the supervision of qualified personnel. 
2. Keep Out of Reach of Children: Prevent children from approaching or interacting with the robot. In environments where children are present, take extra preca 
utions and ensure the robot operates only in safe and supervised conditions. 
3. Idle Protection: Do not leave the robot powered on and unattended. Activate mechanical or software-based suspension protection to prevent unintended movement. 
4. Safe Operating Environment: Keep the operating area clear of obstacles at all times. Use safety restraints or tethers when necessary toprevent accidental movement, tipping, or injury. 
5. Maintain a Safe Distance: Always keep the robot within your line of sight. Maintain a minimum distance of 1 meter (3 feet) from the robot during operation. 
6. Handling Precautions: Do not touch the robot,s joints or actuating components immediately after power-on or during transportation, as unexpected movement 
may cause pinching or impact injuries. 
7. Low Battery Warning: When a low battery warning is displayed, power off the robot and recharge the battery immediately to prevent unexpected shutdown, system malfunction, or damage.


##  Safety Warnings
<img src="https://oss.limxdynamics.com/uploads/image/2026/09/14/1789394881953_img_v3_0215h_f96bbf8a-8834-42ed-8796-cedfa5fd61dg.jpg" alt="img_v3_0215h_f96bbf8a-8834-42ed-8796-cedfa5fd61dg.jpg" style="width: 600px; height: auto;" />


##  Legal and Compliance Notice

The copyright and ownership of this manual belong to Shenzhen LimX Dynamics Technology Co., Ltd. and its affiliates (collectively referred to as "LimX Dynamics"). Without written authorization from LimX Dynamics, no individual or organization may copy, scan, store, distribute, reprint, sell, transfer, modify, or otherwise use all or part of this manual for themselves or others. This manual and its contents are intended only for operating and using this product and may not be used for any other purpose.

To avoid illegal acts, possible injury, and losses, please strictly observe the following requirements:

1. For safety precautions, refer to the Safety Notice. Before using this product, carefully read this document and the Safety Notice to understand your rights, responsibilities, and legal terms. Failure to comply may result in property loss or safety hazards. By using this product, you indicate that you fully understand and accept all terms in this document. Operate strictly according to the instructions and take full responsibility for your actions and any related consequences. LimX Dynamics assumes no responsibility for injury or loss caused to relevant personnel due to improper operation.  
2. Unauthorized disassembly, modification, or non-standard repair of the product is strictly prohibited. LimX Dynamics is not responsible for equipment faults or damage caused by such actions.
3. Do not use this product in extreme environments, such as high temperature, low temperature, or corrosive chemical environments. LimX Dynamics is not responsible for equipment issues caused by such conditions. 
4. Under normal use conditions, issues caused by natural component wear or battery aging are not considered product quality issues, and LimX Dynamics assumes no responsibility for them.
5. This product must not be used for any activity that endangers national security, including but not limited to support for terrorism, nuclear facilities, biochemical weapon development, or the design and use of weapons of mass destruction. 
6. Please confirm that you are not subject to any trade restrictions or sanctions; otherwise, you may not be able to use LimX Dynamics products and services normally. 
7. LimX Dynamics is committed to ensuring product compliance worldwide. Please comply with the laws and regulations of your region and pay attention to relevant compliance requirements. 
8. You must comply with the export-control laws and regulations applicable in your region. 
9. You must undertake to use this product for legitimate purposes and agree to accept all terms in this document. 
10. LimX Dynamics reserves the right of final interpretation of this agreement and may update or adjust it as needed.


## 1 Product Overview

## 1.1 Introduction

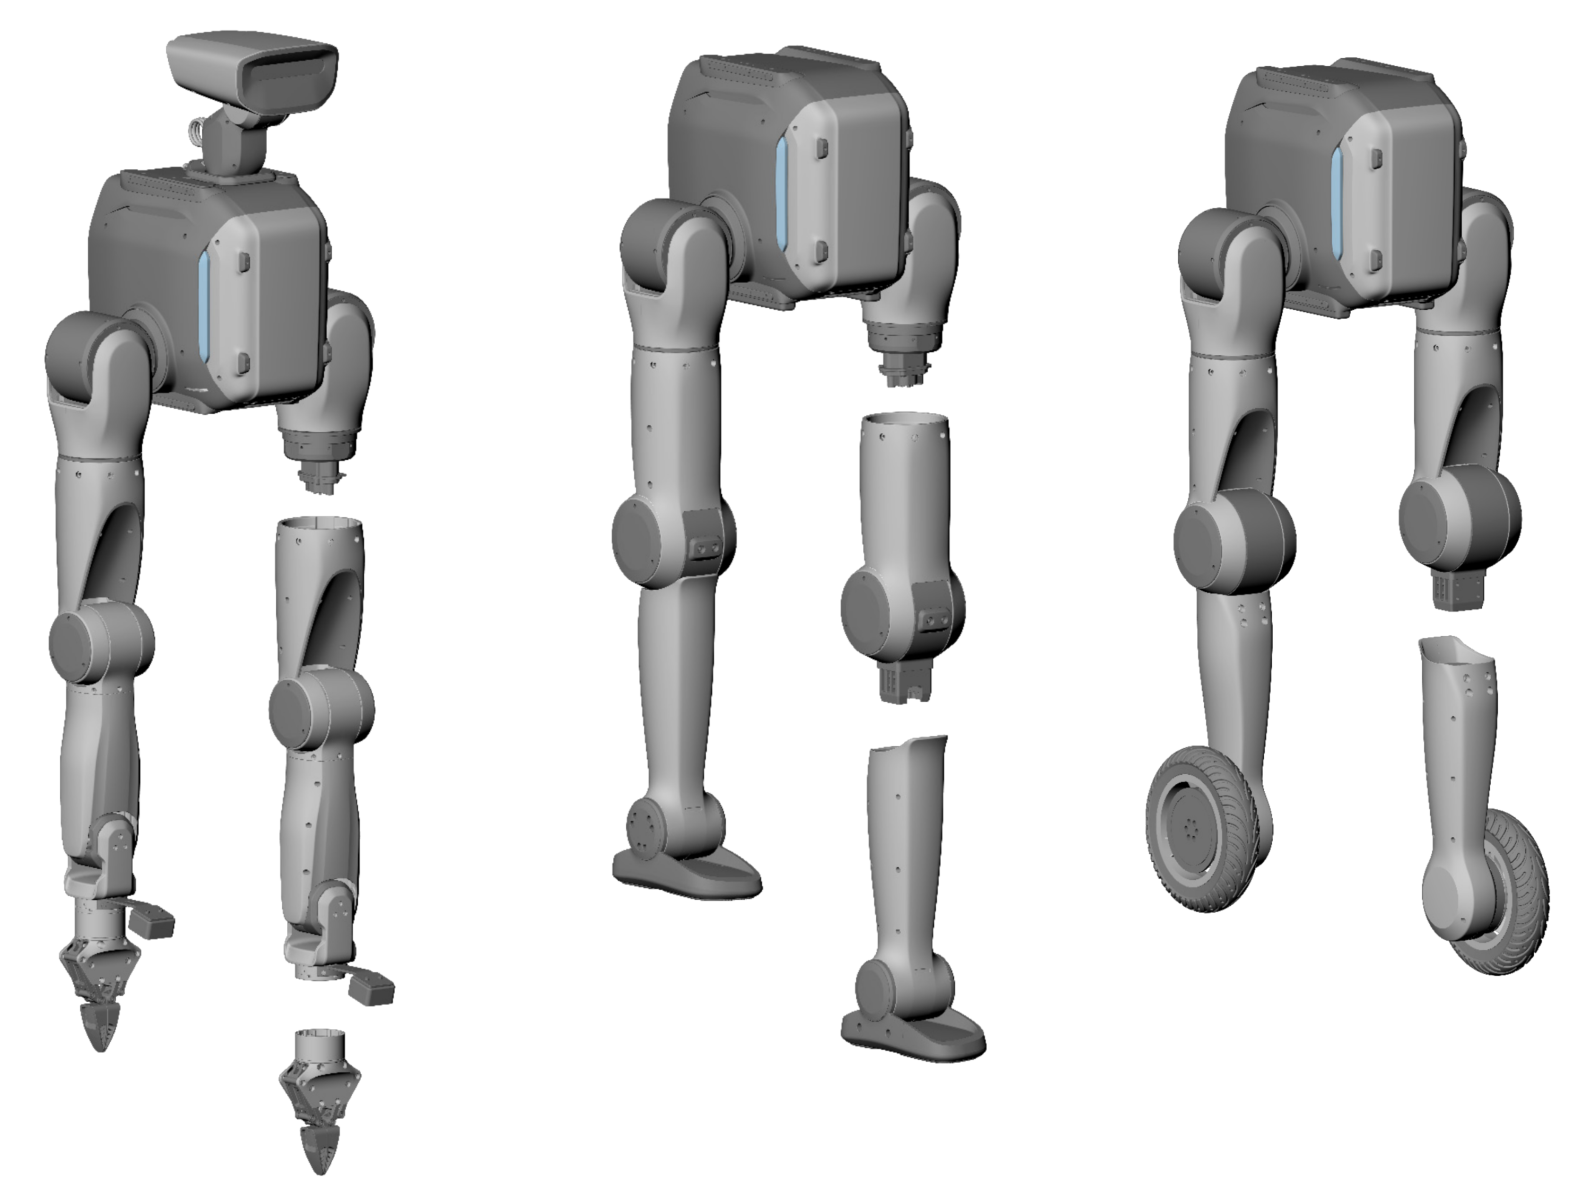
TRON 2 is a modular, composable, multi-scenario embodied-robotics research platform designed for research users. It enables users to freely implement ideas across different robot configurations. By providing open low-level interfaces and Python/C++ development compatibility, it significantly lowers the research barrier in embodied intelligence. As an ideal platform for university research and teaching as well as secondary development by industry enterprises, TRON 2 is dedicated to advancing robotics from the laboratory toward industrialization.

## 1.2 Product Specifications
<table>
<tr>
<td>Parameter Category</td><td>Parameter Item</td><td>TRON 2 EDU Version</td><td>TRON 2 Standard Version</td><td>Notes</td></tr>
<tr>
<td colspan="5">"–" = Not available, "o" = Optional, "✓" = Standard Version</td></tr>
<tr>
<td rowspan="2">Mechanical Parameters</td><td>Material</td><td>Aluminum alloy, plastic</td><td>Aluminum alloy, plastic</td><td></td></tr>
<tr>
<td>Degrees of Freedom</td><td>Single arm: 7 DOF; <br>single leg: 5 DOF; <br>head: 2 DOF</td><td>Single arm: 7 DOF; <br>single leg: 5 DOF; <br>head: 2 DOF</td><td></td></tr>
<tr>
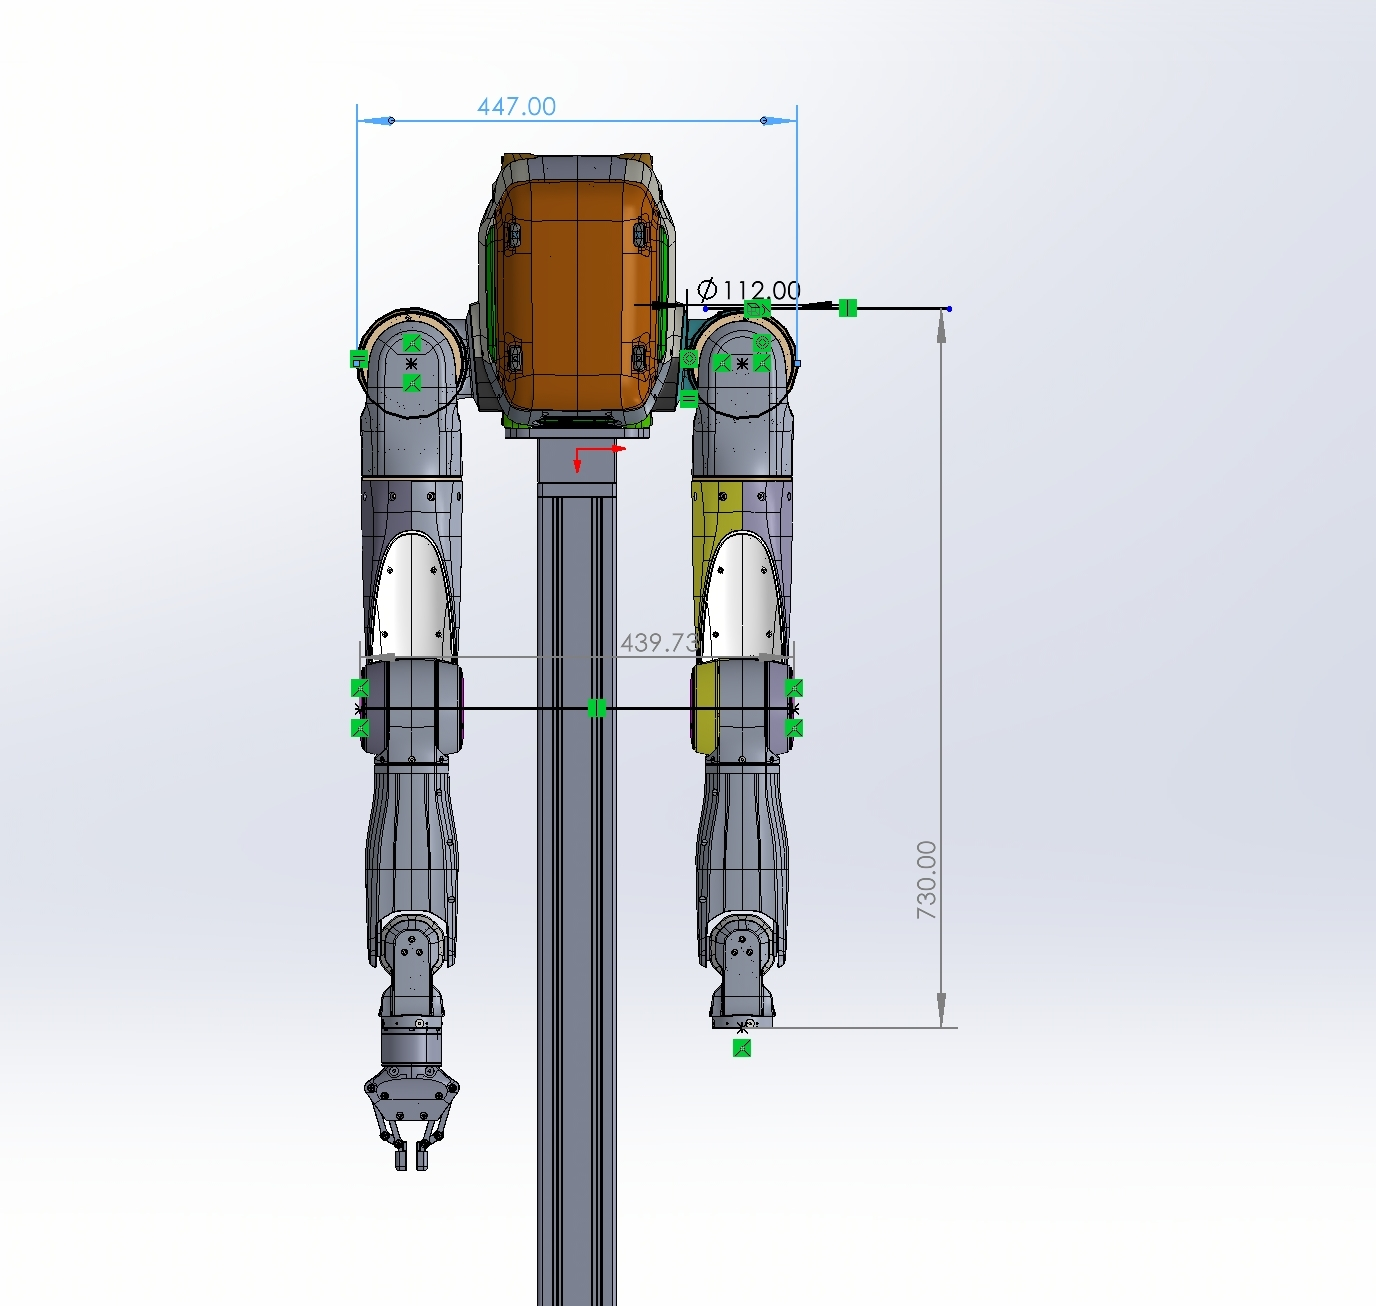
<td rowspan="4">Dimensions</td><td>Dual-Arms</td><td>- Shoulder width: 447 mm <br>- Arm length: 730 mm (without gripper)</td><td>- Shoulder width: 447 mm <br>- Arm length: 730 mm (without gripper)</td><td>
<img src="https://oss.limxdynamics.com/uploads/material/%E9%BB%98%E8%AE%A4/TRON%202/pic/dual_arm_overall_dimensions.png" style="width: 100%; max-width: 250px; border-radius:5px; ">

</td></tr>
<tr>
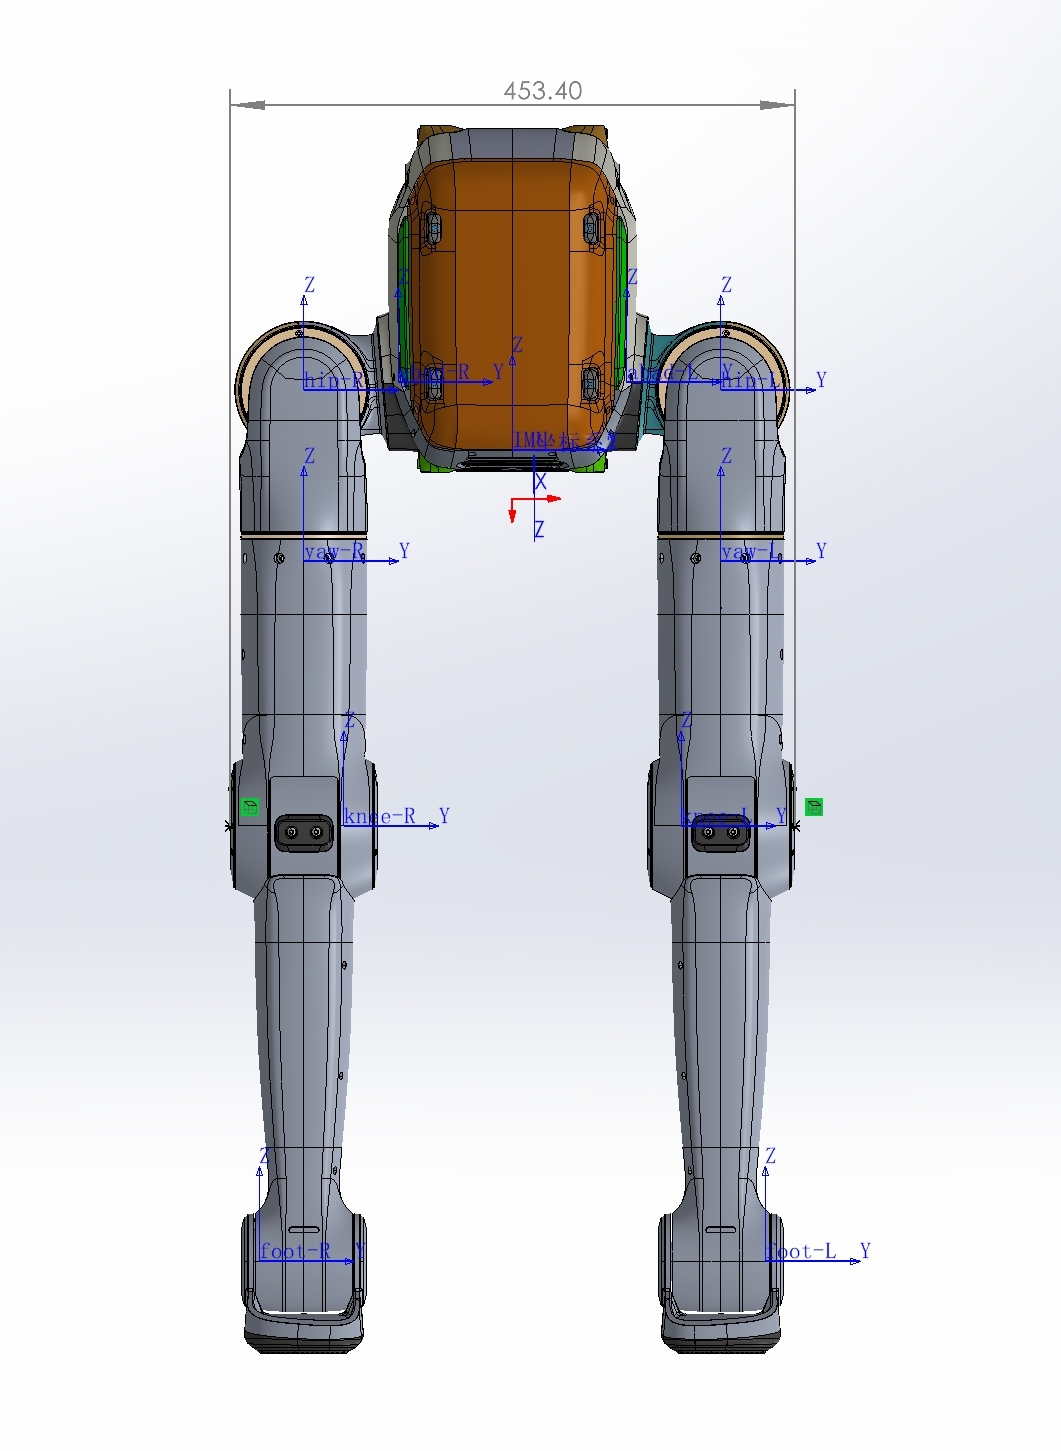
<td>Sole</td><td>- Overall width: 453 mm <br>- Standing height: 987 mm</td><td>- Overall width: 453 mm <br>- Standing height: 987 mm</td><td>
<img src="https://oss.limxdynamics.com/uploads/material/%E9%BB%98%E8%AE%A4/TRON%202/pic/bipedal_overall_dimensions.png" style="width: 100%; max-width: 250px; border-radius:5px; ">

</td></tr>
<tr>
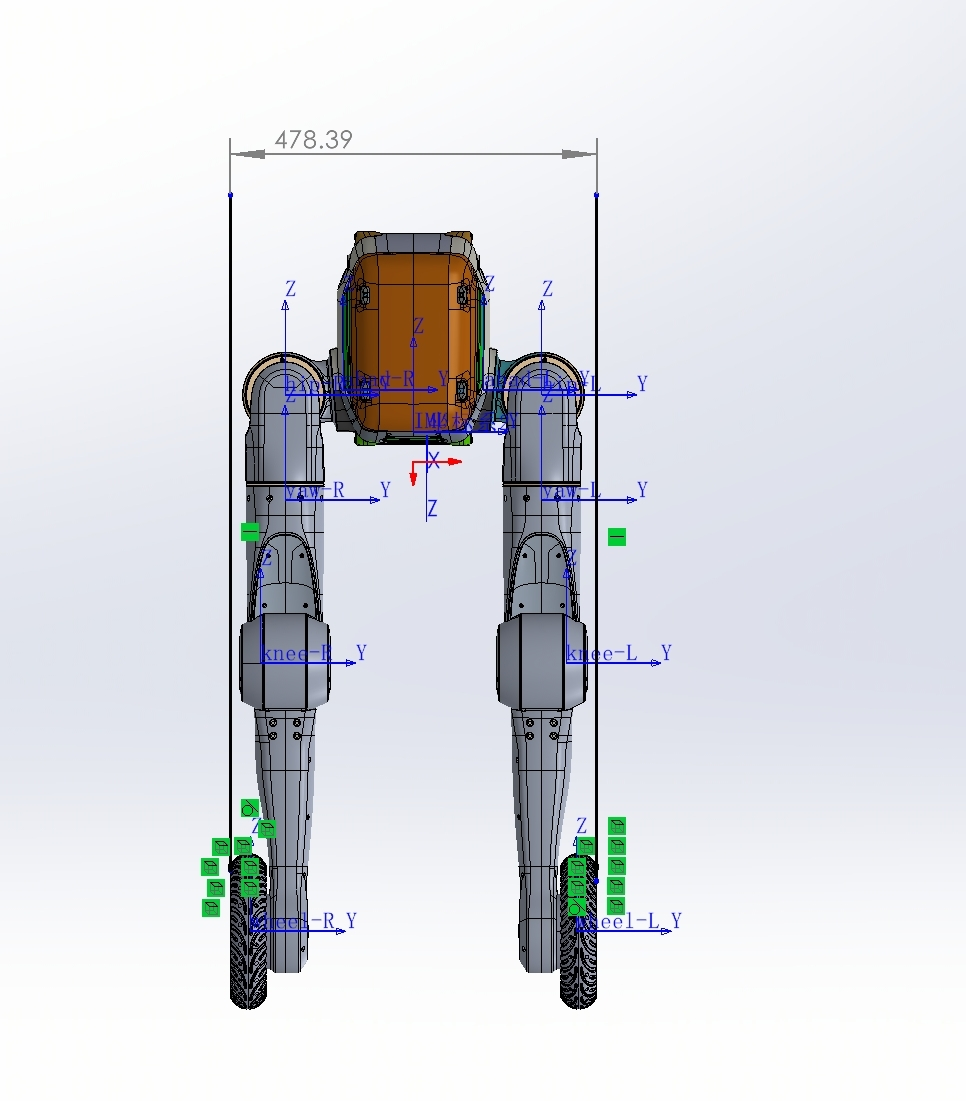
<td>Wheeled-legs</td><td>- Overall width: 478 mm <br>- Standing height: 1015 mm</td><td>- Overall width: 478 mm <br>- Standing height: 1015 mm</td><td>

<img src="https://oss.limxdynamics.com/uploads/material/%E9%BB%98%E8%AE%A4/TRON%202/pic/dual_wheel_foot_overall_dimensions.png" style="width: 100%; max-width: 250px; border-radius:5px; ">

</td></tr>
<tr>
<td>Top Expansion Area</td><td>Width: 146 mm; <br>depth: 170 mm</td><td>Width: 146 mm; <br>depth: 170 mm</td><td></td></tr>
<tr>
<td rowspan="5">Functions</td><td>Secondary Development</td><td>√</td><td>—</td><td></td></tr>
<tr>
<td>Sole/Wheeled Control Functions</td><td>Four-directional Movement, Turning, Static Standing, Squatting Down In-place, Robot Height Adjustment, Stand Up After a Fall, and Ground Clearance Detection</td><td>Four-direction movement, turning, static standing, height adjustment (squat/stand), fall recovery, off-ground detection</td><td></td></tr>
<tr>
<td>Dual-Arm Teleoperation Method</td><td>VR device (PICO 4 Ultra)</td><td>—</td><td></td></tr>
<tr>
<td>Data Collection and Local Storage</td><td>√</td><td>—</td><td></td></tr>
<tr>
<td>Dual-Arm Safety Boundary Protection</td><td>√</td><td>—</td><td></td></tr>
<tr>
<td rowspan="7">Dual-Arm Configuration</td><td>Maximum End Effector Load</td><td>Maximum: 5kg per arm; <br>Extended: 3kg per arm</td><td>Maximum: 5kg per arm; <br>Extended: 3kg per arm</td><td></td></tr>
<tr>
<td>Maximum End-Effector Speed</td><td>5m/s</td><td>5m/s</td><td></td></tr>
<tr>
<td>Maximum End-Effector Acceleration</td><td>36m/s²</td><td>36m/s²</td><td></td></tr>
<tr>
<td>Repeat Positioning Accuracy</td><td>± 0.5mm</td><td>± 0.5mm</td><td></td></tr>
<tr>
<td>Teleoperation Delay</td><td>100ms</td><td>100ms</td><td></td></tr>
<tr>
<td>End-Effector Type</td><td>Gripper \ Dexterous hand</td><td>Gripper \ Dexterous hand</td><td></td></tr>
<tr>
<td>Gripper Performance</td><td>Gripping Force: 20N Maximum; <br>Gripping Width: 85mm</td><td>Gripping Force: 20N Maximum; <br>Gripping Width: 85mm</td><td></td></tr>
<tr>
<td rowspan="4">Sole/Wheeled Configuration</td><td>Maximum Movement Speed</td><td>Sole: 2-3 m/s; <br>wheeled: 3-5 m/s</td><td>Sole: 2-3 m/s; <br>wheeled: 3-5 m/s</td><td></td></tr>
<tr>
<td>Maximum Climbing Slope</td><td>Sole: 15°; <br>wheeled: 30°</td><td>Sole: 15°; <br>wheeled: 30°</td><td></td></tr>
<tr>
<td>Maximum Step Height</td><td>20cm</td><td>20cm</td><td></td></tr>
<tr>
<td>Maximum Load Capacity</td><td>30kg for flat ground walking; <br>20kg for stair climbing</td><td>30kg for flat ground walking; <br>20kg for stair climbing</td><td></td></tr>
<tr>
<td rowspan="9">Electrical Parameters</td><td>Battery Output Voltage</td><td>46.8V</td><td>46.8V</td><td></td></tr>
<tr>
<td>Maximum Battery Power</td><td>2800W</td><td>2800W</td><td></td></tr>
<tr>
<td>Support for Battery Replacement</td><td>√</td><td>√</td><td></td></tr>
<tr>
<td>Battery Type</td><td>Ternary lithium battery</td><td>Ternary lithium battery</td><td></td></tr>
<tr>
<td>Battery Capacity</td><td>9Ah</td><td>9Ah</td><td></td></tr>
<tr>
<td>Charging Power</td><td>542W</td><td>542W</td><td></td></tr>
<tr>
<td>Charging Input Voltage/Current</td><td>100~240V/8A</td><td>100~240V/8A</td><td></td></tr>
<tr>
<td>Charging Output Voltage/Current</td><td>54.275V/10A</td><td>54.275V/10A</td><td></td></tr>
<tr>
<td>Charging Time</td><td>20-80% Charge: 30min   ; <br>20-100% Charge: 54min</td><td>20-80% Charge: 30min   ; <br>20-100% Charge: 54min</td><td></td></tr>
<tr>
<td rowspan="4">Sensor Configuration</td><td>Waist RGBD Camera</td><td>√</td><td>√</td><td></td></tr>
<tr>
<td>IMU(Inertial Measurement Unit)</td><td>√</td><td>√</td><td></td></tr>
<tr>
<td>Head RGBD Camera</td><td>✓ (only for Dual-Arms / Mobile Dual-Arms )</td><td>—</td><td></td></tr>
<tr>
<td>Wrist RGBD Camera</td><td>✓ (only for Dual-Arms / Mobile Dual-Arms)</td><td>—</td><td></td></tr>
<tr>
<td rowspan="4">Communication Interfaces</td><td>Ethernet Port</td><td>√  (1 port)</td><td>√  (1 port)</td><td></td></tr>
<tr>
<td>USB 3.0 Port</td><td>√  (1 port)</td><td>√  (1 port)</td><td></td></tr>
<tr>
<td>EtherCAT Port</td><td>√  (2 port)</td><td>√  (2 port)</td><td></td></tr>
<tr>
<td>RS485 Port</td><td>√  (1 port)</td><td>√  (1 port)</td><td></td></tr>
<tr>
<td rowspan="2">Peripheral Charging Interfaces</td><td>24 V Power Output Port</td><td>√  (2 port)</td><td>√  (2 port)</td><td></td></tr>
<tr>
<td>48 V Power Output Port</td><td>√  (1 port)</td><td>√  (1 port)</td><td></td></tr>
<tr>
<td>Power Supply Port</td><td>External Power Supply Port</td><td>√  (1 port)</td><td>√  (1 port)</td><td></td></tr>
<tr>
<td rowspan="3">Developer Expansion Module</td><td>CPU</td><td>Intel Core Ultra</td><td>—</td><td></td></tr>
<tr>
<td>Storage Capacity</td><td>2TB</td><td>—</td><td></td></tr>
<tr>
<td>Interfaces</td><td>3 x ETH ports, 3 x USB 3.0, 1 x 24 V input power, 1 x 12 V output power</td><td>—</td><td></td></tr>
<tr>
<td rowspan="5">Software Compatibility and Developer Tools</td><td>SDK</td><td>√</td><td>—</td><td></td></tr>
<tr>
<td>Robot Management Platform</td><td>√</td><td>√</td><td></td></tr>
<tr>
<td>Data Platform</td><td>√</td><td>—</td><td></td></tr>
<tr>
<td>Simulation Platform</td><td>√</td><td>—</td><td></td></tr>
<tr>
<td>Software Compatibility</td><td>Compatible with Python, C++ development environments; Supports ROS1/ROS2 systems</td><td>—</td><td></td></tr>
</table>

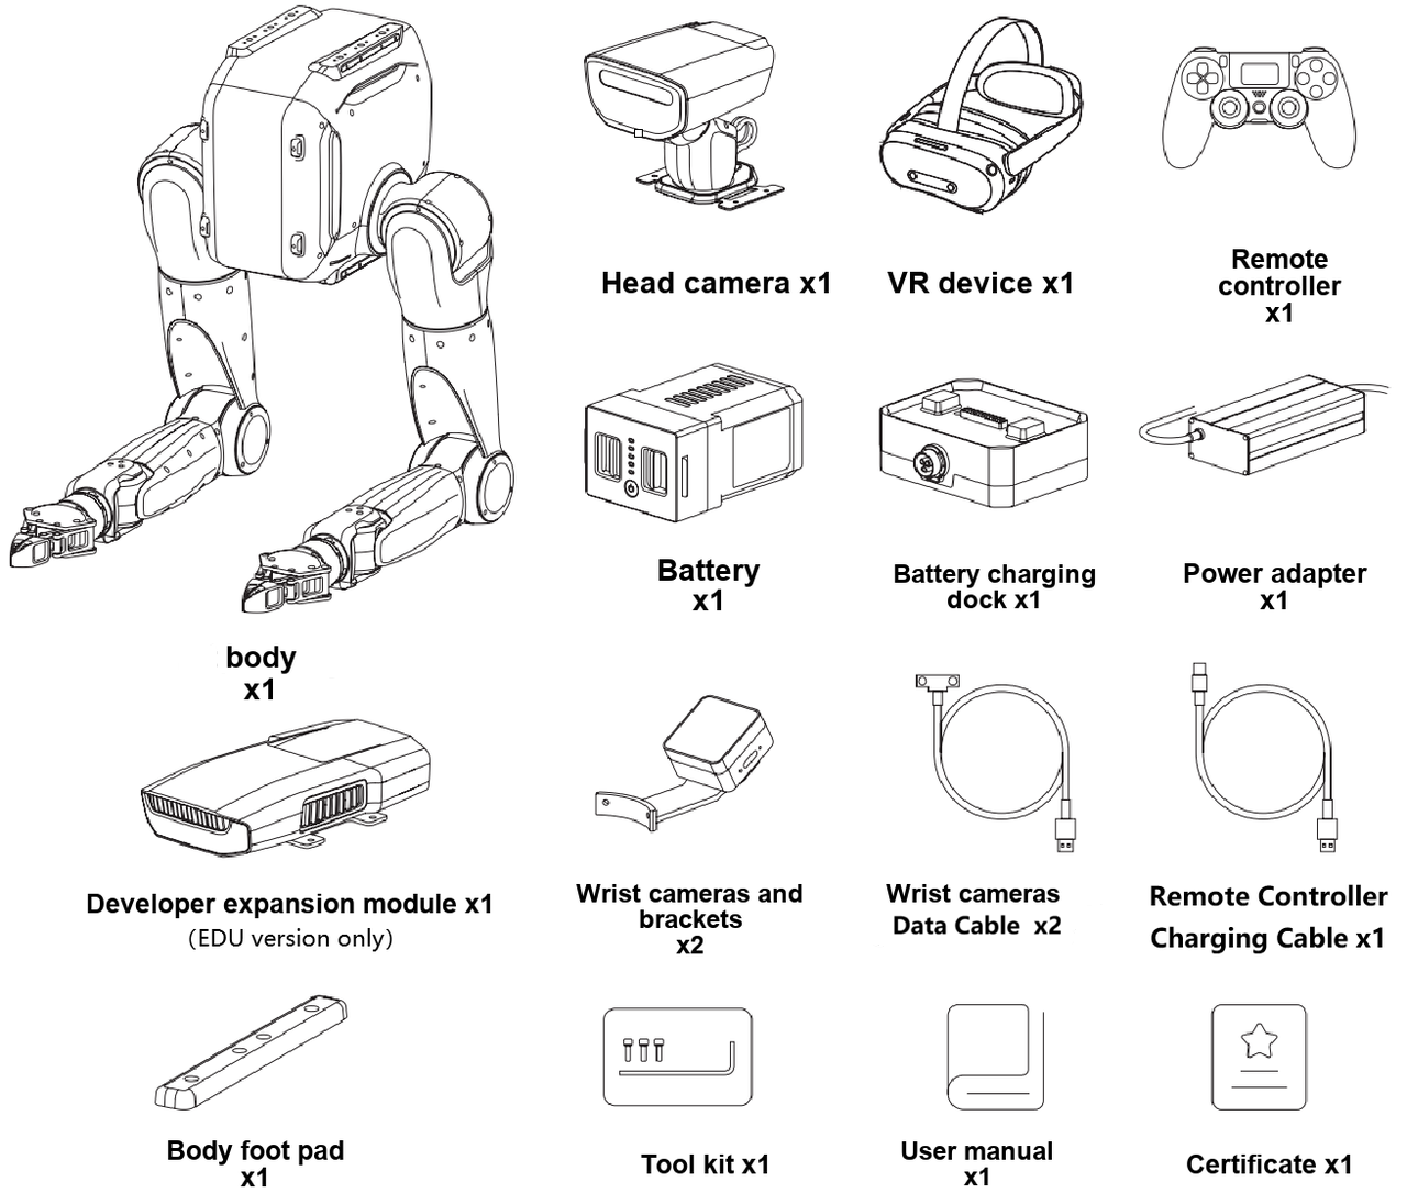
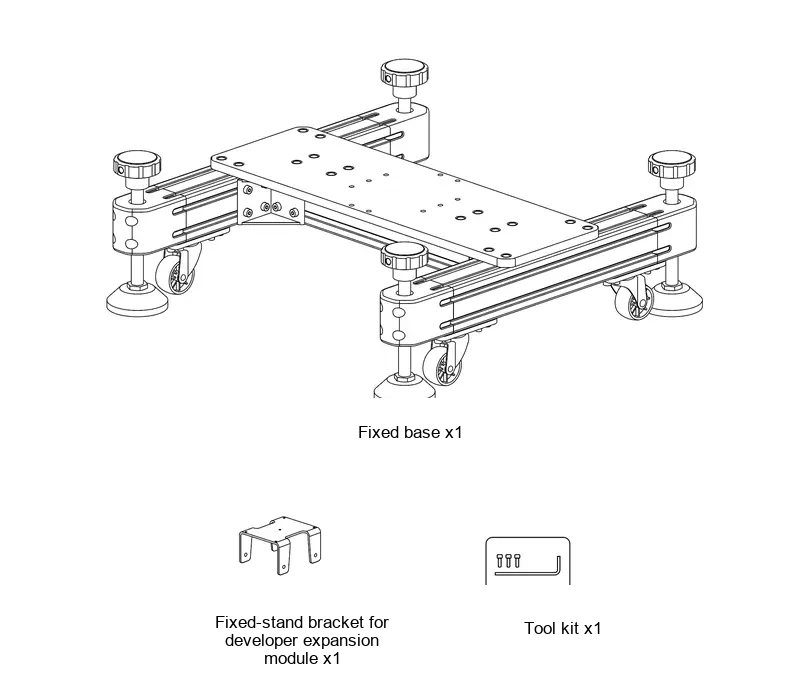
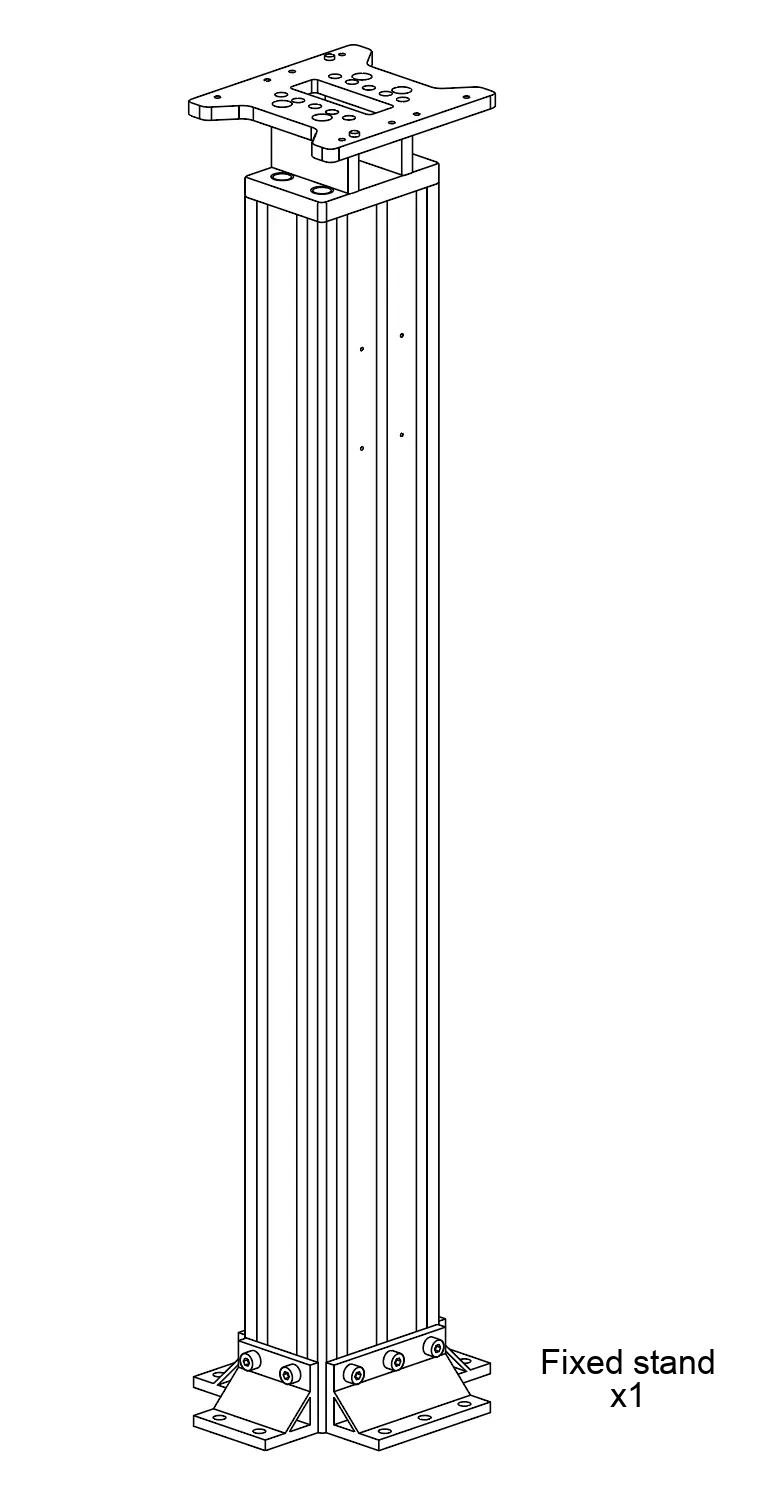
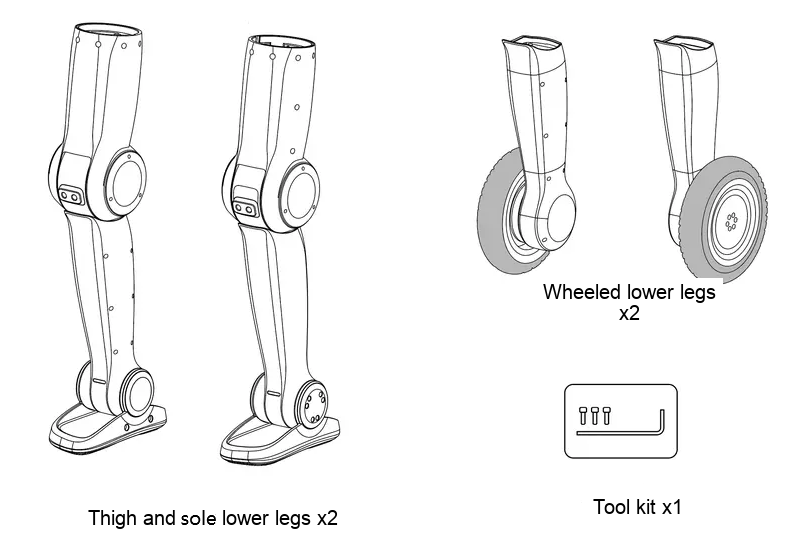
## 1.3 Packing List

- **Flight Case**
<img src="https://oss.limxdynamics.com/uploads/material/默认/TRON 2/pic/pkg_aviation_case_en.png" style="width: 100%; max-width: 800px;  ">


<table style="width: 100%; border-collapse: collapse;">
  <!-- 第一行：标题文字 -->
  <tr>
    <td style="width: 60%; padding: 10px 10px 0 10px; border: 1px solid #e0e0e0;; text-align: left; vertical-align: bottom;">
      <div style="font-weight: bold; font-size: 16px;">Carton</div>
    </td>
    <td style="width: 40%; padding: 10px 10px 0 10px; border: 1px solid #e0e0e0;; text-align: left; vertical-align: bottom;">
      <div style="font-weight: bold; font-size: 16px;">Carton</div>
    </td>
  </tr>
  <!-- 第二行：图片 -->
  <tr>
    <td style="width: 60%; padding: 0 10px 10px 10px; border: 1px solid #e0e0e0;; text-align: left; vertical-align: top;">
      <img src="https://oss.limxdynamics.com/uploads/material/默认/TRON 2/pic/pkg_paper_box_1_en.png" 
           alt="pkg_wooden_box.png" 
           style="width: 100%; max-width: 600px; max-height: 620px; border-radius: 5px; display: block;">
    </td>
    <td style="width: 40%; padding: 0 10px 10px 10px; border: 1px solid #e0e0e0;; text-align: left; vertical-align: top;">
      <img src="https://oss.limxdynamics.com/uploads/material/默认/TRON 2/pic/pkg_paper_box_2_en.png" 
           alt="pkg_paper_box_mobile.png" 
           style="width: 100%; max-width: 300px; border-radius: 5px; display: block;">
    </td>
  </tr>
</table>

- **Carton**
<img src="https://oss.limxdynamics.com/uploads/material/默认/TRON 2/pic/bipedal_cardboard_box_en.png" style="width: 100%; max-width: 600px;  ">
---

- **Carton**
<img src="https://oss.limxdynamics.com/uploads/material/默认/TRON 2/pic/anti_roll_wheel_en.png" style="width: 100%; max-width: 600px;  ">


<table style="width: 100%; border-collapse: collapse;">
  <!-- 第一行：标题文字 -->
  <tr>
    <td style="width: 60%; padding: 10px 10px 0 10px; border: 1px solid #e0e0e0;; text-align: left; vertical-align: bottom;">
      <div style="font-weight: bold; font-size: 16px;">Wooden Crate (Equipped on mobile dual-arms version only)</div>
    </td>
    <td style="width: 40%; padding: 10px 10px 0 10px; border: 1px solid #e0e0e0;; text-align: left; vertical-align: bottom;">
      <div style="font-weight: bold; font-size: 16px;">Carton  (Equipped on mobile dual-arms version only)</div>
    </td>
  </tr>
  <!-- 第二行：图片 -->
  <tr>
    <td style="width: 60%; padding: 0 10px 10px 10px; border: 1px solid #e0e0e0;; text-align: left; vertical-align: top;">
      <img src="https://oss.limxdynamics.com/uploads/material/默认/TRON 2/pic/pkg_wooden_box_en.png" 
           alt="pkg_wooden_box.png" 
           style="width: 100%; max-width: 600px; max-height: 620px; border-radius: 5px; display: block;">
    </td>
    <td style="width: 40%; padding: 0 10px 10px 10px; border: 1px solid #e0e0e0;; text-align: left; vertical-align: top;">
      <img src="https://oss.limxdynamics.com/uploads/material/默认/TRON 2/pic/pkg_paper_box_mobile_en.png" 
           alt="pkg_paper_box_mobile.png" 
           style="width: 100%; max-width: 400px; max-height: 620px; border-radius: 5px; display: block;">
    </td>
  </tr>
</table>


## 1.4 Body Components and Ports

**Body Components**

<img src="https://oss.limxdynamics.com/uploads/material/默认/TRON 2/pic/body_components_en.png" alt="" title="body_components.png" loading="lazy" style="width: 100%; max-width: 800px;  ">

| Component/Ports  | Function Description                                             | **Component/Ports**    | Function Description                                                                        |
| ---------- | ---------------------------------------------------- | ---------------- | ------------------------------------------------------------------------------- |
| **Status Indicator** | Displays overall robot status, including mode status, fault status, low-battery reminders, etc. | **Peripheral Expansion Platform** | Includes peripheral expansion platforms at the top, front, and bottom. All threaded holes are M4 and are used to mount external expansion devices. |

**Robot Body Receptacle Interfaces**
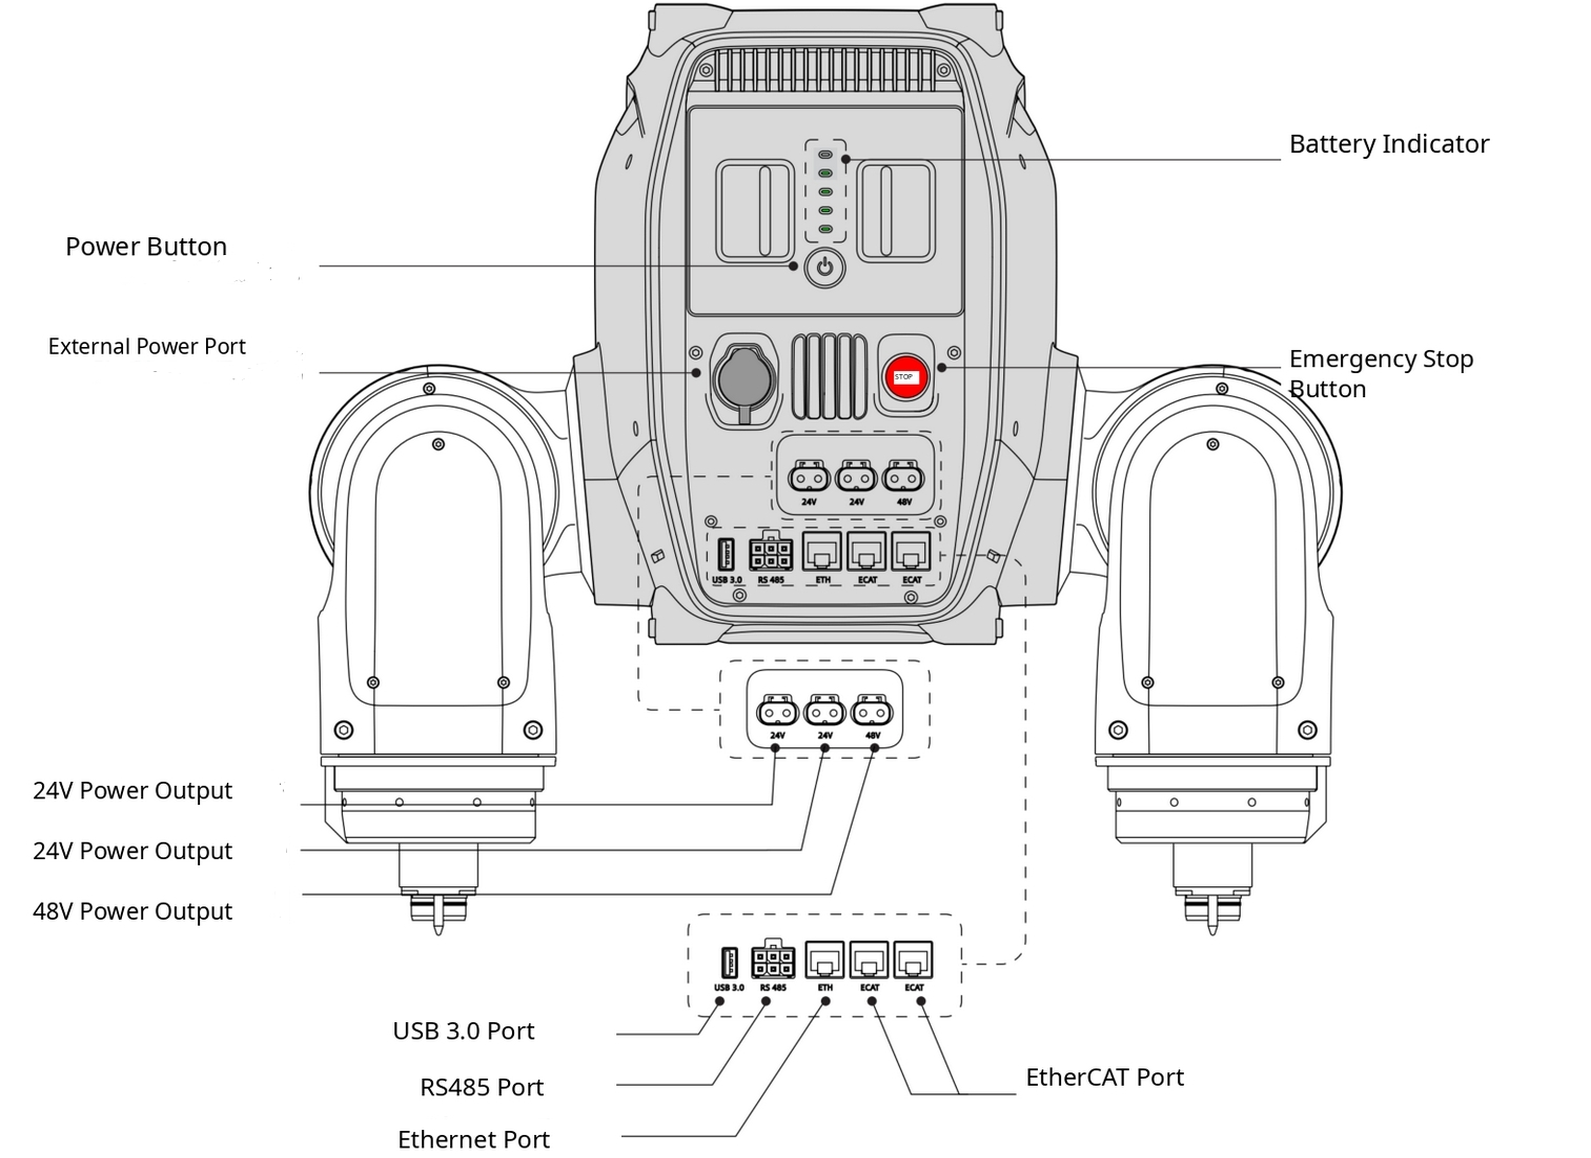
<img src="https://oss.limxdynamics.com/uploads/material/默认/TRON 2/pic/body_base_interface_em.png" alt="" title="body_base_interface.png" loading="lazy" style="width: 100%; max-width: 800px;">


| Component/Ports          | Function Description                                             | **Component/Ports**      | Function Description         |                                     
| ------------------ | ---------------------------------------------------- | ------------------ | ----------------------------------------------------- |
| **Power Button**         | Used to power the robot on/off                                          | **Battery Level Indicator**     | Displays the current robot battery level                              |
| **External Power Ports**   | Used to connect an external power adapter                                   | **Emergency Stop Button**       | In an emergency, press this button to enter torque-off mode, cutting motor power  |
| **24 V Power Output Ports** | LCB female connector, stable 24 V DC output, rated output 5 A, maximum output 20 A | **48 V Power Output Port** | LCB female connector, stable 48 V DC output, rated output 10 A, maximum output 20 A |
| **USB 3.0 Ports**    | USB-A 3.0, available for external device expansion                      | **Ethernet Ports**     | Gigabit Ethernet port for connecting a computer, router, or other communication module      |
| **RS485 Ports**     | Used to expand external devices                                     | **EtherCAT Ports**  | Used to expand external devices                                      |

**Developer Expansion Module Ports**
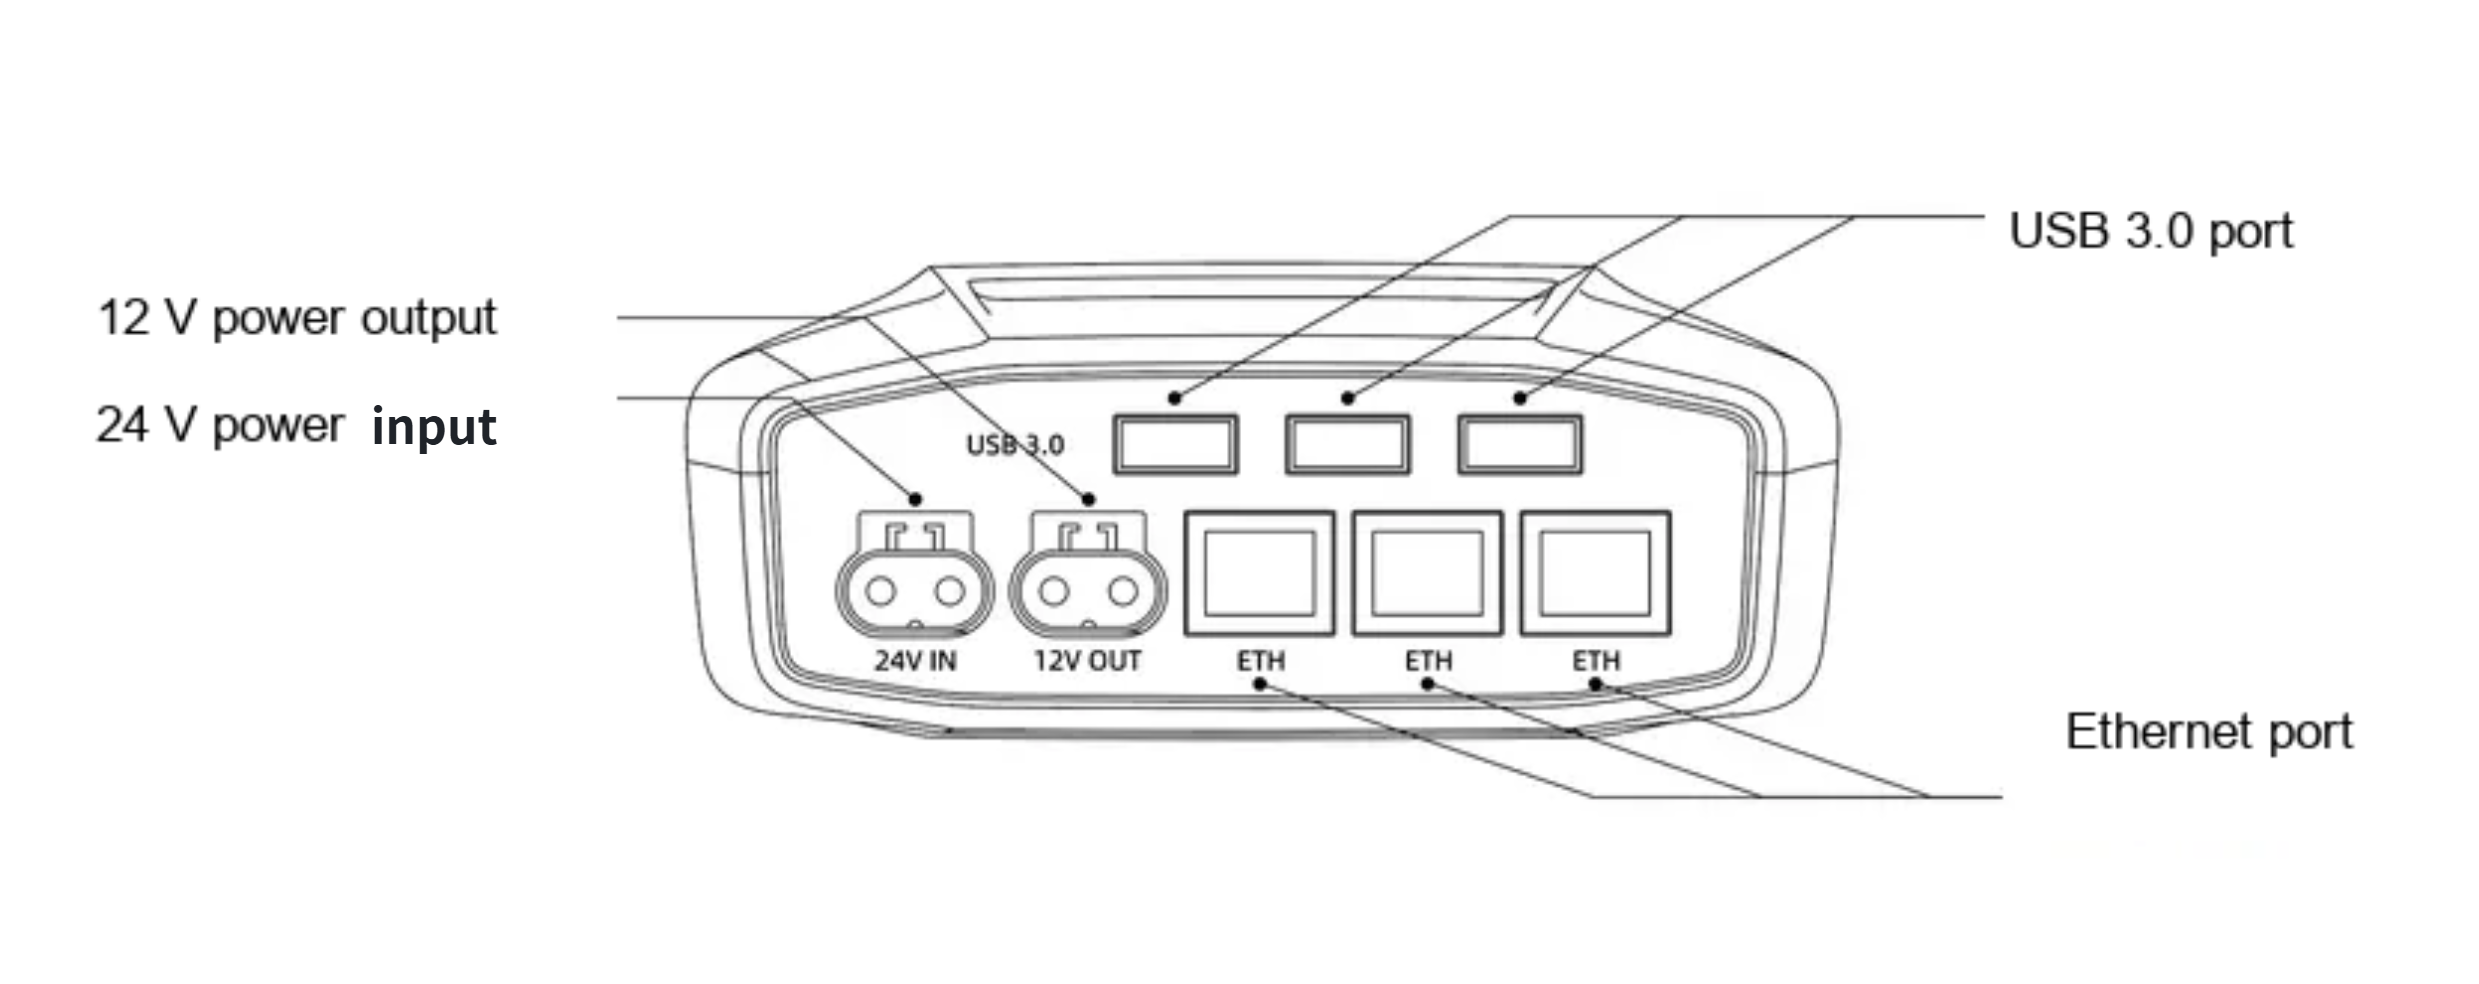

<img src="https://oss.limxdynamics.com/uploads/material/默认/TRON 2/pic/body_extension_interface_en.png" alt="" title="body_extension_interface.png" loading="lazy" style="width: 100%; max-width: 800px; ">


| Component/Interface          | Function Description                                   | **Component/Ports**  | Function Description |
| ------------------ | ------------------------------------------ | -------------- | -------- |
| **12 V Power Output Port** | LCB female connector, stable 12 V DC output, maximum output current 5 A | **Ethernet Interface** | Gigabit Ethernet port |

**Arm-End Adapter Board Pinout**

The figure below shows the connector locations and pin numbers on the arm-end adapter board. Pin assignments are listed in the table.
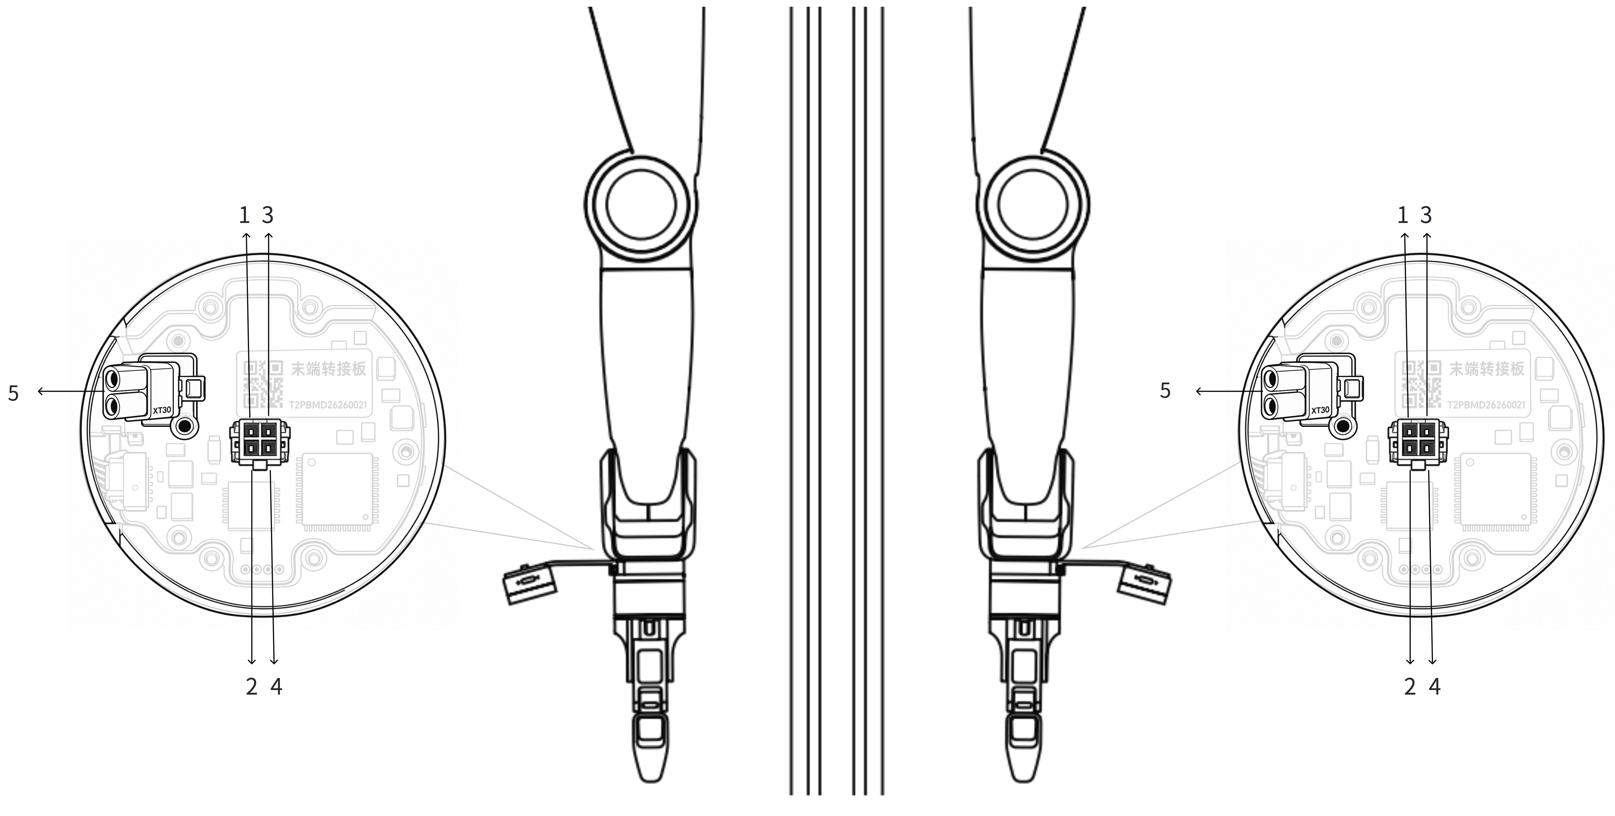
<img src="https://oss.limxdynamics.com/uploads/material/%E9%BB%98%E8%AE%A4/arm_end_adapter_board_pinout1021.png" alt="arm_end_adapter_board_pinout1021.png" style="width: 900px; height: auto;" />


| Pin | Connector Type | Description |
| ---- | -------- | -------- |
| 1 | MX3.0 | Power supply positive, 24 V |
| 2 | MX3.0 | Power supply negative, GND |
| 3 | MX3.0 | Gripper control signal (positive logic) |
| 4 | MX3.0 | Gripper control signal (negative logic) |
| 5 | XT30 | 48 V power supply |
<div style="margin: 16px 0; padding: 14px 18px; background-color: #eff6ff; border-left: 4px solid #2563eb; border-radius: 6px; color: #1e3a8a; line-height: 1.7; overflow-wrap: anywhere;">
  <span aria-hidden="true">📐</span> <strong>Wrist Adapter Flange Specification</strong><br>
  The wrist adapter flange interface specification is <strong>DIN ISO 9409-1-A50</strong>. <a href="https://oss.limxdynamics.com/uploads/material/默认/TRON 2/pic/wrist_adapter_flange_dimensions.png" style="color: #1677ff; text-decoration: underline;">View detailed interface dimensions</a>.When selecting a gripper, dexterous hand, or other accessory, check that the mounting dimensions, fasteners, and electrical interfaces are compatible.
</div>


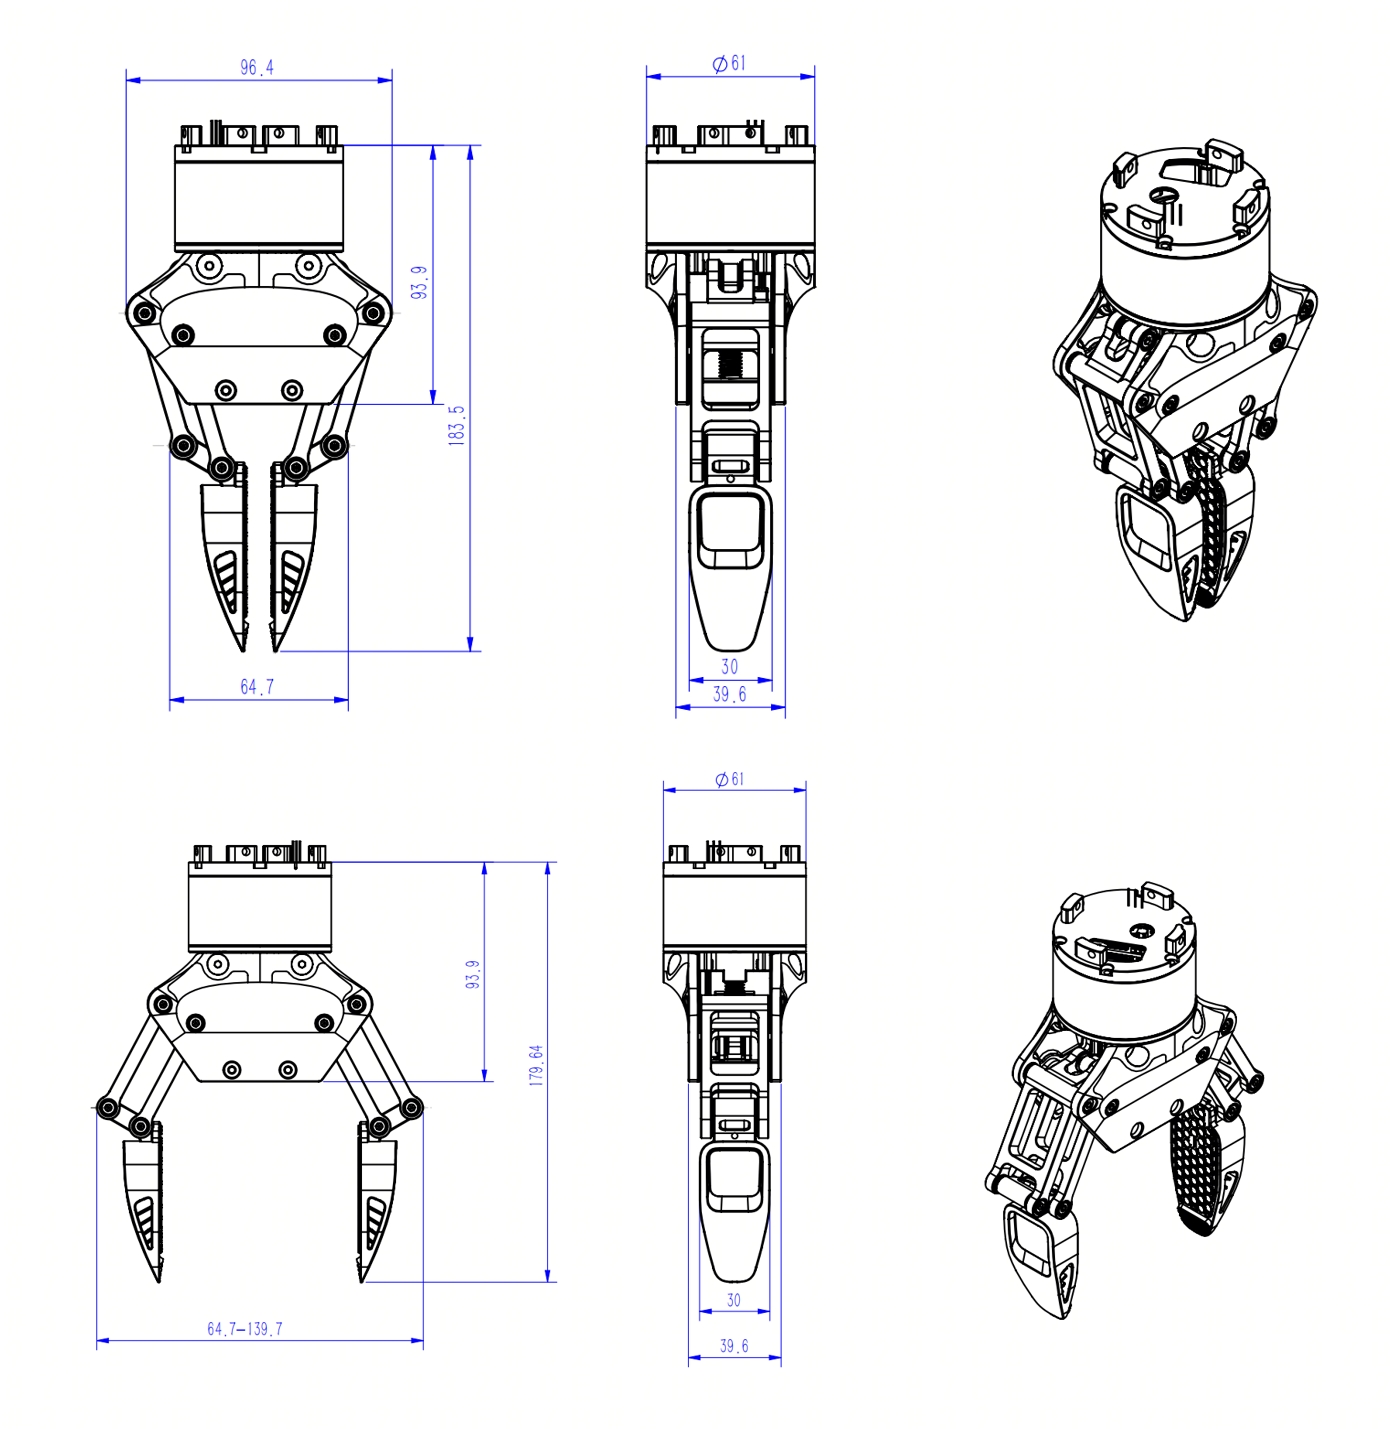
**Gripper Dimensions**

The figure below shows the gripper dimensions in the **closed**  and **open**  positions.

<img src="https://oss.limxdynamics.com/uploads/material/%E9%BB%98%E8%AE%A4/TRON%202/pic/gripper_dimensions.jpg" alt="Gripper Dimensions" title="gripper_dimensions.jpg" loading="lazy" style="width: 100%; max-width: 800px;">

## 1.5 Coordinate Frames and Joint Limits

**Dual-Arms Configuration**

When all joints are at zero degrees, their joint coordinate frames are shown below. Red indicates the x-axis, green indicates the y-axis, and blue indicates the z-axis.
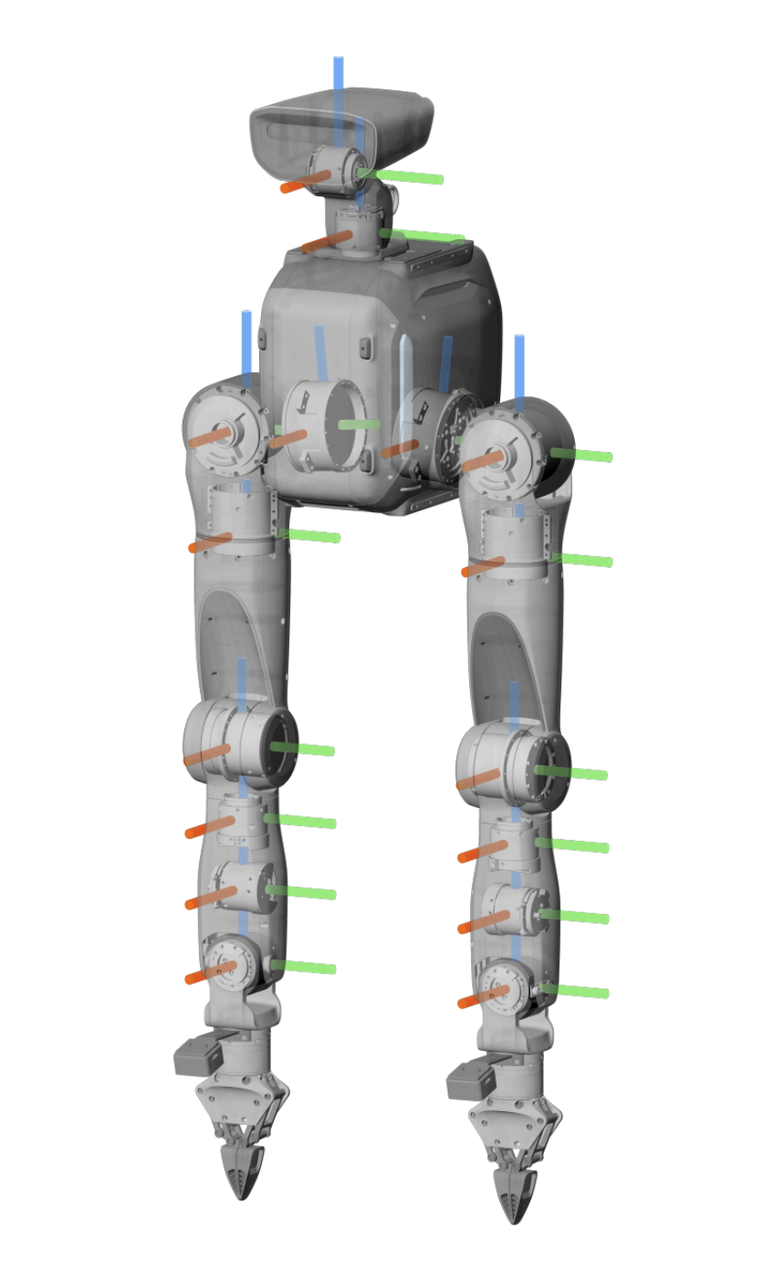
<img src="https://oss.limxdynamics.com/uploads/material/默认/TRON 2/pic/joint_coordinate.png" alt="" title="joint_coordinate.png" loading="lazy" style="width: 100%; max-width: 400px; ">

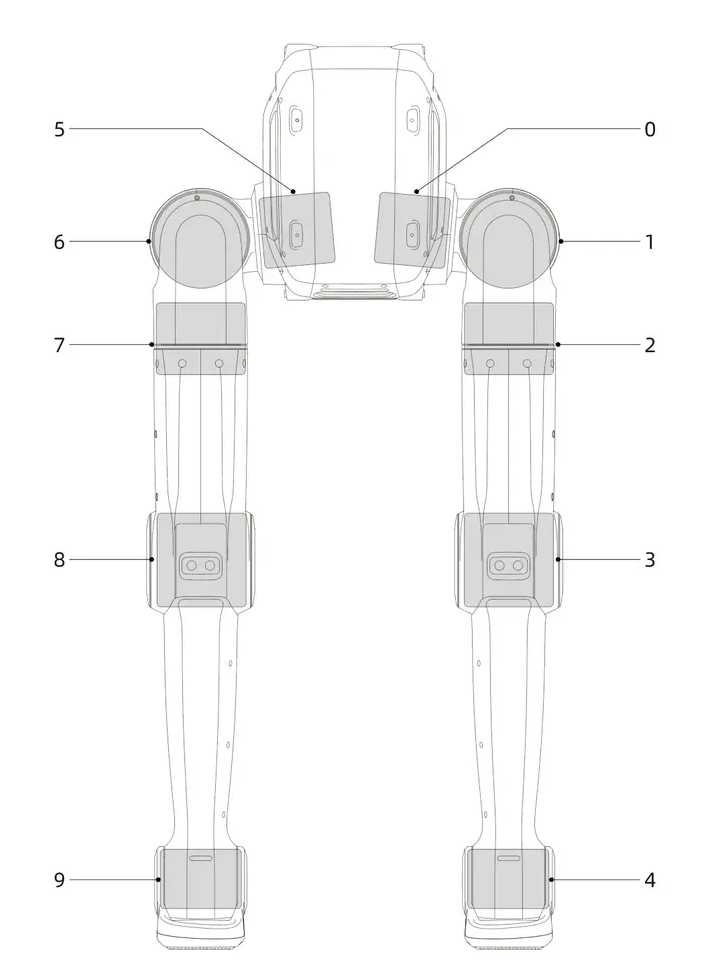
Joint numbers and limits are shown below.
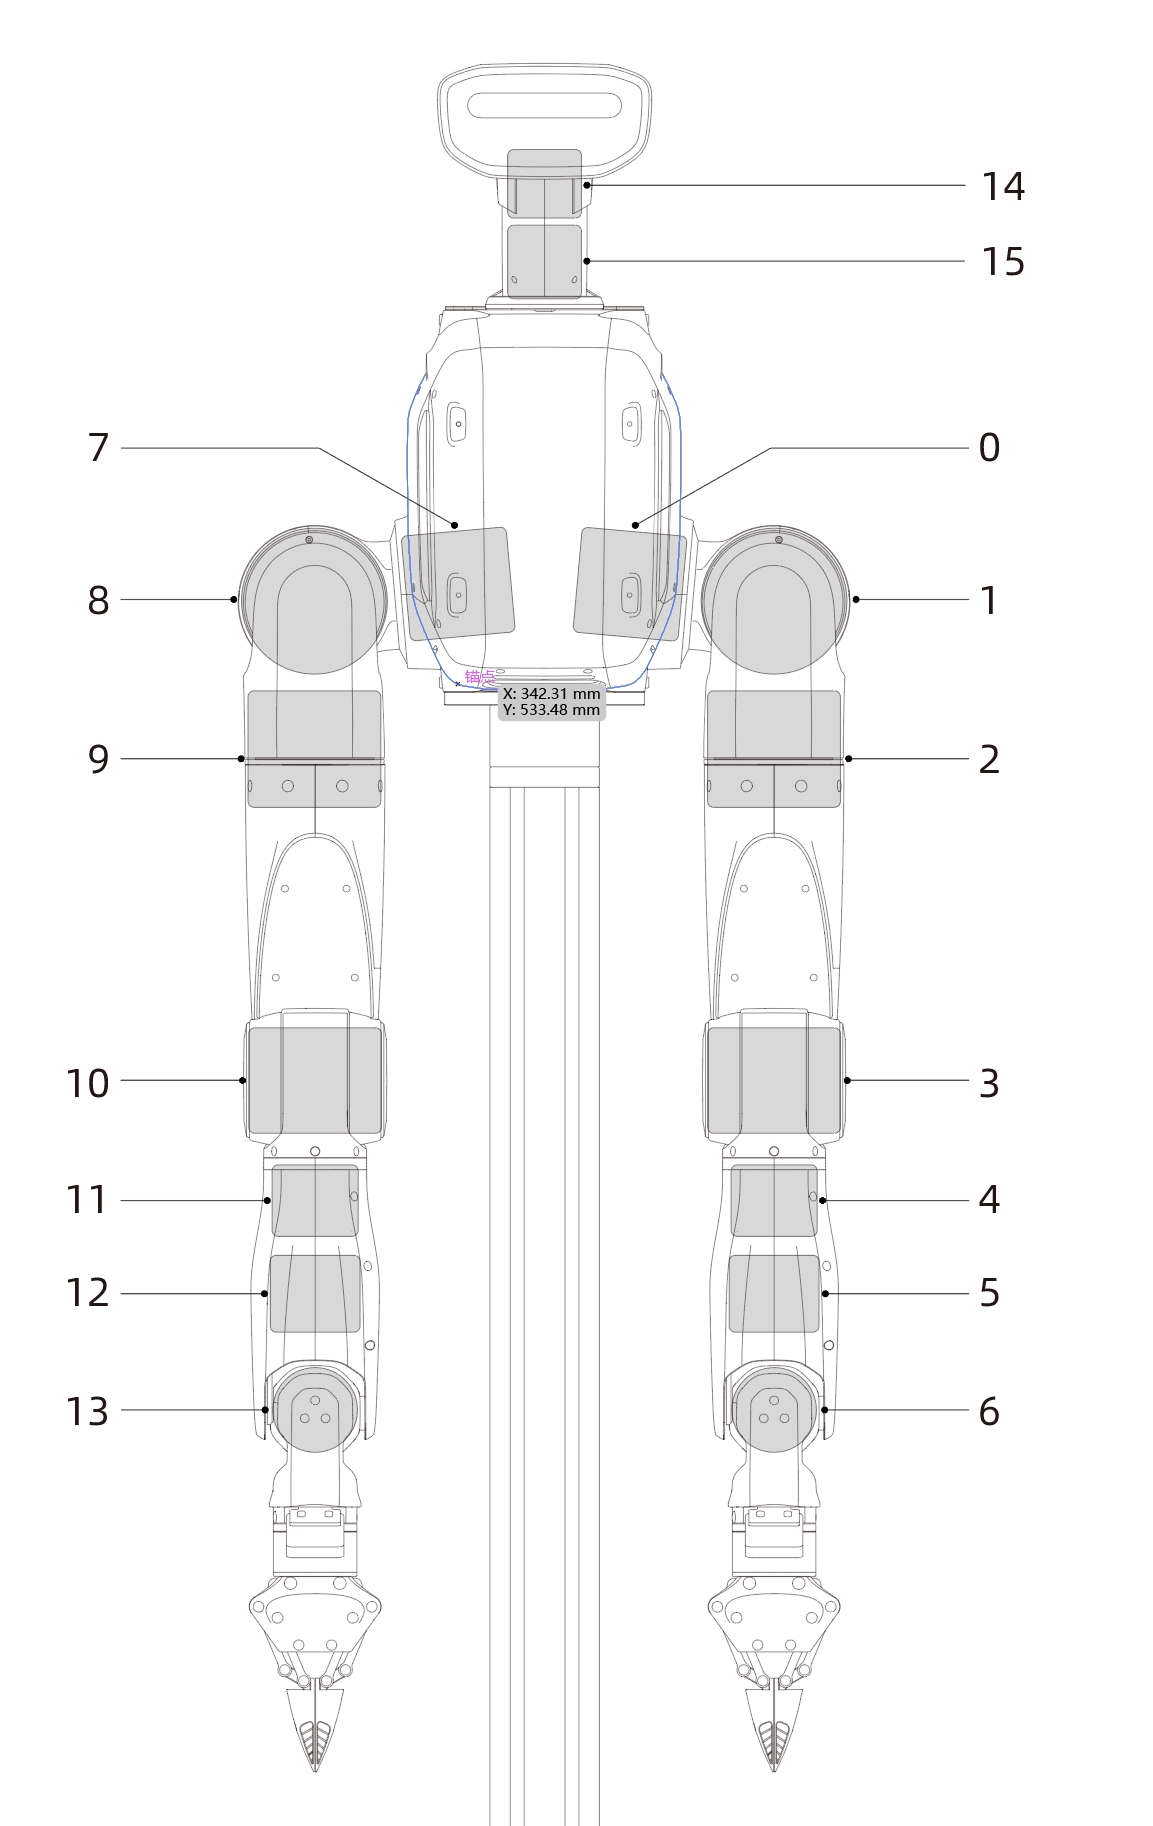

<table border="0" cellspacing="0" cellpadding="8" style="width:100%;">
  <tr>
    <td style="width:35%; vertical-align:top;">
      <img src="https://oss.limxdynamics.com/uploads/material/默认/TRON 2/pic/joint_limit.png" 
           alt="joint_limit.png" 
           style="width: 100%; max-width: 500px; ">
    </td>
    <td style="width:65%; vertical-align:top;">
      <table border="1" cellspacing="0" cellpadding="6" style="border-collapse:collapse; text-align:center; width:100%;">
        <thead>
          <tr>
            <th rowspan="2" style="background-color:#d3d3d3; color:#000000;">Joint<br>No.</th>
            <th rowspan="2" style="background-color:#d3d3d3; color:#000000;">English Joint Name</th>
            <th colspan="2" style="background-color:#d3d3d3; color:#000000;">Limits (deg)</th>
            <th colspan="2" style="background-color:#d3d3d3; color:#000000;">Limits (rad)</th>
          </tr>
          <tr>
            <th style="background-color:#d3d3d3; color:#000000;">Lower Limit</th>
            <th style="background-color:#d3d3d3; color:#000000;">Upper Limit</th>
            <th style="background-color:#d3d3d3; color:#000000;">Lower Limit</th>
            <th style="background-color:#d3d3d3; color:#000000;">Upper Limit</th>
          </tr>
        </thead>
        <tbody>
          <tr style="background-color:#ffffff; color:#000000;">
            <td>0</td><td>proximal_pitch_L_Joint</td><td>-180</td><td>149</td><td>-3.141</td><td>2.600</td>
          </tr>
          <tr style="background-color:#ffffff; color:#000000;">
            <td>1</td><td>proximal_roll_L_Joint</td><td>-15</td><td>170</td><td>-0.261</td><td>2.967</td>
          </tr>
          <tr style="background-color:#ffffff; color:#000000;">
            <td>2</td><td>proximal_yaw_L_Joint</td><td>-210</td><td>85</td><td>-3.665</td><td>1.483</td>
          </tr>
          <tr style="background-color:#ffffff; color:#000000;">
            <td>3</td><td>elbow_L_Joint</td><td>-150</td><td>30</td><td>-2.617</td><td>0.523</td>
          </tr>
          <tr style="background-color:#ffffff; color:#000000;">
            <td>4</td><td>wrist_yaw_L_Joint</td><td>-100</td><td>80</td><td>-1.745</td><td>1.396</td>
          </tr>
          <tr style="background-color:#ffffff; color:#000000;">
            <td>5</td><td>wrist_pitch_L_Joint</td><td>-43</td><td>43</td><td>-0.750</td><td>0.750</td>
          </tr>
          <tr style="background-color:#ffffff; color:#000000;">
            <td>6</td><td>wrist_roll_L_Joint</td><td>-43</td><td>43</td><td>-0.750</td><td>0.750</td>
          </tr>
          <tr style="background-color:#ffffff; color:#000000;">
            <td>7</td><td>proximal_pitch_R_Joint</td><td>-180</td><td>149</td><td>-3.141</td><td>2.600</td>
          </tr>
          <tr style="background-color:#ffffff; color:#000000;">
            <td>8</td><td>proximal_roll_R_Joint</td><td>-170</td><td>15</td><td>-2.967</td><td>0.261</td>
          </tr>
          <tr style="background-color:#ffffff; color:#000000;">
            <td>9</td><td>proximal_yaw_R_Joint</td><td>-85</td><td>210</td><td>-1.483</td><td>3.665</td>
          </tr>
          <tr style="background-color:#ffffff; color:#000000;">
            <td>10</td><td>elbow_R_Joint</td><td>-150</td><td>30</td><td>-2.617</td><td>0.523</td>
          </tr>
          <tr style="background-color:#ffffff; color:#000000;">
            <td>11</td><td>wrist_yaw_R_Joint</td><td>-80</td><td>100</td><td>-1.396</td><td>1.745</td>
          </tr>
          <tr style="background-color:#ffffff; color:#000000;">
            <td>12</td><td>wrist_pitch_R_Joint</td><td>-43</td><td>43</td><td>-0.750</td><td>0.750</td>
          </tr>
          <tr style="background-color:#ffffff; color:#000000;">
            <td>13</td><td>wrist_roll_R_Joint</td><td>-43</td><td>43</td><td>-0.750</td><td>0.750</td>
          </tr>
          <tr style="background-color:#ffffff; color:#000000;">
            <td>14</td><td>head_pitch_Joint</td><td>-45</td><td>60</td><td>-0.78</td><td>1.04</td>
          </tr>
          <tr style="background-color:#ffffff; color:#000000;">
            <td>15</td><td>head_yaw_Joint</td><td>-90</td><td>90</td><td>-1.57</td><td>1.57</td>
          </tr>
        </tbody>
      </table>
    </td>
  </tr>
</table>

**Sole/Wheeled Configuration**

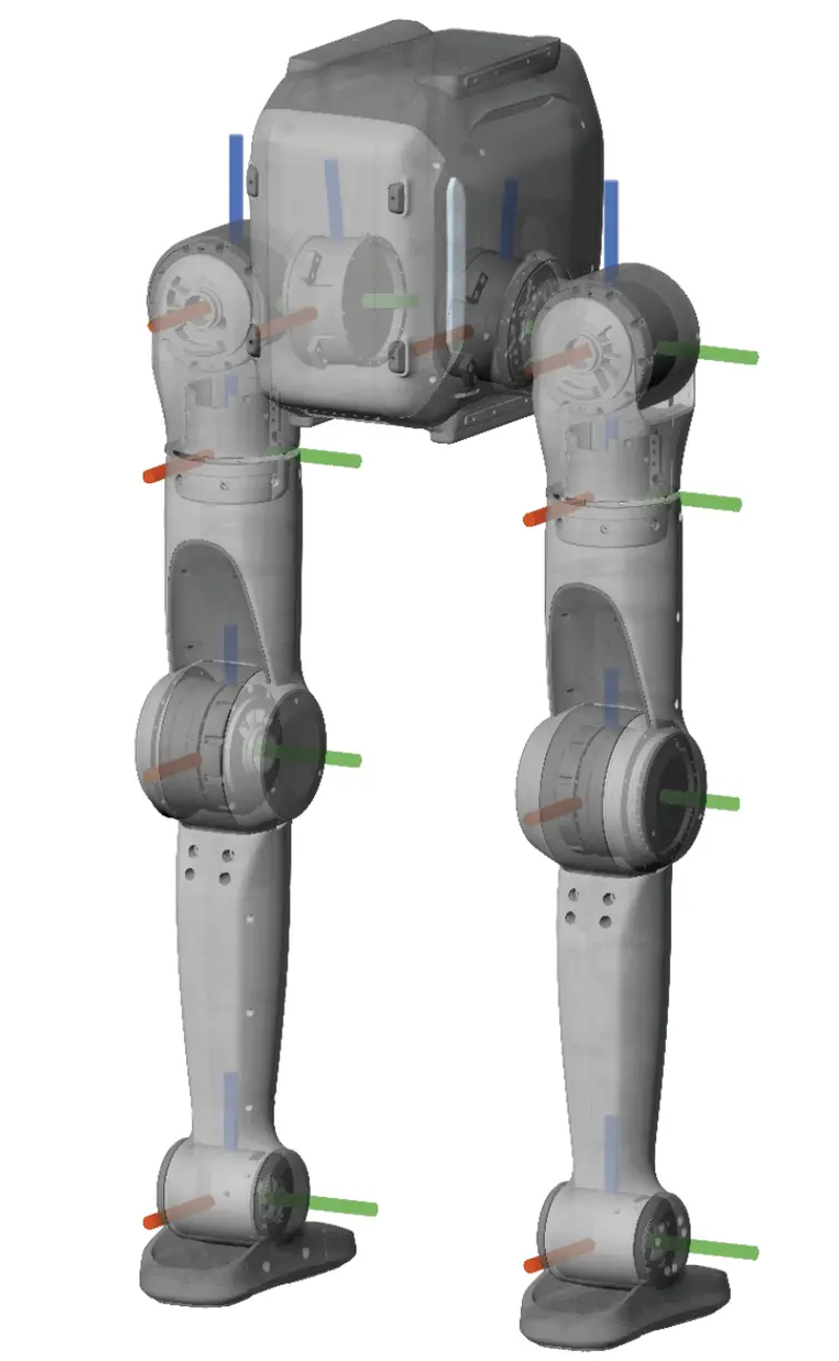
When all joints are at zero degrees, their joint coordinate frames are shown below. Red indicates the x-axis, green indicates the y-axis, and blue indicates the z-axis.

<img src="https://oss.limxdynamics.com/uploads/image/2026/07/20/1784548843675_image.png" alt="img_v3_0211n_7d399328-d76b-443a-bc6a-639081a8702g.jpg" style="width: 400px; height: auto;" />


<table style="width: 100%; border-collapse: collapse;">
  <tr>
    <td style="width: 35%; vertical-align: middle; padding-right: 20px;">
      <img src="https://oss.limxdynamics.com/uploads/material/默认/TRON 2/pic/bipedal_limit_joint_diagram.png"
           alt="joint_limit.png"
           style="width: 100%; max-width: 400px;">
    </td>
    <td style="width: 65%; vertical-align: middle;">
      <table style="width: 100%; border-collapse: collapse; font-size: 14px;">
        <thead>
          <tr style="background-color: #d3d3d3;">
            <th style="border: 1px solid #ddd; padding: 8px; text-align: center; width: 8%;" rowspan="2">Joint<br>No.</th>
            <th style="border: 1px solid #ddd; padding: 8px; text-align: center; width: 22%;" rowspan="2">English Joint Name</th>
            <th style="border: 1px solid #ddd; padding: 8px; text-align: center; width: 20%;" colspan="2">Limits (deg)</th>
            <th style="border: 1px solid #ddd; padding: 8px; text-align: center; width: 20%;" colspan="2">Limits (rad)</th>
          </tr>
          <tr style="background-color: #d3d3d3;">
            <th style="border: 1px solid #ddd; padding: 4px; text-align: center; width: 10%;">Lower Limit</th>
            <th style="border: 1px solid #ddd; padding: 4px; text-align: center; width: 10%;">Upper Limit</th>
            <th style="border: 1px solid #ddd; padding: 4px; text-align: center; width: 10%;">Lower Limit</th>
            <th style="border: 1px solid #ddd; padding: 4px; text-align: center; width: 10%;">Upper Limit</th>
          </tr>
        </thead>
        <tbody>
          <tr style="background-color: #ffffff;">
            <td style="border: 1px solid #ddd; padding: 6px; text-align: center;">0</td>
            <td style="border: 1px solid #ddd; padding: 6px; text-align: center;">proximal_pitch_L_Joint</td>
            <td style="border: 1px solid #ddd; padding: 6px; text-align: center;">-180</td>
            <td style="border: 1px solid #ddd; padding: 6px; text-align: center;">149</td>
            <td style="border: 1px solid #ddd; padding: 6px; text-align: center;">-3.14</td>
            <td style="border: 1px solid #ddd; padding: 6px; text-align: center;">2.60</td>
          </tr>
          <tr style="background-color: #ffffff;">
            <td style="border: 1px solid #ddd; padding: 6px; text-align: center;">1</td>
            <td style="border: 1px solid #ddd; padding: 6px; text-align: center;">proximal_roll_L_Joint</td>
            <td style="border: 1px solid #ddd; padding: 6px; text-align: center;">-15</td>
            <td style="border: 1px solid #ddd; padding: 6px; text-align: center;">183</td>
            <td style="border: 1px solid #ddd; padding: 6px; text-align: center;">-0.26</td>
            <td style="border: 1px solid #ddd; padding: 6px; text-align: center;">3.19</td>
          </tr>
          <tr style="background-color: #ffffff;">
            <td style="border: 1px solid #ddd; padding: 6px; text-align: center;">2</td>
            <td style="border: 1px solid #ddd; padding: 6px; text-align: center;">proximal_yaw_L_Joint</td>
            <td style="border: 1px solid #ddd; padding: 6px; text-align: center;">-210</td>
            <td style="border: 1px solid #ddd; padding: 6px; text-align: center;">85</td>
            <td style="border: 1px solid #ddd; padding: 6px; text-align: center;">-3.66</td>
            <td style="border: 1px solid #ddd; padding: 6px; text-align: center;">1.48</td>
          </tr>
          <tr style="background-color: #ffffff;">
            <td style="border: 1px solid #ddd; padding: 6px; text-align: center;">3</td>
            <td style="border: 1px solid #ddd; padding: 6px; text-align: center;">knee_L_Joint</td>
            <td style="border: 1px solid #ddd; padding: 6px; text-align: center;">-150</td>
            <td style="border: 1px solid #ddd; padding: 6px; text-align: center;">15</td>
            <td style="border: 1px solid #ddd; padding: 6px; text-align: center;">-2.61</td>
            <td style="border: 1px solid #ddd; padding: 6px; text-align: center;">0.26</td>
          </tr>
          <tr style="background-color: #ffffff;">
            <td style="border: 1px solid #ddd; padding: 6px; text-align: center;" rowspan="2">4</td>
            <td style="border: 1px solid #ddd; padding: 6px; text-align: center;">ankle_pitch_L_Joint</td>
            <td style="border: 1px solid #ddd; padding: 6px; text-align: center;">-97</td>
            <td style="border: 1px solid #ddd; padding: 6px; text-align: center;">97</td>
            <td style="border: 1px solid #ddd; padding: 6px; text-align: center;">-1.69</td>
            <td style="border: 1px solid #ddd; padding: 6px; text-align: center;">1.69</td>
          </tr>
          <tr style="background-color: #ffffff;">
            <td style="border: 1px solid #ddd; padding: 6px; text-align: center;">wheel_L_Joint</td>
            <td style="border: 1px solid #ddd; padding: 6px; text-align: center;">∞</td>
            <td style="border: 1px solid #ddd; padding: 6px; text-align: center;">∞</td>
            <td style="border: 1px solid #ddd; padding: 6px; text-align: center;">∞</td>
            <td style="border: 1px solid #ddd; padding: 6px; text-align: center;">∞</td>
          </tr>
          <tr style="background-color: #ffffff;">
            <td style="border: 1px solid #ddd; padding: 6px; text-align: center;">5</td>
            <td style="border: 1px solid #ddd; padding: 6px; text-align: center;">proximal_pitch_R_Joint</td>
            <td style="border: 1px solid #ddd; padding: 6px; text-align: center;">-180</td>
            <td style="border: 1px solid #ddd; padding: 6px; text-align: center;">149</td>
            <td style="border: 1px solid #ddd; padding: 6px; text-align: center;">-3.14</td>
            <td style="border: 1px solid #ddd; padding: 6px; text-align: center;">2.60</td>
          </tr>
          <tr style="background-color: #ffffff;">
            <td style="border: 1px solid #ddd; padding: 6px; text-align: center;">6</td>
            <td style="border: 1px solid #ddd; padding: 6px; text-align: center;">proximal_roll_R_Joint</td>
            <td style="border: 1px solid #ddd; padding: 6px; text-align: center;">-183</td>
            <td style="border: 1px solid #ddd; padding: 6px; text-align: center;">15</td>
            <td style="border: 1px solid #ddd; padding: 6px; text-align: center;">-3.19</td>
            <td style="border: 1px solid #ddd; padding: 6px; text-align: center;">0.26</td>
          </tr>
          <tr style="background-color: #ffffff;">
            <td style="border: 1px solid #ddd; padding: 6px; text-align: center;">7</td>
            <td style="border: 1px solid #ddd; padding: 6px; text-align: center;">proximal_yaw_R_Joint</td>
            <td style="border: 1px solid #ddd; padding: 6px; text-align: center;">-85</td>
            <td style="border: 1px solid #ddd; padding: 6px; text-align: center;">210</td>
            <td style="border: 1px solid #ddd; padding: 6px; text-align: center;">-1.48</td>
            <td style="border: 1px solid #ddd; padding: 6px; text-align: center;">3.66</td>
          </tr>
          <tr style="background-color: #ffffff;">
            <td style="border: 1px solid #ddd; padding: 6px; text-align: center;">8</td>
            <td style="border: 1px solid #ddd; padding: 6px; text-align: center;">knee_R_Joint</td>
            <td style="border: 1px solid #ddd; padding: 6px; text-align: center;">-150</td>
            <td style="border: 1px solid #ddd; padding: 6px; text-align: center;">15</td>
            <td style="border: 1px solid #ddd; padding: 6px; text-align: center;">-2.61</td>
            <td style="border: 1px solid #ddd; padding: 6px; text-align: center;">0.26</td>
          </tr>
          <tr style="background-color: #ffffff;">
            <td style="border: 1px solid #ddd; padding: 6px; text-align: center;" rowspan="2">9</td>
            <td style="border: 1px solid #ddd; padding: 6px; text-align: center;">ankle_pitch_R_Joint</td>
            <td style="border: 1px solid #ddd; padding: 6px; text-align: center;">-97</td>
            <td style="border: 1px solid #ddd; padding: 6px; text-align: center;">97</td>
            <td style="border: 1px solid #ddd; padding: 6px; text-align: center;">-1.69</td>
            <td style="border: 1px solid #ddd; padding: 6px; text-align: center;">1.69</td>
          </tr>
          <tr style="background-color: #ffffff;">
            <td style="border: 1px solid #ddd; padding: 6px; text-align: center;">wheel_R_Joint</td>
            <td style="border: 1px solid #ddd; padding: 6px; text-align: center;">∞</td>
            <td style="border: 1px solid #ddd; padding: 6px; text-align: center;">∞</td>
            <td style="border: 1px solid #ddd; padding: 6px; text-align: center;">∞</td>
            <td style="border: 1px solid #ddd; padding: 6px; text-align: center;">∞</td>
          </tr>
        </tbody>
      </table>
    </td>
  </tr>
</table>


## 1.6 Installation Guide
### 1.6.1 Installation Video Guide

| Item No. | Video Title| Video Links|
| - | - | - |
|1 |Unboxing | https://oss.limxdynamics.com/uploads/material/%E9%BB%98%E8%AE%A4/TRON%202/video/1_unboxing_EN_output.mp4  |
| 2|Dual-Arm Installation |https://oss.limxdynamics.com/uploads/material/%E9%BB%98%E8%AE%A4/TRON%202/video/dual_arm_installation2_EN.mp4 |
|3 |Wheeled-Foot Installation | https://oss.limxdynamics.com/uploads/material/%E9%BB%98%E8%AE%A4/TRON%202/video/3_wheeled_foot_installation_EN_output.mp4  |
|4 |Wheeled-Foot Sole Switching |https://oss.limxdynamics.com/uploads/material/%E9%BB%98%E8%AE%A4/TRON%202/video/4_wheeled_foot_sole_switching_EN_output.mp4 |
|5 |Anti-Roll Bar Installation | https://oss.limxdynamics.com/uploads/material/%E9%BB%98%E8%AE%A4/TRON%202/video/5_anti_roll_bar_installation_EN_output.mp4  |
| 6|Remote Controller Pairing | https://oss.limxdynamics.com/uploads/material/%E9%BB%98%E8%AE%A4/TRON%202/video/6_remote_controller_pairing_EN_output.mp4  |
|7 |Packing | https://oss.limxdynamics.com/uploads/material/%E9%BB%98%E8%AE%A4/TRON%202/video/7_packing_EN_output.mp4   |
|8 |Dual-Arm Remote Control |https://oss.limxdynamics.com/uploads/material/%E9%BB%98%E8%AE%A4/TRON%202/video/8_remote_controller_arm_EN_output.mp4 |
|9 |Wheeled-Foot Remote Control |https://oss.limxdynamics.com/uploads/material/%E9%BB%98%E8%AE%A4/TRON%202/video/9_remote_controller_wheeled_foot_EN_output.mp4   |
| 10|Dual-Arm Teleoperation | https://oss.limxdynamics.com/uploads/material/%E9%BB%98%E8%AE%A4/TRON%202/video/10_dual_arm_teleoperation_EN_output.mp4  |
|11 |Network Setup | https://oss.limxdynamics.com/uploads/material/%E9%BB%98%E8%AE%A4/TRON%202/video/11_network_setup_EN_output.mp4   |
|12 |Zero Calibration |https://oss.limxdynamics.com/uploads/material/%E9%BB%98%E8%AE%A4/TRON%202/video/12_zero_calibration_EN_output.mp4 |

### 1.6.2 Pre-Power-On Wiring Check

<div style="margin: 16px 0; padding: 14px 18px; background-color: #f5cdca; border-left: 4px solid #f30c33; border-radius: 6px; color: #131312; line-height: 1.7;">
  <strong style="color: #e75a19;">🚫 DANGER</strong><br>
  Never connect a 24 V power cable to a 48 V port. Connecting a power cable incorrectly may damage the robot hardware.
</div>

**Mandatory Checks Before Power-On**

1. Verify that the robot, power adapter, and Mobile Base are all powered off.
2. Check each cable label against its port label as shown in the wiring diagrams. Pay particular attention to the power cable connections.
3. Verify the connector orientation. Never force a connector into a port.
4. Verify that every connector is fully seated and locked, with no looseness, misalignment, or exposed metal contacts.
5. Inspect the cables and connectors for damage, deformation, signs of burning, or unusual odors.
6. If you cannot confirm that the wiring is correct, do not power on the robot. Contact LimX Dynamics Technical Support.


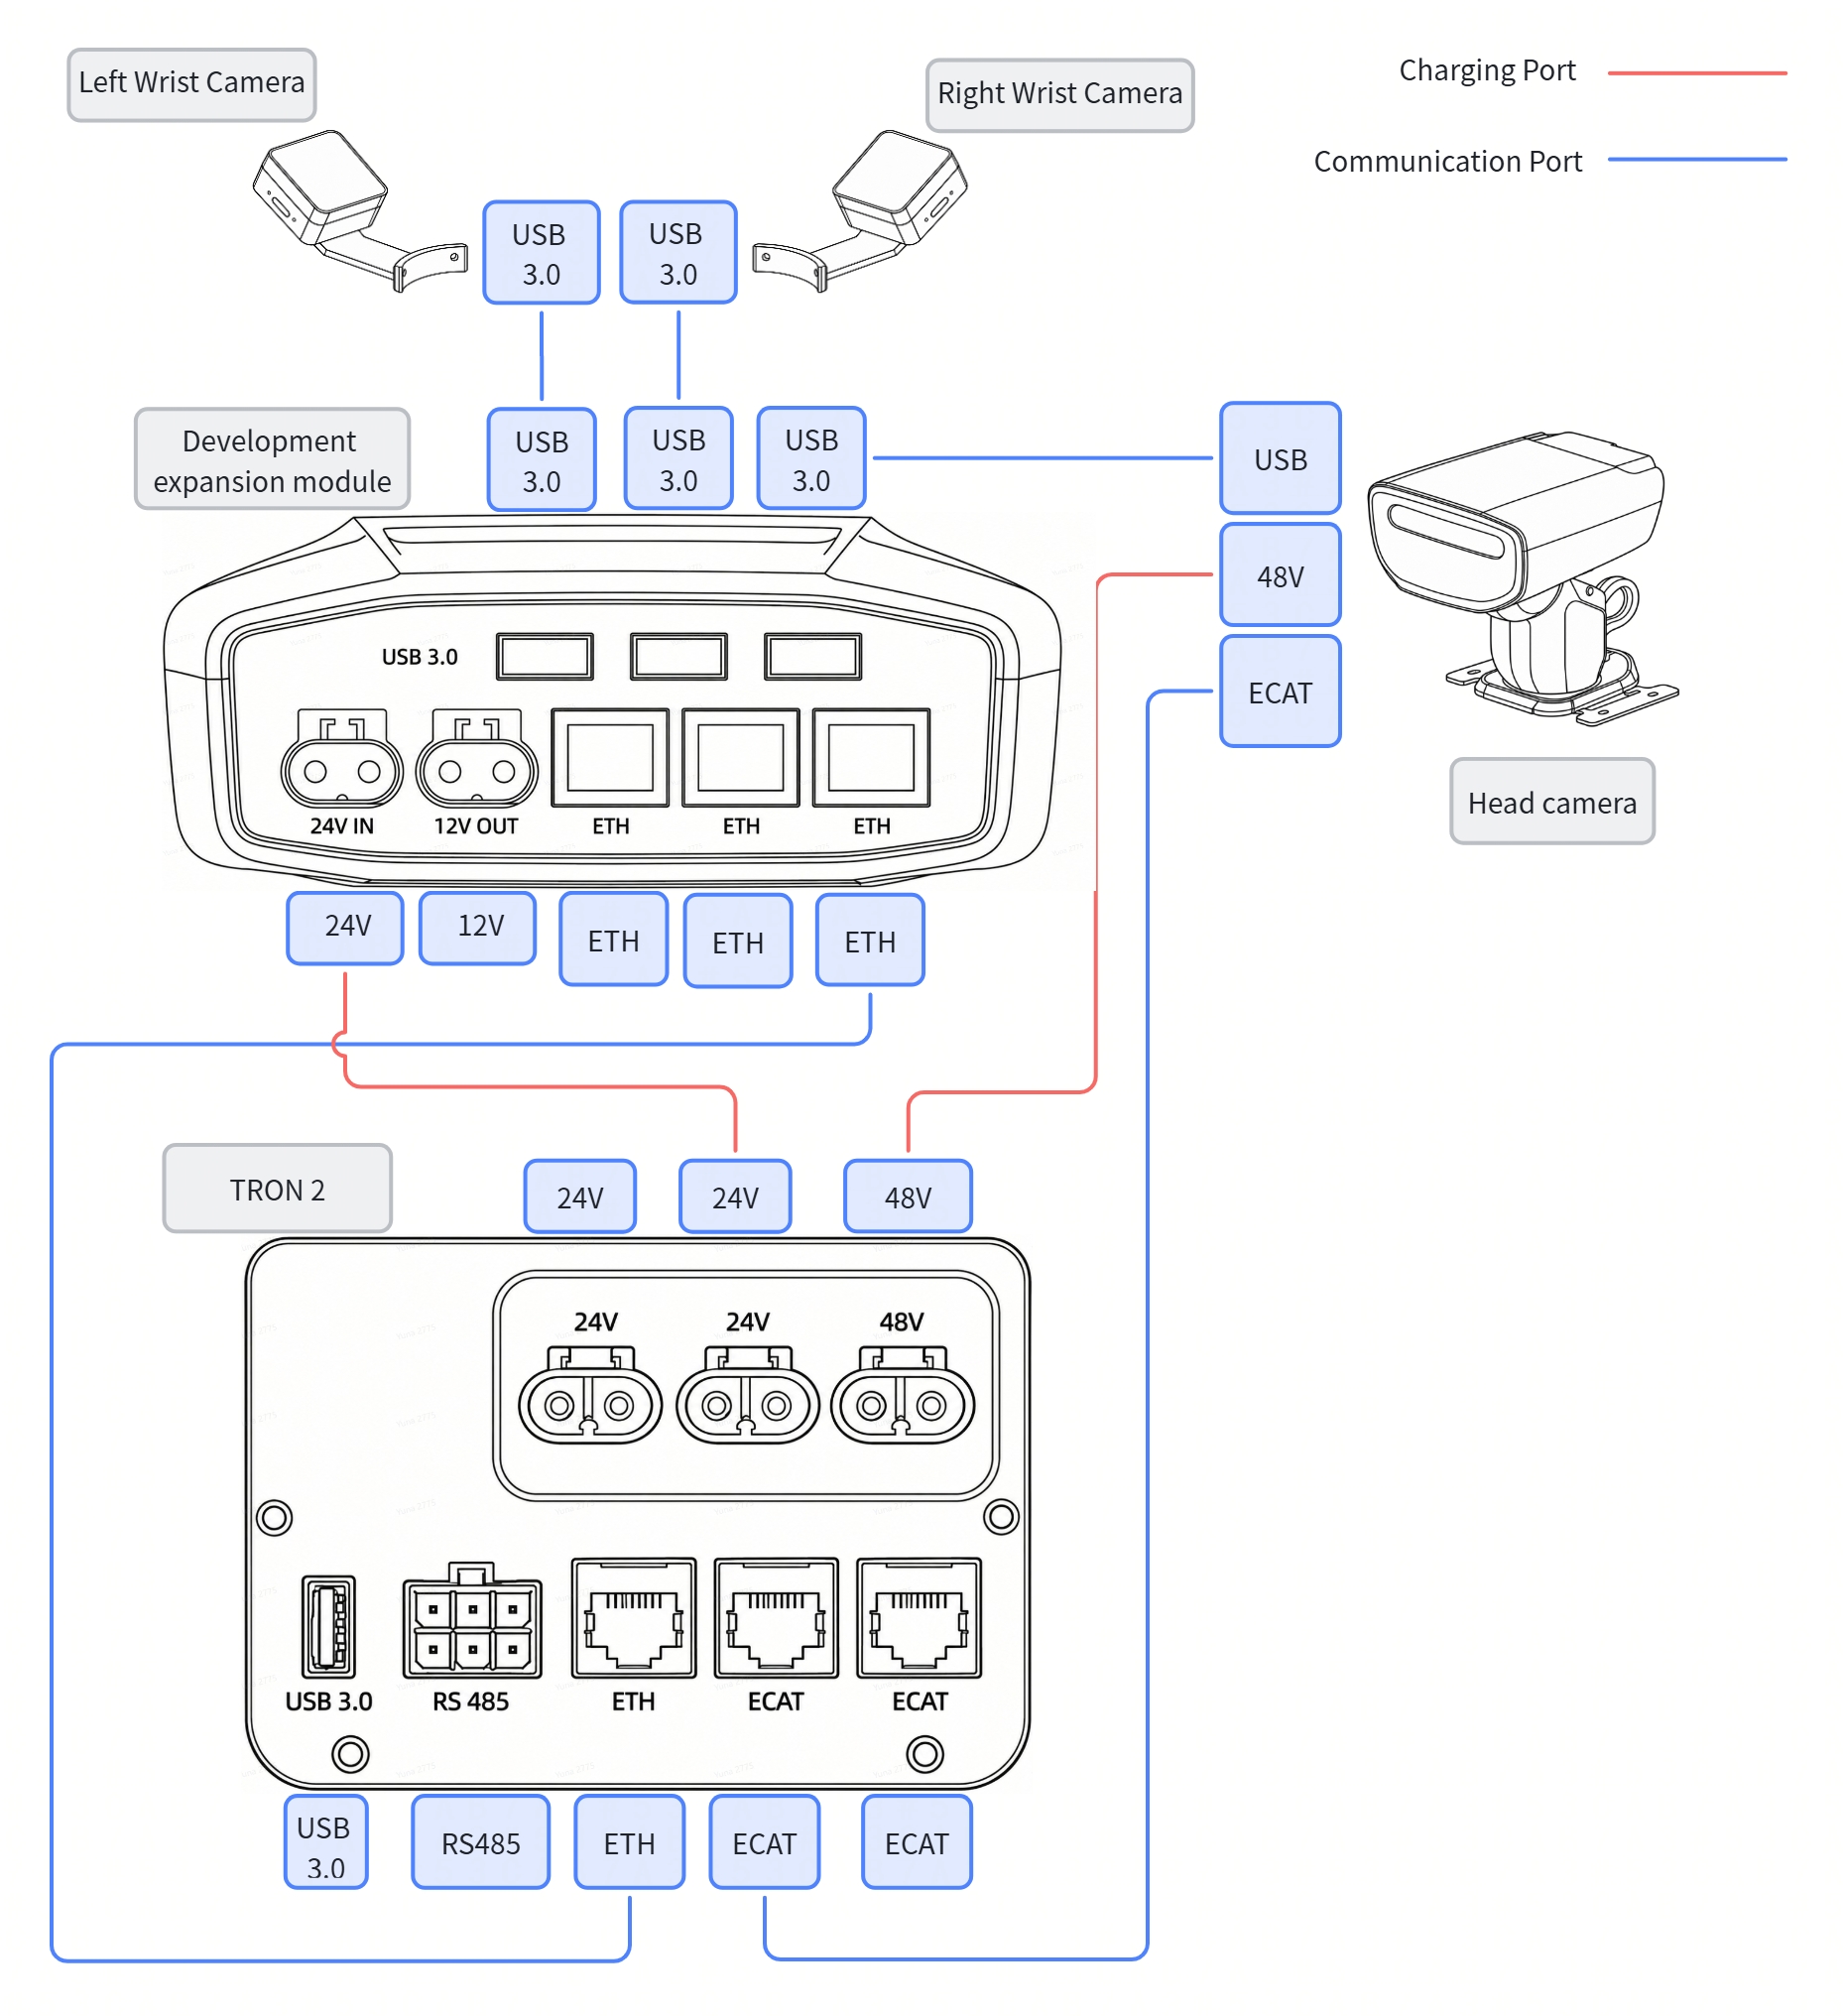
**Dual-Arm Robot Wiring**

Before power-on, check the Dual-Arm Robot wiring against the diagram below.

<img src="https://oss.limxdynamics.com/uploads/material/%E9%BB%98%E8%AE%A4/TRON%202/pic/Wiring_Diagram_en.jpg" style="width: 100%; max-width: 600px;">

<div style="margin: 16px 0; padding: 14px 18px; background-color: #eff6ff; border-left: 4px solid #2563eb; border-radius: 6px; color: #1e3a8a; line-height: 1.7; overflow-wrap: anywhere;">
	<span aria-hidden="true">💡</span> <strong>Tip</strong>
	<br>The robot can be converted from the Dual-Arm Configuration to either the Sole or Wheeled-legs Configuration. The robot-body wiring remains the same. Check the wiring against the Dual-Arm Robot wiring diagram.
</div>

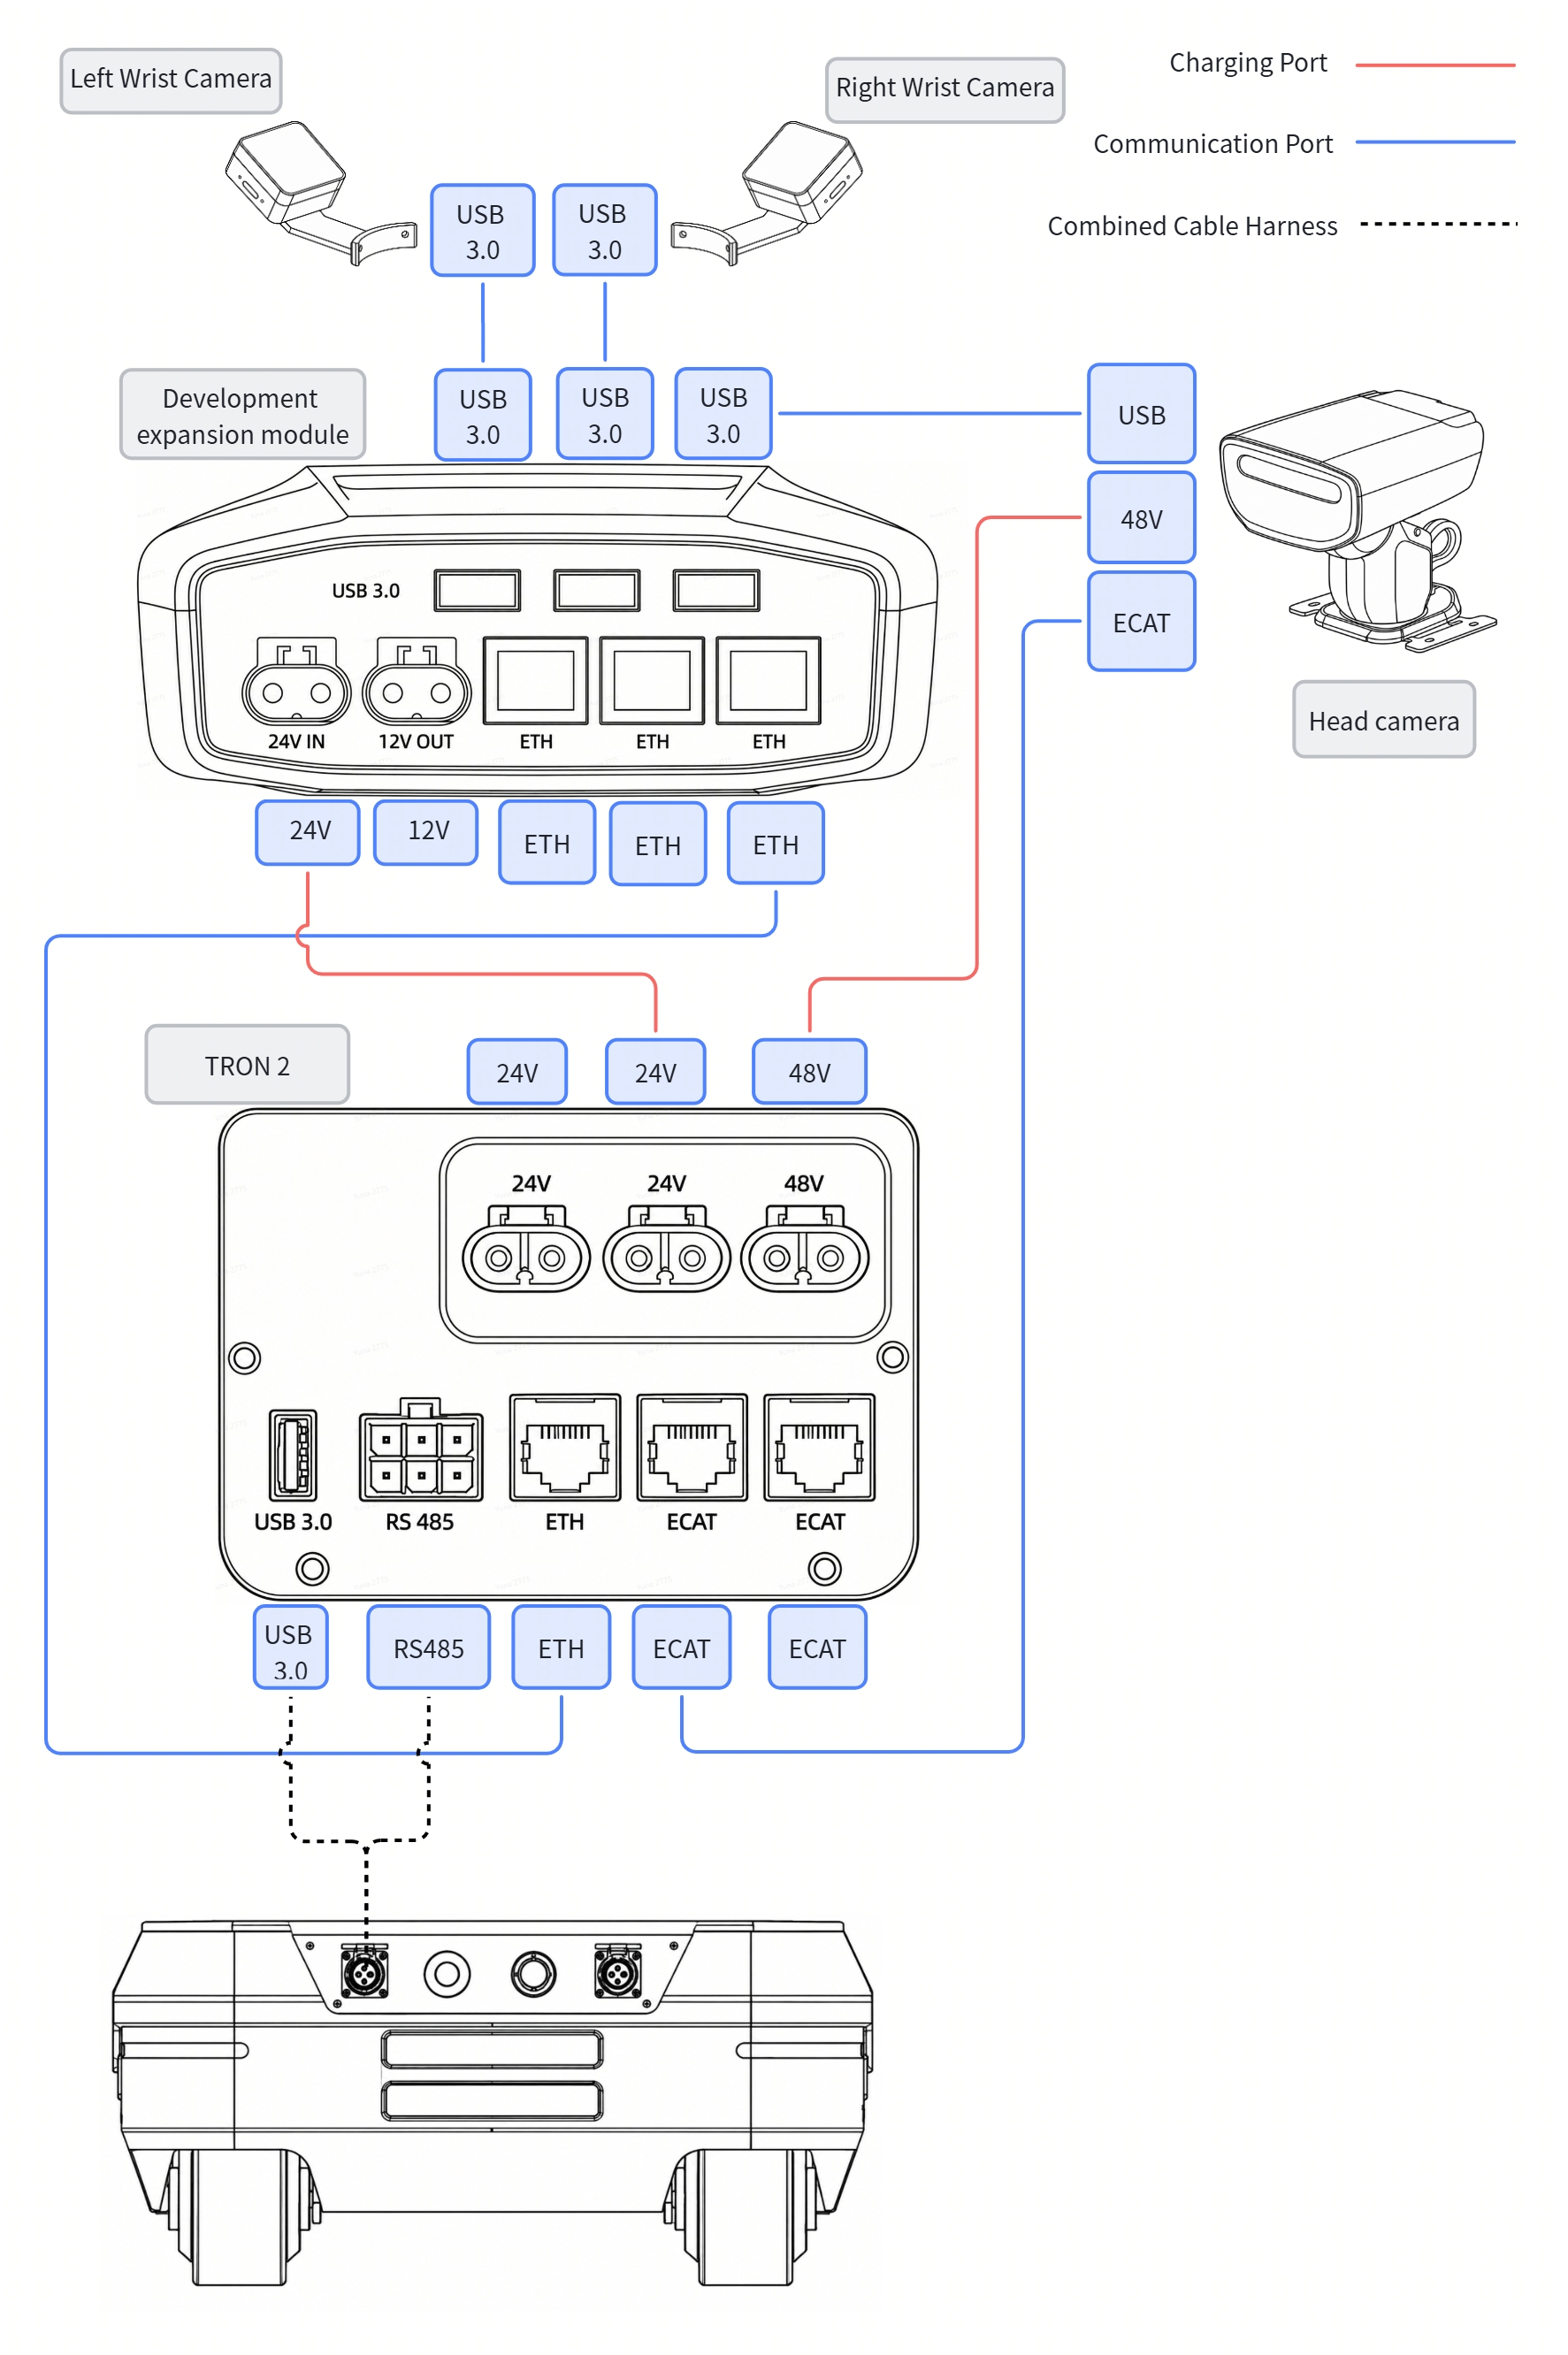
**Mobile Base Wiring**

This wiring diagram applies only to the Mobile Dual-Arms Robot. Before power-on, check the wiring of both the Dual-Arm Robot and the Mobile Base.

<blockquote style="margin: 16px 0; padding: 14px 18px; background-color: #eff6ff; border-left: 4px solid #2563eb; border-radius: 6px; color: #1e3a8a; line-height: 1.7; overflow-wrap: anywhere;">
  <span aria-hidden="true">💡</span> <strong>Wiring Tip</strong>
  <ul style="margin: 8px 0 0; padding-left: 22px;">
    <li>The communication harness that connects to the Mobile Base includes cables with USB 3.0 and RS485 interfaces. Route the harness out through the rail drag chain, then connect it to the communication interface on the Mobile Base with the aviation connector.</li>
    <li>Connect the charging cable to the charging interface on the Mobile Base.</li>
  </ul>
</blockquote>

<img src="https://oss.limxdynamics.com/uploads/material/%E9%BB%98%E8%AE%A4/TRON%202/pic/Mobile_Base_Wiring_en.jpg" style="width: 100%; max-width: 600px;">


## 2 Battery Level Check and Charging Instructions

## 2.1 Robot Battery Level Check and Charging

**Checking the Robot Battery Level**

Short-press the power button once to check the battery level.

**Charging the Robot Battery**

1. Connect the battery charging dock and power adapter, align the aviation connector with the keyed position, and insert it.
2. Insert the battery into the charging dock, press it down to ensure it is fully seated, and plug the power adapter into a power outlet (220 V AC).
3. If the battery indicator flashes and the power adapter indicator is steady blue, charging has started. When the battery indicator and the power adapter indicator are both steady green, the battery is fully charged.
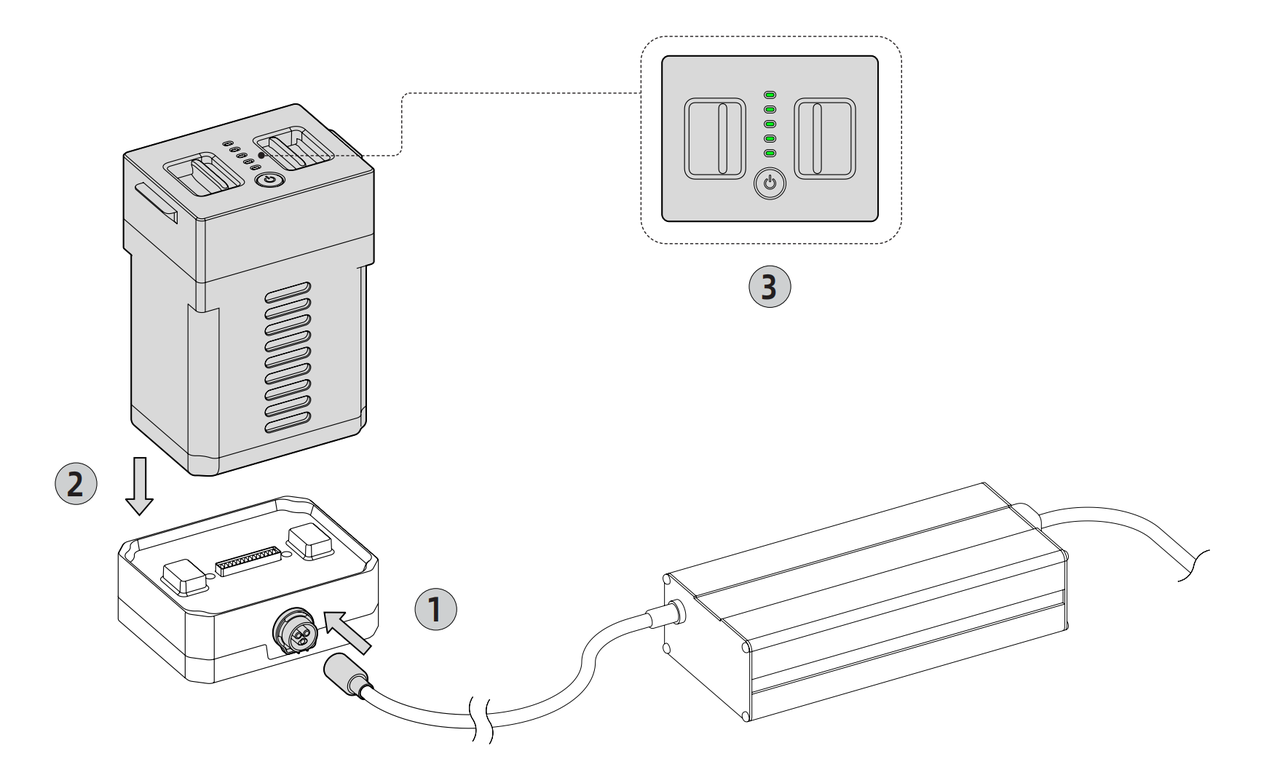
<img src="https://oss.limxdynamics.com/uploads/material/默认/TRON 2/pic/battery_charging.png" alt="" title="battery_charging.png" loading="lazy" style="width: 100%; max-width: 800px; ">

**Battery and Adapter Indicator Lights**

|            | Not Charging    | Charging    | Charging Complete  | Charging Fault  |
| ---------- | --------- | --------- | --------- | --------- |
| Battery       | No light    | Green flashing | Green steady |           |
| Power Adapter | Green steady | Blue steady | Green steady | Red flashing |
<div style="margin: 16px 0; padding: 14px 18px; background-color: #eff6ff; border-left: 4px solid #2563eb; border-radius: 6px; color: #1e3a8a; line-height: 1.7; overflow-wrap: anywhere;">
	<span aria-hidden="true">💡</span> <strong>Tip</strong>
	<ul style="margin: 8px 0 0; padding-left: 22px;">
		<li>If the device will not be used for an extended period, charge the battery once every three months to avoid battery damage.</li>
		<li>Long-term charging is not recommended. Remove the power adapter promptly after the battery is fully charged.</li>
	</ul>
</div>

## 2.2 Remote Controller Battery Level Check and Charging

**Checking the Remote Controller Battery Level**

After long-pressing the Power button below the remote controller screen to turn it on, check the battery icon at the upper right of the screen.

**Charging the Remote Controller**

1. Connect the Type-C end of the remote controller charging cable to the remote controller and connect the other end to a 5 V/1 A power supply.
2. A steady green remote controller indicator means charging has started successfully.

**Remote Controller Charging Indicator**

|              | Not Charging | Charging / Charging Complete |
| ------------ | ------ | --------------- |
| Remote Controller Indicator | No light | Green steady       |

## 2.3 Mobile Bases Battery Level Check and Charging (Mobile Dual-Arms Version Only)

**Checking the Mobile Bases Battery Level**

The normal battery voltage range is 24-29.4 V. If the chassis LED flashes red, the battery voltage is too low. Charge it promptly.

**Charging the Mobile Bases**


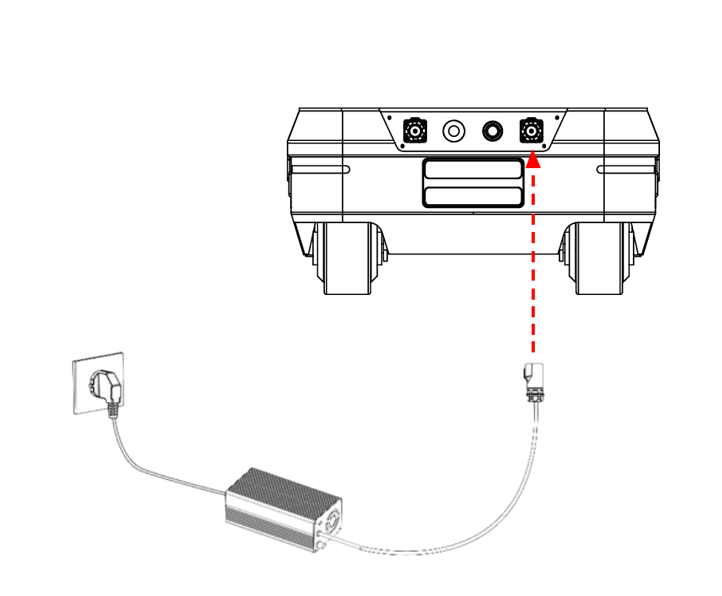
Use the 10A charger provided with the product. Insert the charger plug into the charging port on the rear of the mobile base, then connect the charger to a power source. The robot will begin charging.

<img src="https://oss.limxdynamics.com/uploads/material/默认/TRON 2/pic/mobile_base_charging.png" alt="" title="mobile_base_charging.png" loading="lazy" style="width: 100%; max-width: 700px; ">

## 3 Using Your TRON 2

## 3.1 Operating Environment Requirements

- Electromagnetic interference: Avoid operating near interference sources such as high-voltage power lines and mobile base stations.
- Wi-Fi signal interference: Avoid co-channel interference. If interference occurs, turn off other nearby wireless signal sources.
- Line-of-sight control: Keep the robot within visual range at all times and maintain a safety distance of at least 1 m from obstacles, crowds, water surfaces, etc.
- Temperature range: -5°C to 40°C. Outdoor use is prohibited in severe weather such as heavy fog, rain, snow, or thunderstorms.
- Water and dust protection: The robot is not waterproof or dustproof. Avoid humid, sandy, or dusty environments.
- Ground requirements: Use on flat ground with high friction. Operate cautiously if the robot must be used on smooth surfaces.
- Safety assistance: In Sole/wheeled configurations, use a tether to avoid falls during remote control and early development testing.


## 3.2 Mode Descriptions and Usage Flow
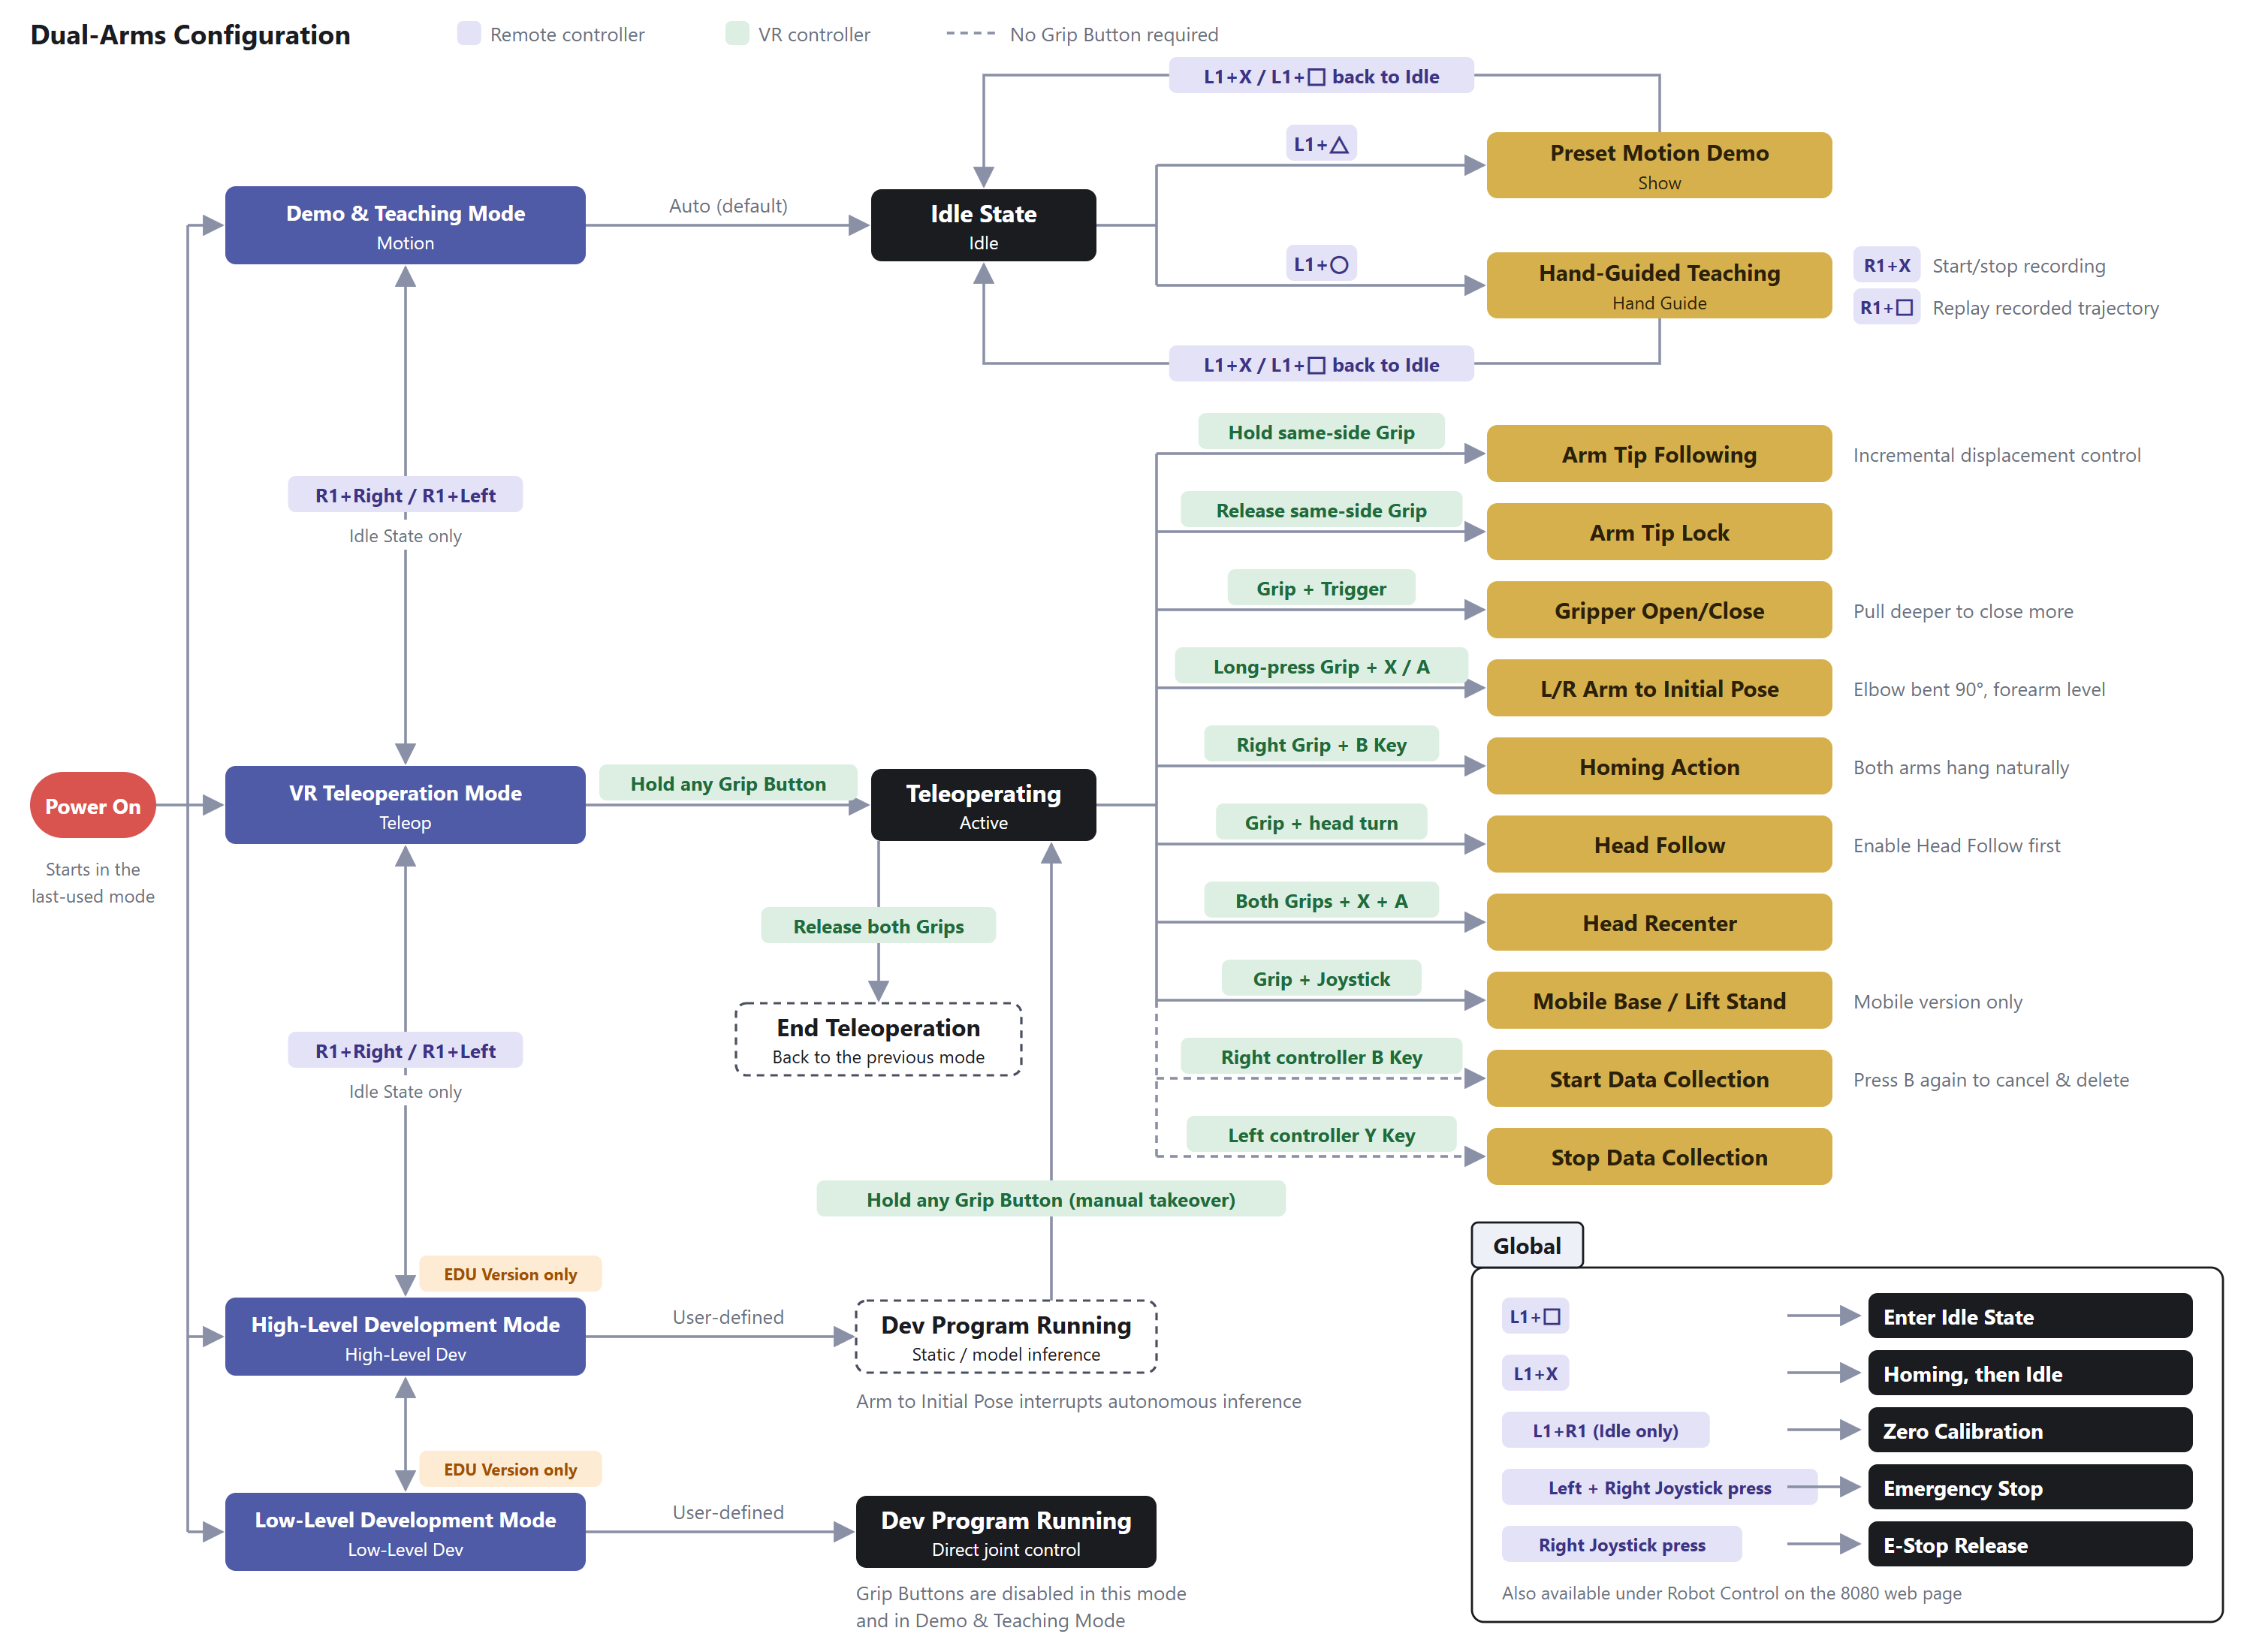
<table>
<tr>
<td>Configuration</td><td>Mode</td><td>Mode Description</td></tr>
<tr>
<td rowspan="4">Dual-Arms Configuration</td>
<td>Show Mode</td>
<td>Provides Preset Motion Demo, Drag-to-Record Trajectory, and Playback of Recorded Trajectory.</td></tr>
<tr>
<td>VR Teleoperation Mode</td>
<td>In this mode, a VR device is used to remotely operate the robot, mainly for teleoperation, data collection, etc.</td></tr>
<tr>
<td>High-Level Development Mode (EDU version only)</td>
<td>Allows calls to high-level application development interfaces to control robot motion based on built-in motion-control algorithms, such as moveJ and servoP.</td></tr>
<tr>
<td>Low-Level Development Mode (EDU version only)</td>
<td>Allows calls to low-level development interfaces to directly control joints.</td></tr>
<tr>
<td rowspan="3">Sole/Wheeled Configuration</td>
<td>Remote-Control Mode</td>
<td>The user controls robot motion with the remote controller, including forward/backward/left/right movement, turning, height adjustment, etc.</td></tr>
<tr>
<td>High-Level Development Mode (EDU version only)</td>
<td>Calls high-level application development interfaces to control robot motion based on built-in motion-control algorithms, including forward/backward/left/right movement, turning, height adjustment, etc.</td></tr>
<tr>
<td>Low-Level Development Mode (EDU version only)</td>
<td>Calls low-level motion-control interfaces outside the built-in motion-control algorithms to directly control joints.</td></tr>
</table>


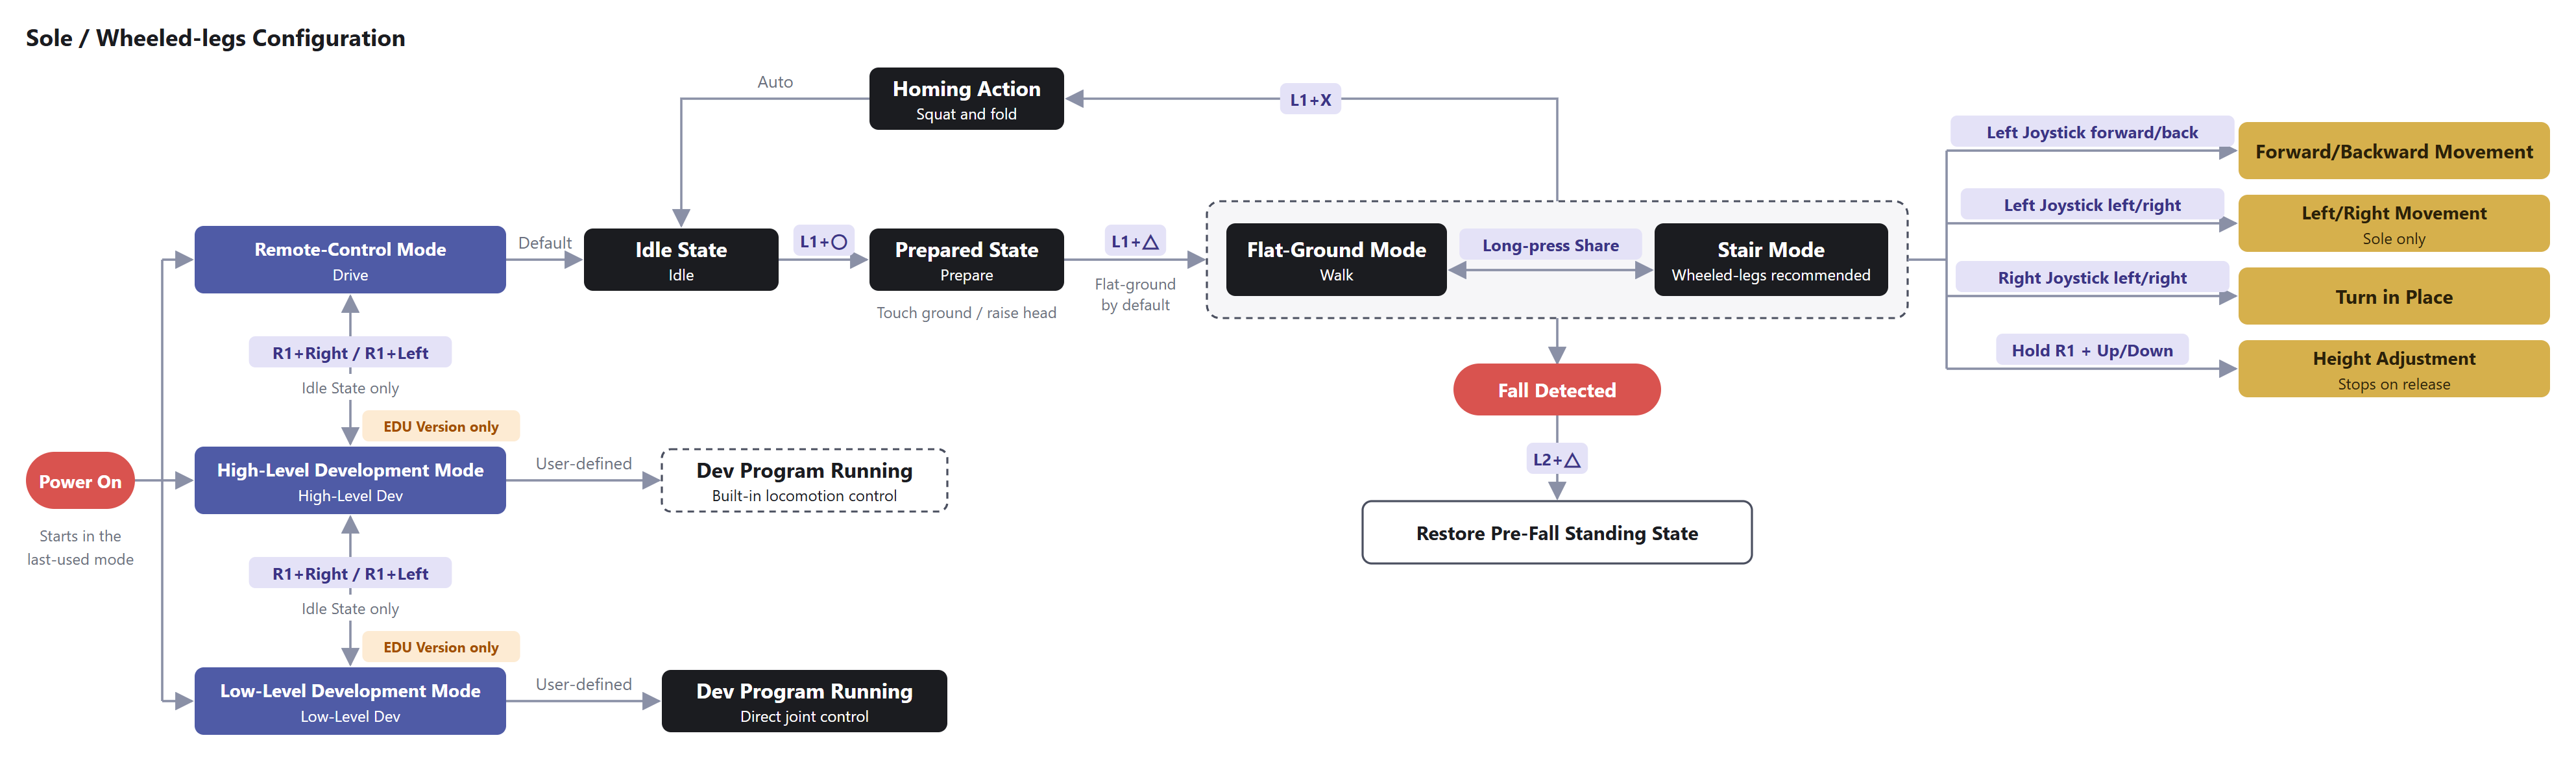
<img src="https://oss.limxdynamics.com/uploads/material/%E9%BB%98%E8%AE%A4/TRON%202/pic/tron2_dual_arm_mode_flowchart_v2_7_en.png" alt="tron2_dual_arm_mode_flowchart_v2_7_zh_1111.png" style="width: 1200px; height: auto;border: 1px solid #e0e0e0; border-radius: 5px;" />


<img src="https://oss.limxdynamics.com/uploads/material/%E9%BB%98%E8%AE%A4/TRON%202/pic/tron2_biped_wheel_legged_mode_flowchart_v2_7_en.png" alt="tron2_biped_wheel_legged_mode_flowchart_v2_7_zh.png" style="width: 1200px; height: auto;border: 1px solid #e0e0e0; border-radius: 5px;" />


## 3.3 Dual-Arms/Mobile Dual-Arms Robot Power-On/Off Procedure

**Power-On Procedure**
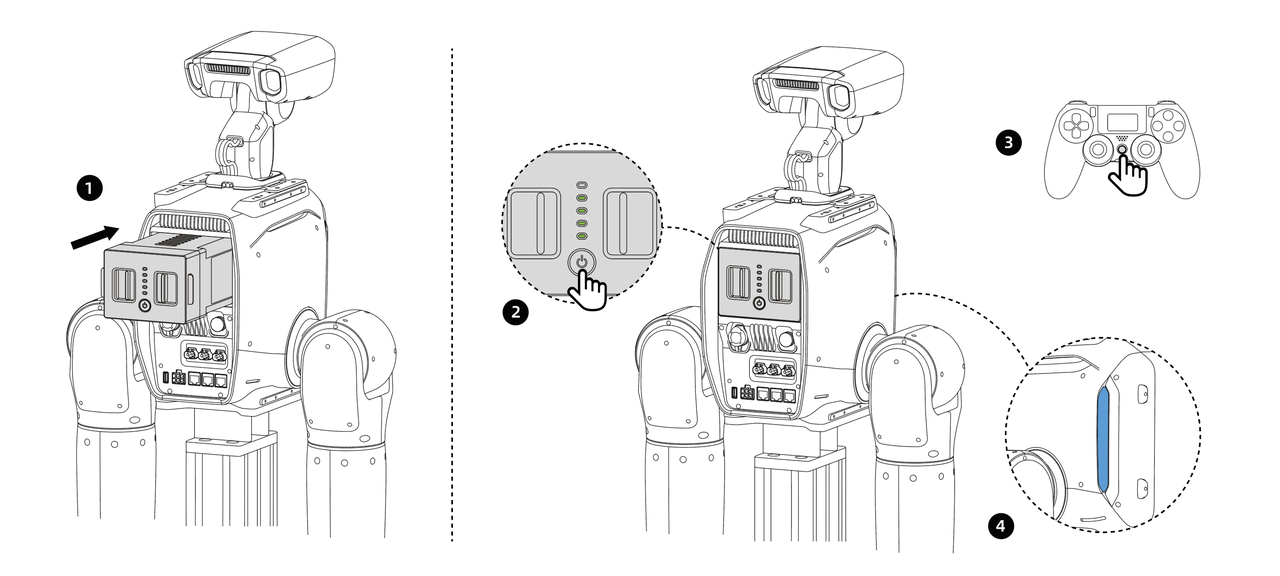
<img src="https://oss.limxdynamics.com/uploads/material/默认/TRON 2/pic/power_on_flow.png" alt="" title="power_on_flow.png" loading="lazy" style="width: 100%; max-width: 800px; ">

1. Complete robot installation according to the installation procedure and wait for startup.
2. Insert a fully charged battery into the battery compartment and press until the latch locks. For the fixed-stand version, connect the power adapter to the external power interface and to 220 V power before startup. For the mobile base version, turn on the power switch at the rear of the base.
3. Short-press for 0.5 s, then long-press the robot Power button for 3 s to start the robot. The battery level indicator will turn on.
4. Long-press the remote controller power button for 2 s to turn it on. The display will light up and show information.
5. Observe the status indicator. During startup, it flashes white. After about 20 s, it changes to steady Blue/Cyan/Green, indicating startup is complete.
6. Check the signal indicator on the remote controller display. If a signal is shown, pairing has succeeded and startup is complete.
<div style="margin: 16px 0; padding: 14px 18px; background-color: #fff4e5; border-left: 4px solid #d97706; border-radius: 6px; color: #78350f; line-height: 1.7; overflow-wrap: anywhere;">
	<span aria-hidden="true">⚠️</span> <strong>NOTICE</strong>
	<br>Install the robot head and connect the head joint power cable and joint communication cable before powering on. Otherwise, the robot cannot start.
</div>

<div style="margin: 16px 0; padding: 14px 18px; background-color: #eff6ff; border-left: 4px solid #2563eb; border-radius: 6px; color: #1e3a8a; line-height: 1.7; overflow-wrap: anywhere;">
	<span aria-hidden="true">💡</span> <strong>Tip</strong>
	<br>If you are not using the remote controller, skip steps 4 and 6 and control the robot from the 8080 web page. See <a href="#46-web-based-robot-control" style="color: #1677ff; text-decoration: none;">4.6</a>.
</div>

**Power-Off Procedure**

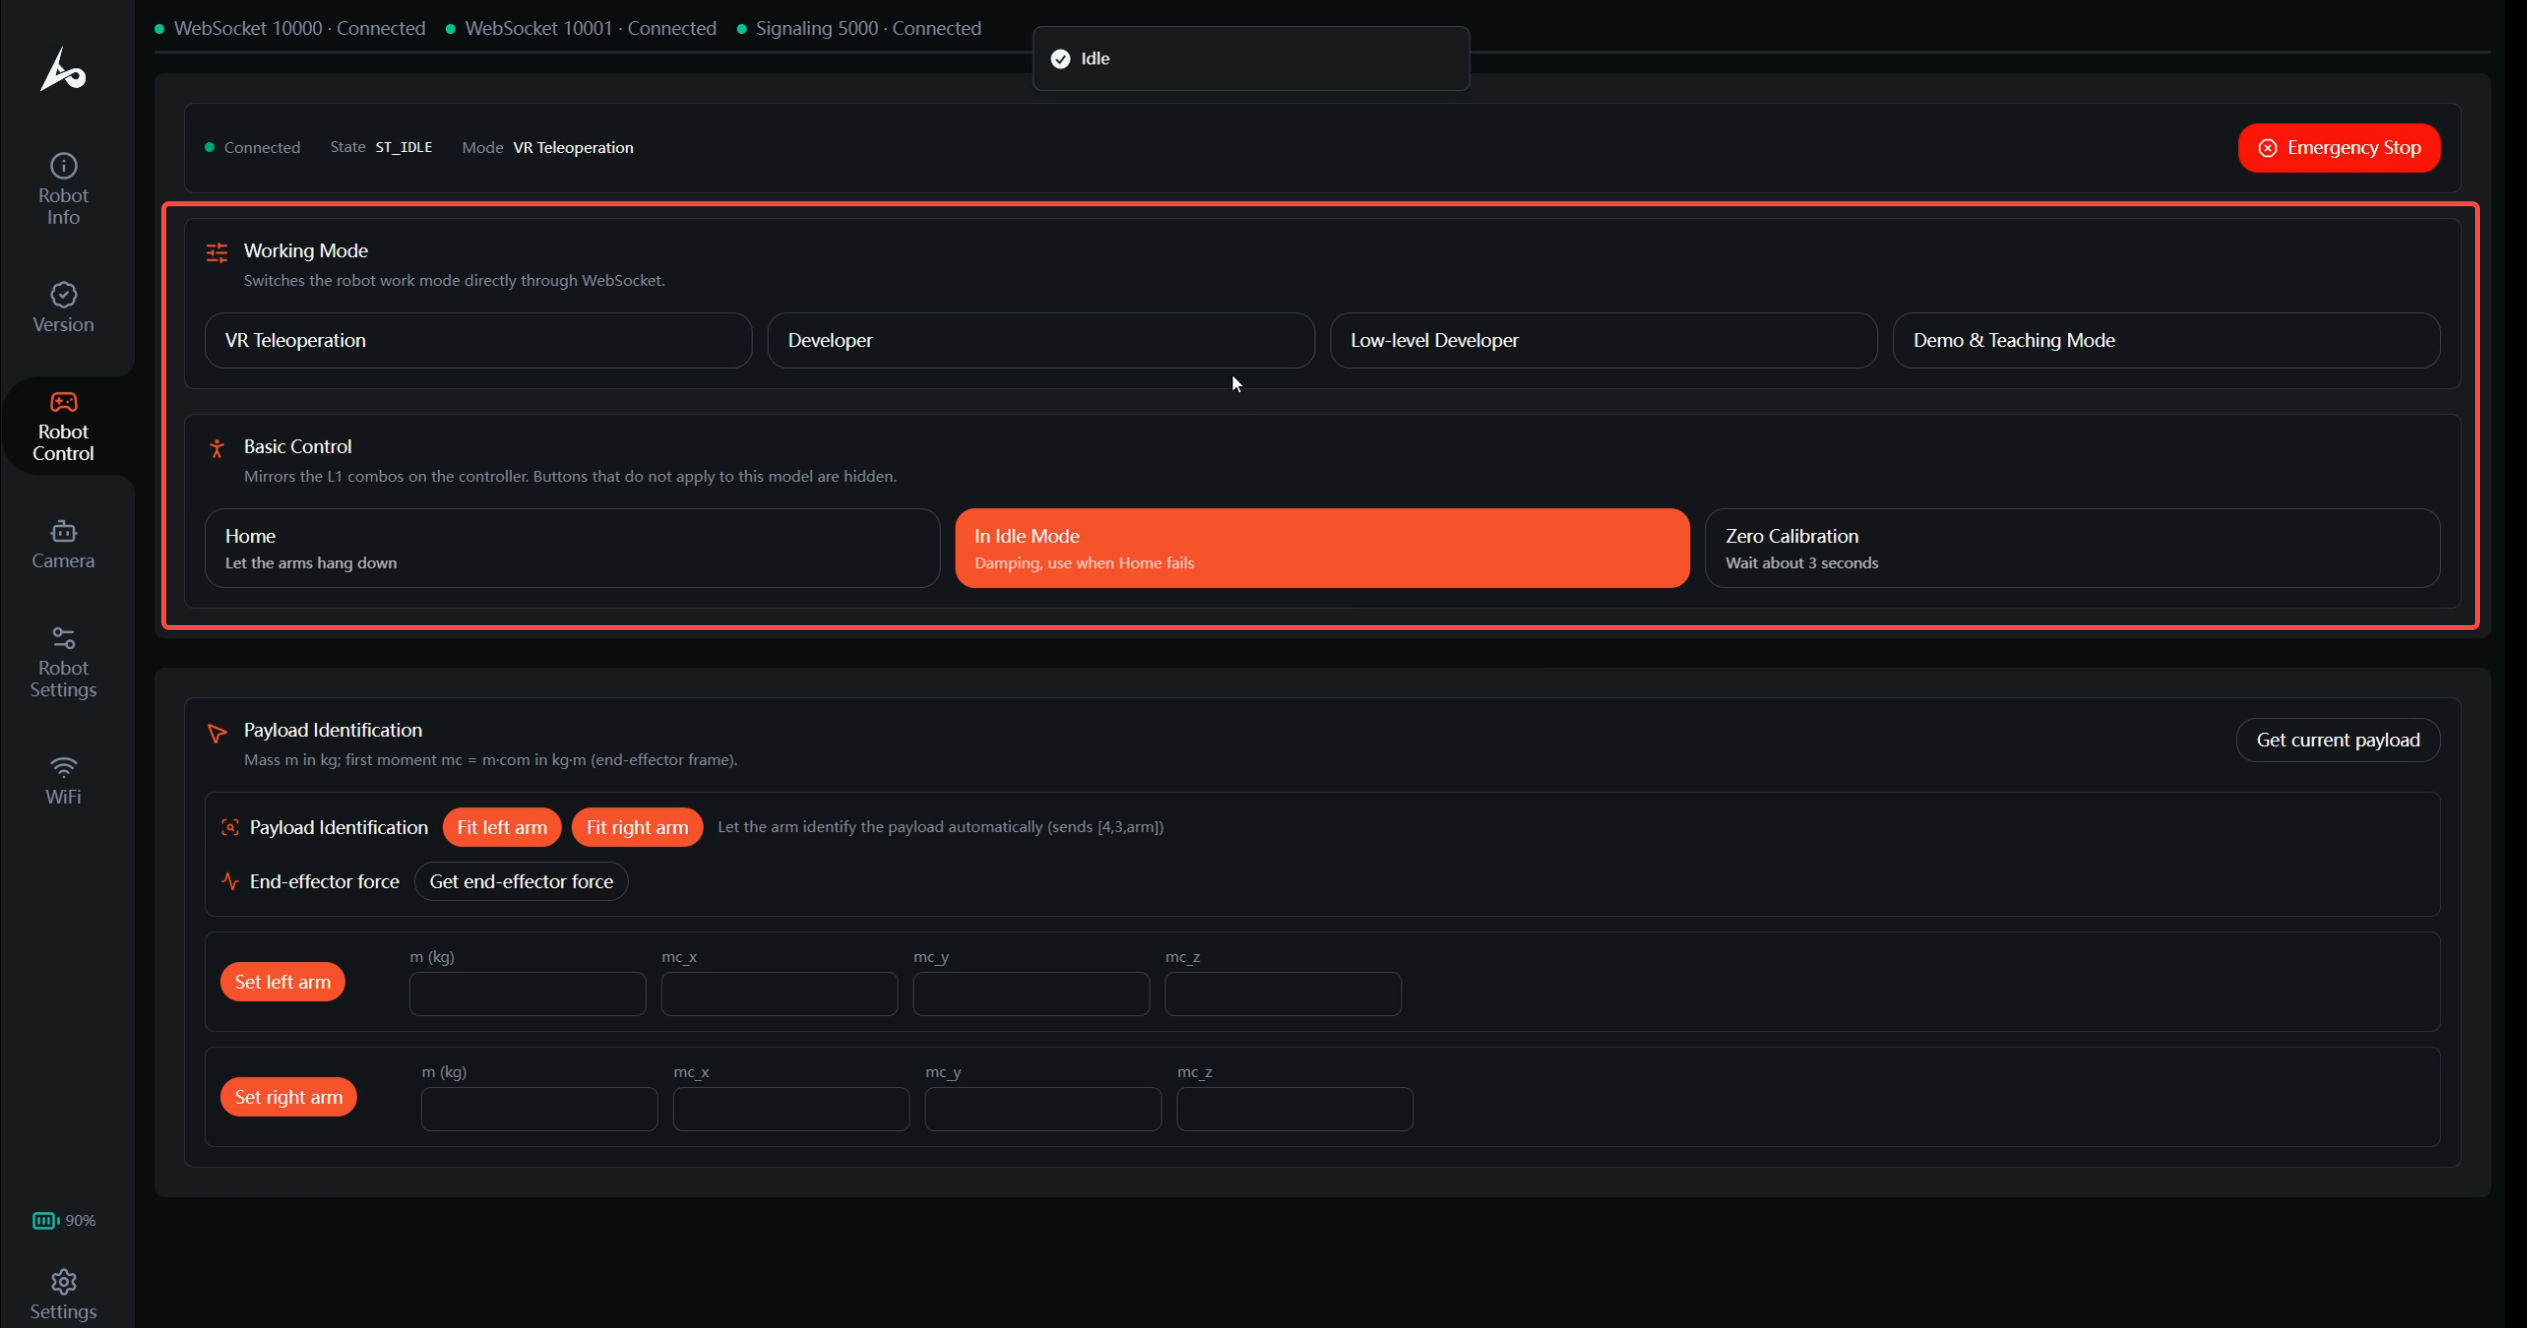
1. To stop robot motion, press `L1+X` simultaneously in remote-control mode to enter idle state. All joint motors enter torque-damping state and will slowly move downward. Alternatively, click **Home** on the **Robot Control** page of the 8080 web page.
2. For the fixed-base version, unplug the external power interface. For the mobile base version, turn off the power switch at the rear of the base.
3. Short-press for 0.5 s, then long-press the robot Power button for 3 s to power off. The battery level indicator and status light will turn off.
4. Long-press the remote controller power-off button for 3 s to power off. The display will turn off.

<div style="margin: 16px 0; padding: 14px 18px; background-color: #fff4e5; border-left: 4px solid #d97706; border-radius: 6px; color: #78350f; line-height: 1.7; overflow-wrap: anywhere;">
	<span aria-hidden="true">⚠️</span> <strong>NOTICE</strong>
	<br>Put the robot into the idle state first so that the joint motors return slowly. If you press the power button directly, the joints drop immediately and the robot may be damaged.
</div>

## 3.4 Sole/Wheeled Robot Power-On/Off Procedure

**Power-On Procedure**

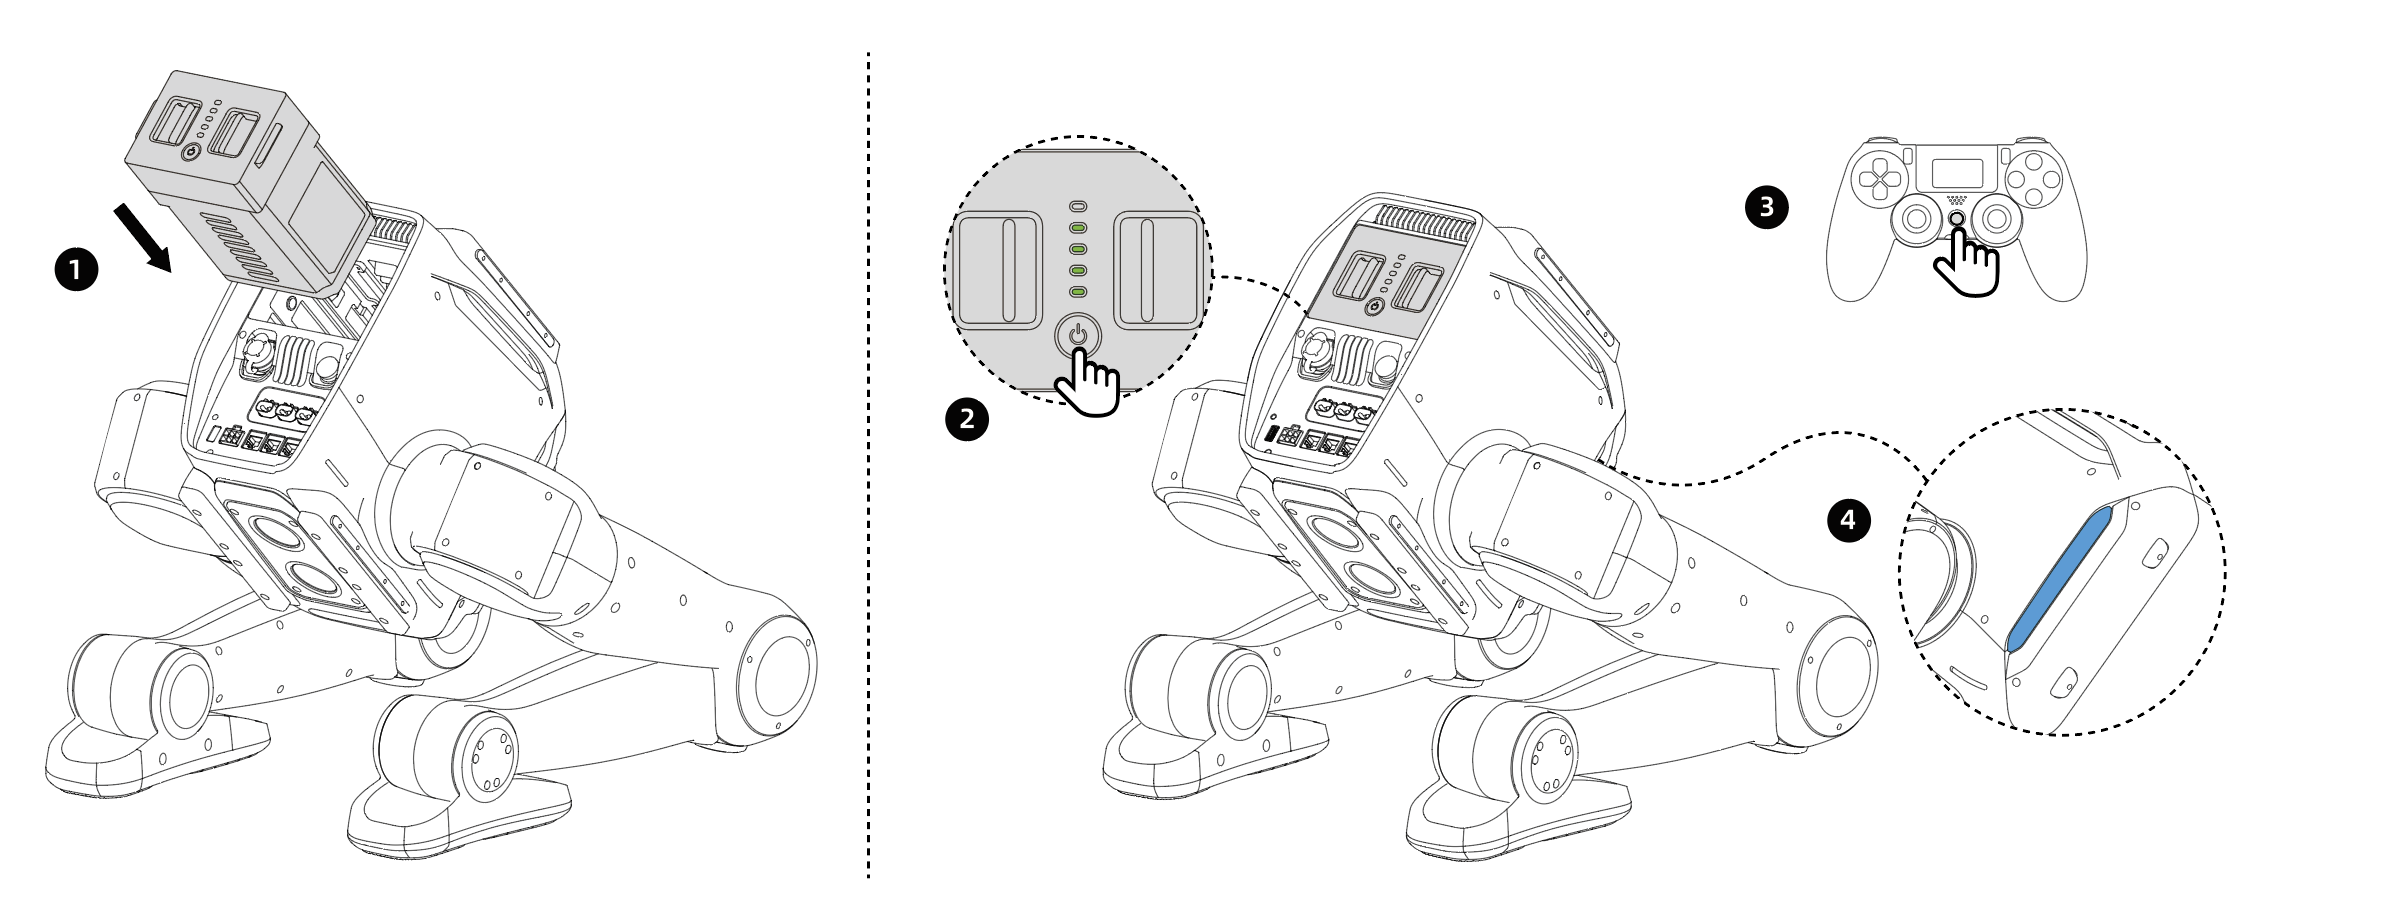
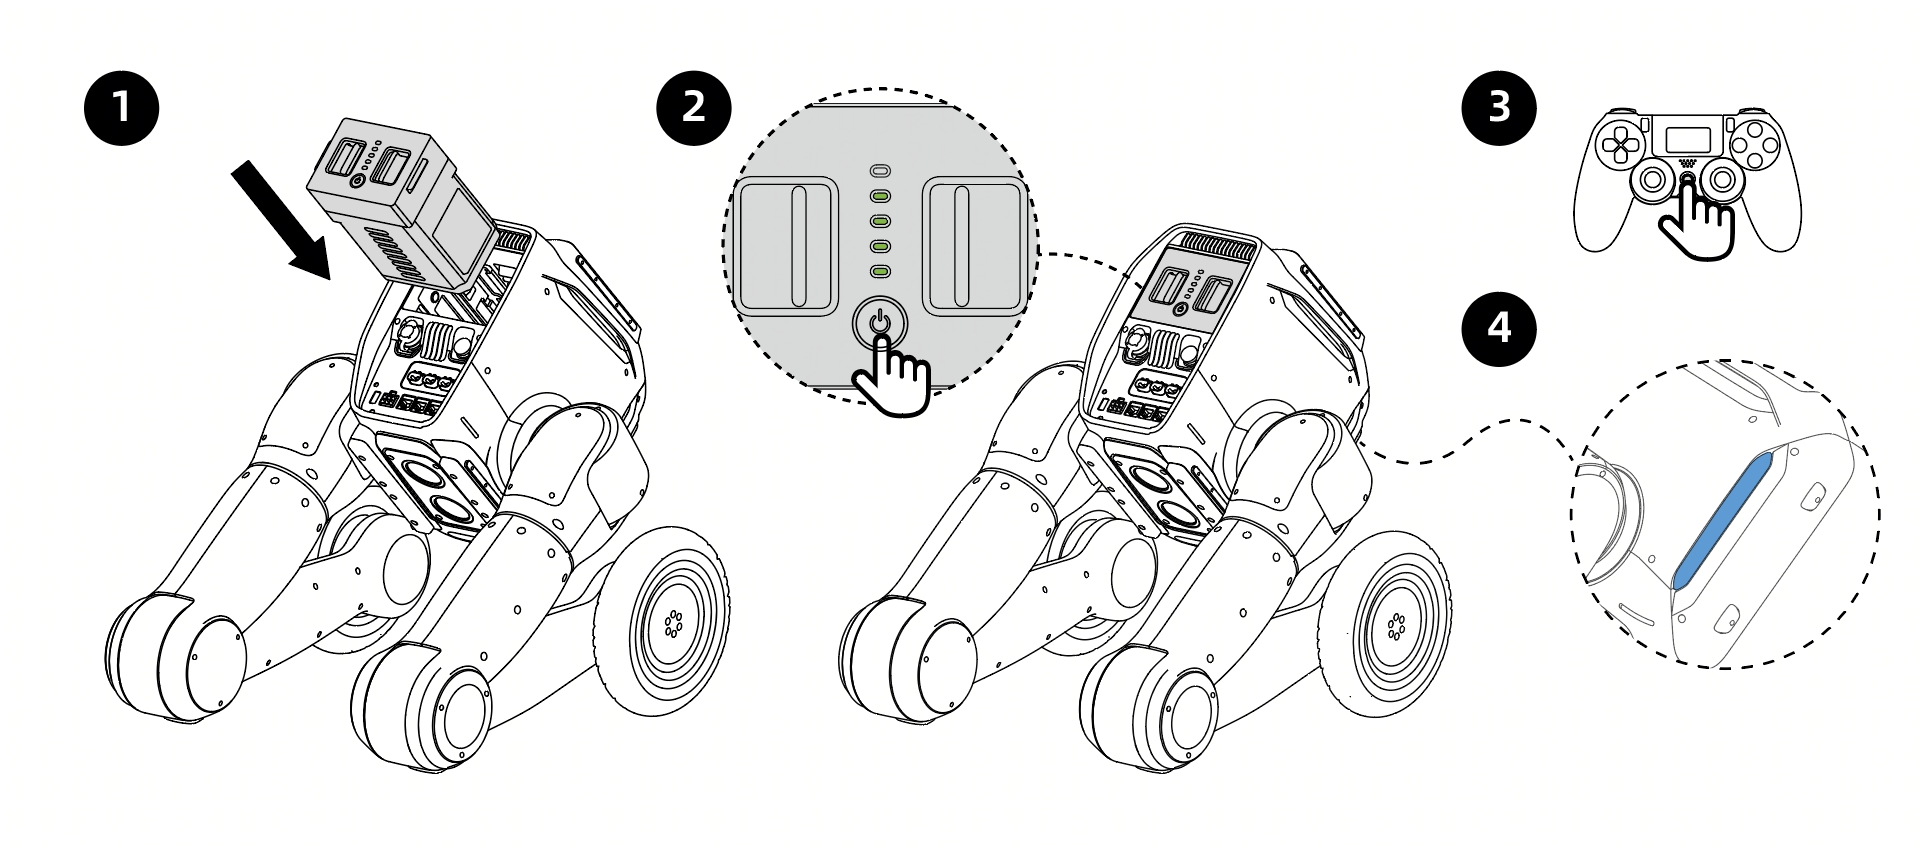
<img src="https://oss.limxdynamics.com/uploads/image/2026/06/04/1780559201558_image.png" alt="" title="power_on_flow.png" loading="lazy" style="width: 100%; max-width: 800px; ">

<img src="https://oss.limxdynamics.com/uploads/image/2026/06/04/1780559209588_image.png" alt="" title="power_on_flow.png" loading="lazy" style="width: 100%; max-width: 800px; ">


1. Before powering on, place the robot in the position shown and keep it self-balanced.
2. Insert a fully charged battery into the battery compartment and press until the latch locks.
3. Short-press for 0.5 s, then long-press the robot Power button for 3 s to start the robot. The battery level indicator will turn on.
4. Long-press the remote controller power button for 2 s to turn it on. The display will light up and show information.
5. Observe the status indicator. It flashes white during startup, and steady blue indicates startup is complete.
6. About 20 s after startup, the body status indicator changes from white to steady Blue/Cyan/Green. Check the signal indicator on the remote controller display. If a signal is shown, pairing has succeeded and startup is complete.

**Power-Off Procedure**

1. To stop robot motion, press `L1+X` simultaneously in remote-control mode to enter squat state and let the device land stably.
2. Long-press the robot power-off button for 3 s to power off. The battery level indicator and status light will turn off.
3. Long-press the remote controller power-off button for 2 s to power off. The display will turn off.
4. After all indicators turn off, remove the battery.


## 3.5 Robot Light Indicator Meanings
<table style="border-collapse: collapse; width: 100%;">
  <thead>
    <tr style="background-color: #f5f7fa;">
      <th scope="col" style="border: 1px solid #e0e0e0; padding: 6px 10px; text-align: center; vertical-align: middle;">Event/Status</th>
      <th scope="col" style="border: 1px solid #e0e0e0; padding: 6px 10px; text-align: center; vertical-align: middle;">Indicator Color</th>
      <th scope="col" style="border: 1px solid #e0e0e0; padding: 6px 10px; text-align: center; vertical-align: middle;">Indicator Description</th>
      <th scope="col" style="border: 1px solid #e0e0e0; padding: 6px 10px; text-align: center; vertical-align: middle;">Frequency (seconds/time)</th>
    </tr>
  </thead>
  <tbody>
    <tr>
      <td colspan="4" style="border: 1px solid #e0e0e0; padding: 6px 10px; text-align: center; vertical-align: middle;">TRON2 Robot Body</td>
    </tr>
    <tr>
      <td style="border: 1px solid #e0e0e0; padding: 6px 10px; text-align: center; vertical-align: middle;">Starting Up</td>
      <td style="border: 1px solid #e0e0e0; padding: 6px 10px; text-align: center; vertical-align: middle; background-color: #f5f5f5; color: #555555;">White slow flashing</td>
      <td style="border: 1px solid #e0e0e0; padding: 6px 10px; text-align: left; vertical-align: middle;">Startup self-test in progress</td>
      <td style="border: 1px solid #e0e0e0; padding: 6px 10px; text-align: left; vertical-align: middle;">1</td>
    </tr>
    <tr>
      <td style="border: 1px solid #e0e0e0; padding: 6px 10px; text-align: center; vertical-align: middle;">Fault Warning</td>
      <td style="border: 1px solid #e0e0e0; padding: 6px 10px; text-align: center; vertical-align: middle; background-color: #fbe1e1; color: #c0392b;">Red steady</td>
      <td style="border: 1px solid #e0e0e0; padding: 6px 10px; text-align: left; vertical-align: middle;">Robot fault detected</td>
      <td style="border: 1px solid #e0e0e0; padding: 6px 10px; text-align: left; vertical-align: middle;">/</td>
    </tr>
    <tr>
      <td style="border: 1px solid #e0e0e0; padding: 6px 10px; text-align: center; vertical-align: middle;">Low Battery Warning</td>
      <td style="border: 1px solid #e0e0e0; padding: 6px 10px; text-align: center; vertical-align: middle; background-color: #fbe1e1; color: #c0392b;">Red flashing</td>
      <td style="border: 1px solid #e0e0e0; padding: 6px 10px; text-align: left; vertical-align: middle;">Robot battery low (below 20%)</td>
      <td style="border: 1px solid #e0e0e0; padding: 6px 10px; text-align: left; vertical-align: middle;">2</td>
    </tr>
    <tr>
      <td style="border: 1px solid #e0e0e0; padding: 6px 10px; text-align: center; vertical-align: middle;">Critically Low Battery Warning</td>
      <td style="border: 1px solid #e0e0e0; padding: 6px 10px; text-align: center; vertical-align: middle; background-color: #fbe1e1; color: #c0392b;">Red fast flashing</td>
      <td style="border: 1px solid #e0e0e0; padding: 6px 10px; text-align: left; vertical-align: middle;">Robot battery low (below 5%)</td>
      <td style="border: 1px solid #e0e0e0; padding: 6px 10px; text-align: left; vertical-align: middle;">0.5</td>
    </tr>
    <tr>
      <td style="border: 1px solid #e0e0e0; padding: 6px 10px; text-align: center; vertical-align: middle;">Emergency Stop State</td>
      <td style="border: 1px solid #e0e0e0; padding: 6px 10px; text-align: center; vertical-align: middle; background-color: #fff8d6; color: #8a6d3b;">Yellow flashing</td>
      <td style="border: 1px solid #e0e0e0; padding: 6px 10px; text-align: left; vertical-align: middle;">Body emergency stop button triggered</td>
      <td style="border: 1px solid #e0e0e0; padding: 6px 10px; text-align: left; vertical-align: middle;">2</td>
    </tr>
    <tr>
      <td style="border: 1px solid #e0e0e0; padding: 6px 10px; text-align: center; vertical-align: middle;">Show Mode</td>
      <td style="border: 1px solid #e0e0e0; padding: 6px 10px; text-align: center; vertical-align: middle; background-color: #e8e4f7; color: #5b4b8a;">Blue-Violet</td>
      <td style="border: 1px solid #e0e0e0; padding: 6px 10px; text-align: left; vertical-align: middle;">After startup or mode switching, the current mode status will be shown.</td>
      <td style="border: 1px solid #e0e0e0; padding: 6px 10px; text-align: left; vertical-align: middle;">/</td>
    </tr>
    <tr>
      <td style="border: 1px solid #e0e0e0; padding: 6px 10px; text-align: center; vertical-align: middle;">Remote-Control Mode (for Sole/wheeled)</td>
      <td style="border: 1px solid #e0e0e0; padding: 6px 10px; text-align: center; vertical-align: middle; background-color: #dde8f5; color: #2c5d8f;">Steady blue</td>
      <td style="border: 1px solid #e0e0e0; padding: 6px 10px; text-align: left; vertical-align: middle;">After startup or mode switching, the current mode status will be shown.</td>
      <td style="border: 1px solid #e0e0e0; padding: 6px 10px; text-align: left; vertical-align: middle;">/</td>
    </tr>
    <tr>
      <td style="border: 1px solid #e0e0e0; padding: 6px 10px; text-align: center; vertical-align: middle;">VR Teleoperation Mode (for dual-arms configuration)</td>
      <td style="border: 1px solid #e0e0e0; padding: 6px 10px; text-align: center; vertical-align: middle; background-color: #dde8f5; color: #2c5d8f;">Steady blue</td>
      <td style="border: 1px solid #e0e0e0; padding: 6px 10px; text-align: left; vertical-align: middle;">After startup or mode switching, the current mode status will be shown.</td>
      <td style="border: 1px solid #e0e0e0; padding: 6px 10px; text-align: left; vertical-align: middle;">/</td>
    </tr>
    <tr>
      <td style="border: 1px solid #e0e0e0; padding: 6px 10px; text-align: center; vertical-align: middle;">High-Level Developer Mode</td>
      <td style="border: 1px solid #e0e0e0; padding: 6px 10px; text-align: center; vertical-align: middle; background-color: #d8ebf2; color: #2a6b80;">Steady cyan</td>
      <td style="border: 1px solid #e0e0e0; padding: 6px 10px; text-align: left; vertical-align: middle;">After startup or mode switching, the current mode status will be shown.</td>
      <td style="border: 1px solid #e0e0e0; padding: 6px 10px; text-align: left; vertical-align: middle;">/</td>
    </tr>
    <tr>
      <td style="border: 1px solid #e0e0e0; padding: 6px 10px; text-align: center; vertical-align: middle;">Low-Level Developer Mode</td>
      <td style="border: 1px solid #e0e0e0; padding: 6px 10px; text-align: center; vertical-align: middle; background-color: #dff0d8; color: #3c763d;">Steady green</td>
      <td style="border: 1px solid #e0e0e0; padding: 6px 10px; text-align: left; vertical-align: middle;">After startup or mode switching, the current mode status will be shown.</td>
      <td style="border: 1px solid #e0e0e0; padding: 6px 10px; text-align: left; vertical-align: middle;">/</td>
    </tr>
    <tr>
      <td style="border: 1px solid #e0e0e0; padding: 6px 10px; text-align: center; vertical-align: middle;">Stair Mode (only for wheeled)</td>
      <td style="border: 1px solid #e0e0e0; padding: 6px 10px; text-align: center; vertical-align: middle; background-color: #ece4f5; color: #6b4d8a;">Purple dynamic</td>
      <td style="border: 1px solid #e0e0e0; padding: 6px 10px; text-align: left; vertical-align: middle;">Robot is in stair mode</td>
      <td style="border: 1px solid #e0e0e0; padding: 6px 10px; text-align: left; vertical-align: middle;">2</td>
    </tr>
    <tr>
      <td style="border: 1px solid #e0e0e0; padding: 6px 10px; text-align: center; vertical-align: middle;">Fall (for Sole/wheeled)</td>
      <td style="border: 1px solid #e0e0e0; padding: 6px 10px; text-align: center; vertical-align: middle; background-color: #fff8d6; color: #8a6d3b;">Steady yellow</td>
      <td style="border: 1px solid #e0e0e0; padding: 6px 10px; text-align: left; vertical-align: middle;">Robot fall detected</td>
      <td style="border: 1px solid #e0e0e0; padding: 6px 10px; text-align: left; vertical-align: middle;">/</td>
    </tr>
    <tr>
      <td style="border: 1px solid #e0e0e0; padding: 6px 10px; text-align: center; vertical-align: middle;">Off-Ground Detection (for Sole/wheeled)</td>
      <td style="border: 1px solid #e0e0e0; padding: 6px 10px; text-align: center; vertical-align: middle; background-color: #fff8d6; color: #8a6d3b;">Yellow breathing</td>
      <td style="border: 1px solid #e0e0e0; padding: 6px 10px; text-align: left; vertical-align: middle;">Robot is in off-ground detection state</td>
      <td style="border: 1px solid #e0e0e0; padding: 6px 10px; text-align: left; vertical-align: middle;">2</td>
    </tr>
    <tr>
      <td colspan="4" style="border: 1px solid #e0e0e0; padding: 6px 10px; text-align: center; vertical-align: middle;">Mobile Chassis (mobile dual-arm version only)</td>
    </tr>
    <tr>
      <td style="border: 1px solid #e0e0e0; padding: 6px 10px; text-align: center; vertical-align: middle;">Error</td>
      <td style="border: 1px solid #e0e0e0; padding: 6px 10px; text-align: center; vertical-align: middle; background-color: #fbe1e1; color: #c0392b;">Red steady</td>
      <td style="border: 1px solid #e0e0e0; padding: 6px 10px; text-align: left; vertical-align: middle;">Error occurred</td>
      <td style="border: 1px solid #e0e0e0; padding: 6px 10px; text-align: left; vertical-align: middle;">/</td>
    </tr>
    <tr>
      <td style="border: 1px solid #e0e0e0; padding: 6px 10px; text-align: center; vertical-align: middle;">Low Battery Warning</td>
      <td style="border: 1px solid #e0e0e0; padding: 6px 10px; text-align: center; vertical-align: middle; background-color: #fbe1e1; color: #c0392b;">Red flashing</td>
      <td style="border: 1px solid #e0e0e0; padding: 6px 10px; text-align: left; vertical-align: middle;">Battery level below 15% warning</td>
      <td style="border: 1px solid #e0e0e0; padding: 6px 10px; text-align: left; vertical-align: middle;">1</td>
    </tr>
    <tr>
      <td style="border: 1px solid #e0e0e0; padding: 6px 10px; text-align: center; vertical-align: middle;">Charging</td>
      <td style="border: 1px solid #e0e0e0; padding: 6px 10px; text-align: center; vertical-align: middle; background-color: #dff0d8; color: #3c763d;">Green slow flashing</td>
      <td style="border: 1px solid #e0e0e0; padding: 6px 10px; text-align: left; vertical-align: middle;">Charging current greater than 1 A</td>
      <td style="border: 1px solid #e0e0e0; padding: 6px 10px; text-align: left; vertical-align: middle;">2</td>
    </tr>
    <tr>
      <td style="border: 1px solid #e0e0e0; padding: 6px 10px; text-align: center; vertical-align: middle;">Parking</td>
      <td style="border: 1px solid #e0e0e0; padding: 6px 10px; text-align: center; vertical-align: middle; background-color: #fff8d6; color: #8a6d3b;">Yellow steady</td>
      <td style="border: 1px solid #e0e0e0; padding: 6px 10px; text-align: left; vertical-align: middle;">Four wheels locked in an X configuration</td>
      <td style="border: 1px solid #e0e0e0; padding: 6px 10px; text-align: left; vertical-align: middle;">/</td>
    </tr>
    <tr>
      <td style="border: 1px solid #e0e0e0; padding: 6px 10px; text-align: center; vertical-align: middle;">Normal Motion Mode</td>
      <td style="border: 1px solid #e0e0e0; padding: 6px 10px; text-align: center; vertical-align: middle; background-color: #dde8f5; color: #2c5d8f;">Blue steady</td>
      <td style="border: 1px solid #e0e0e0; padding: 6px 10px; text-align: left; vertical-align: middle;">Standby state or straight-line motion</td>
      <td style="border: 1px solid #e0e0e0; padding: 6px 10px; text-align: left; vertical-align: middle;">/</td>
    </tr>
  </tbody>
</table>

## 3.6 Robot Configuration Switching

- The robot automatically recognizes each configuration. No manual setup is required.
- **① Hip/shoulder interface:** The leg and arm configurations share the same first three joints. Replace a whole arm or leg at this interface. One person can do this with the supplied toolkit.
- **② Knee interface:** Swap the lower leg to switch quickly between the Sole and Wheeled-legs configurations. The mounting structure has a poka-yoke design that prevents the foot from being installed front-to-back or the wheel from being installed inside-out.

<img src="https://oss.limxdynamics.com/uploads/material/%E9%BB%98%E8%AE%A4/TRON%202/pic/robot_morphology_switching.png" style="width: 100%; max-width: 700px;">

<div style="margin: 16px 0; padding: 14px 18px; background-color: #fff4e5; border-left: 4px solid #d97706; border-radius: 6px; color: #78350f; line-height: 1.7; overflow-wrap: anywhere;">
	<span aria-hidden="true">⚠️</span> <strong>NOTICE: Interface ① (Hip/Shoulder)</strong>
	<ul style="margin: 8px 0 0; padding-left: 22px;">
		<li>Power off the robot before removing or installing an arm or leg. Use the 3.0 mm L-shaped hex key from the supplied toolkit. Fully seat the connector before tightening the M4 screws one by one.</li>
		<li>Replace a screw after it has been removed and installed 3 times. Loose screws can cause the robot to drift while walking or lose communication.</li>
		<li>If you buy replacement screws, use M4×8 socket head cap screws.</li>
	</ul>
</div>

## 4 Remote Controller Instructions

## 4.1 Remote Controller Power On/Off

- Turn on the remote controller: Press and hold the Power button for more than 2 s. When you hear a beep, the remote controller has turned on successfully and enters the default interface.
- Turn off the remote controller: Press and hold the Power button for more than 2 s. When you hear a beep, the remote controller turns off and the display goes dark.


## 4.2 Screen Information

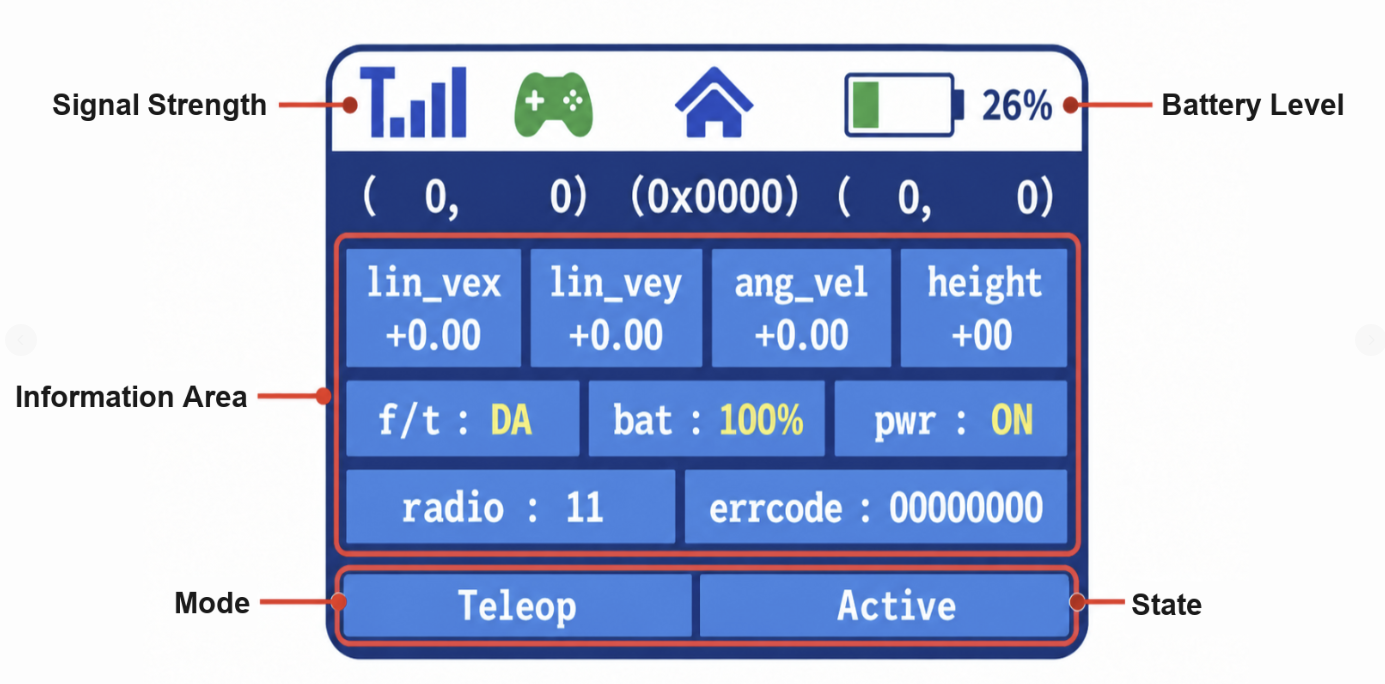
<img src="https://oss.limxdynamics.com/uploads/material/%E9%BB%98%E8%AE%A4/TRON%202/pic/remote_screen_info1010_en.png" alt="remote_screen_info1010_en.png" style="width: 100%; max-width: 600px;" />

### 4.2.1 Screen Layout

| Screen Area | Description |
| ----------- | ----------- |
| Signal Strength | No signal icon appears until the remote controller connects to the robot. Once connected, blue signal bars appear. More bars indicate a stronger signal. |
| Battery Level (top right) | Shows the battery level of the remote controller. This is not the robot battery level. |
| Information Area | Shows feedback from the robot, including motion values, body height, battery level, power status, and error codes. `bat` is the robot battery level, `pwr` is the robot power status, and `errcode` is the current error code. Field names appear exactly as shown on the screen. |
| Mode (bottom left) | Shows the current mode. In the example, `Teleop` indicates VR Teleoperation Mode. |
| State (bottom right) | Shows the current state within that mode. In the example, `Active` indicates that the robot is ready to be controlled with the VR device. |

### 4.2.2 Remote Controller Modes and States
<table style="width: 100%;">
	<thead>
		<tr><th style="width: 16%; white-space: nowrap;">Screen Mode</th><th style="width: 32%;">Mode Description</th><th style="width: 16%; white-space: nowrap;">Screen State</th><th style="width: 36%;">State Description</th></tr>
	</thead>
	<tbody>
		<tr>
			<td rowspan="3">Motion</td>
			<td rowspan="3">Show Mode (demo and teaching)</td>
			<td>Show</td>
			<td>Demo motion state. To prevent accidental activation, enter it only from the <code>Idle</code> state of <code>Motion</code> mode by pressing <code>L1+△</code>. It cannot be entered with <code>R1+Right</code> or <code>R1+Left</code>.</td>
		</tr>
		<tr>
			<td>Hand Guide</td>
			<td>Drag-to-record (hand-guiding) state. Enter it only from the <code>Idle</code> state of <code>Motion</code> mode by pressing <code>L1+○</code>. In this state, you can move the robotic arms by hand to record and replay motion trajectories:<br/>• Record (Rec): Press <code>R1+X</code> to start recording, move the arms by hand to demonstrate the motion, then press <code>R1+X</code> again to stop recording.<br/>• Replay: Press <code>R1+□</code> to replay the most recently recorded motion.</td>
		</tr>
		<tr><td>Idle</td><td>Idle state.</td></tr>
		<tr>
			<td rowspan="6">Drive</td>
			<td rowspan="6">Remote-Control Mode (Sole/Wheeled Configuration)</td>
			<td>Prepare</td>
			<td>The robot is in the ready posture.</td>
		</tr>
		<tr><td>Walk</td><td>The robot is standing or walking.</td></tr>
		<tr><td>Docking</td><td>The robot has started auto-recharge and is moving onto the charging dock.</td></tr>
		<tr><td>Charging</td><td>The robot is seated on the charging dock and is charging or fully charged.</td></tr>
		<tr><td>Undocking</td><td>The robot is leaving the charging dock.</td></tr>
		<tr><td>Idle</td><td>Idle state.</td></tr>
		<tr>
			<td rowspan="2">Teleop</td>
			<td rowspan="2">VR Teleoperation Mode (Dual-Arms Configuration)</td>
			<td>Active</td>
			<td>Teleoperation is active. Control the robot directly with the VR device.</td>
		</tr>
		<tr><td>Idle</td><td>Idle state.</td></tr>
		<tr>
			<td rowspan="2">High-Level Dev</td>
			<td rowspan="2">High-Level Development Mode</td>
			<td>Active</td>
			<td>Running.</td>
		</tr>
		<tr><td>Idle</td><td>Idle state.</td></tr>
		<tr>
			<td rowspan="2">Low-Level Dev</td>
			<td rowspan="2">Low-Level Development Mode</td>
			<td>Active</td>
			<td>Running.</td>
		</tr>
		<tr><td>Idle</td><td>Idle state.</td></tr>
	</tbody>
</table>

<div style="margin: 16px 0; padding: 14px 18px; background-color: #fff4e5; border-left: 4px solid #d97706; border-radius: 6px; color: #78350f; line-height: 1.7; overflow-wrap: anywhere;">
	<span aria-hidden="true">&#9888;</span> <strong>CAUTION</strong><br>
	Before entering the <code>Show</code> state in <code>Motion</code> mode, clear all objects within at least 1 m of the robot. The demo motions can strike nearby objects.
</div>

## 4.3 Remote Controller Buttons
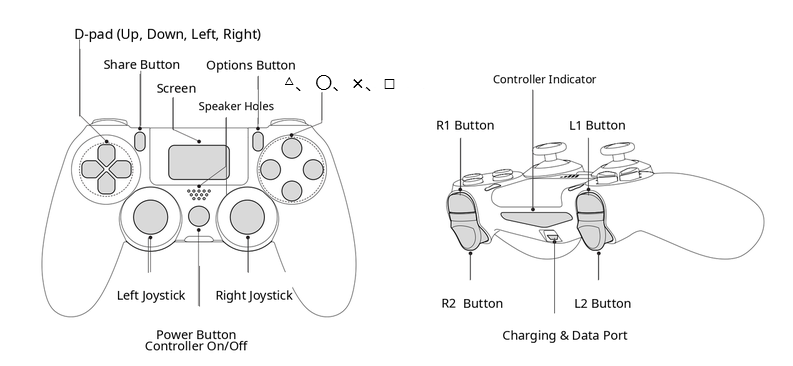
<img src="https://oss.limxdynamics.com/uploads/material/%E9%BB%98%E8%AE%A4/TRON%202/pic/remote_keys_en.png" style="width: 100%; max-width: 900px; ">

<div style="margin: 16px 0; padding: 14px 18px; background-color: #eff6ff; border-left: 4px solid #2563eb; border-radius: 6px; color: #1e3a8a; line-height: 1.7; overflow-wrap: anywhere;">
	<span aria-hidden="true">&#8644;</span> <strong>How to Switch Modes</strong>
	<ul style="margin: 8px 0 0; padding-left: 22px;">
		<li>Press <code>L1+□</code> to enter the idle state of the current mode. Before you press it, make sure the robot is properly supported.</li>
		<li>Check that the current state at the bottom right of the screen shows <code>Idle</code>.</li>
		<li>Press <code>R1+Right</code> to cycle forward through the modes, or <code>R1+Left</code> to cycle backward. Each press switches to the next mode.</li>
		<li>Check the mode name at the bottom left of the screen to confirm that the robot is in the required mode.</li>
		<li>You can switch modes only in the idle state. If the current state is not <code>Idle</code>, <code>R1+Right</code> and <code>R1+Left</code> do not switch modes. To enter a state within a mode, use the command for that state.</li>
		<li>In the dual-arms configuration, the forward order of the modes is: <code>Motion</code> → <code>Teleop</code> → <code>High-Level Dev</code> → <code>Low-Level Dev</code>.</li>
	</ul>
</div>


<div style="margin: 16px 0; padding: 14px 18px; background-color: #f5f3ff; border-left: 4px solid #7c3aed; border-radius: 6px; color: #4c1d95; line-height: 1.7; overflow-wrap: anywhere;">
	<span aria-hidden="true">&#128161;</span> <strong>Tip</strong><br>
	If the screen already shows <code>Idle</code> but the mode does not change, press <code>L1+□</code> once more, then press <code>R1+Right</code> or <code>R1+Left</code>.
</div>


## 4.4 Dual-Arms/Mobile Dual-Arms Robot Remote-Control Commands

<table style="border-collapse: collapse; width: 100%;">
  <tbody>
    <tr style="background-color: #f5f5f5;">
      <td style="border: 1px solid #e0e0e0; padding: 6px 10px; text-align: center; vertical-align: middle;"><strong>Concept</strong></td>
      <td style="border: 1px solid #e0e0e0; padding: 6px 10px; text-align: center; vertical-align: middle;"><strong>Command Description</strong></td>
      <td style="border: 1px solid #e0e0e0; padding: 6px 10px; text-align: center; vertical-align: middle;"><strong>Prerequisite</strong></td>
      <td style="border: 1px solid #e0e0e0; padding: 6px 10px; text-align: center; vertical-align: middle;"><strong>Button</strong></td>
      <td style="border: 1px solid #e0e0e0; padding: 6px 10px; text-align: center; vertical-align: middle;"><strong>Notes</strong></td>
    </tr>
    <tr>
      <td style="border: 1px solid #e0e0e0; padding: 6px 10px; text-align: center; vertical-align: middle;">Mode Switching</td>
      <td style="border: 1px solid #e0e0e0; padding: 6px 10px; text-align: left; vertical-align: middle;"Cycles through the dual-arm modes.<br>Forward order: Show Mode → VR Teleoperation Mode →<br>High-Level Development Mode → Low-Level Development Mode</td>
      <td style="border: 1px solid #e0e0e0; padding: 6px 10px; text-align: left; vertical-align: middle;">Idle state</td>
      <td style="border: 1px solid #e0e0e0; padding: 6px 10px; text-align: left; vertical-align: middle;"><code style="background: rgba(22,119,255,0.08); color: #1677ff; padding: 2px 6px; border-radius: 4px; font-family: ui-monospace, SFMono-Regular, Menlo, Consolas, monospace; font-size: 0.9em;">R1 + Right</code>: Cycle forward through the modes<br><code style="background: rgba(22,119,255,0.08); color: #1677ff; padding: 2px 6px; border-radius: 4px; font-family: ui-monospace, SFMono-Regular, Menlo, Consolas, monospace; font-size: 0.9em;">R1 + Left</code>: Cycle backward through the modes</td>
      <td style="border: 1px solid #e0e0e0; padding: 6px 10px; text-align: left; vertical-align: middle;">At startup, the robot returns to<br>the mode it was in before shutdown.<br>In Motion mode, press <code>L1+△</code> in the<br>Idle state to enter the Show state.</td>
    </tr>
    <tr>
      <td style="border: 1px solid #e0e0e0; padding: 6px 10px; text-align: center; vertical-align: middle;">Return Action</td>
      <td style="border: 1px solid #e0e0e0; padding: 6px 10px; text-align: left; vertical-align: middle;">- In dual-arms mode,<br>the homing action consists of the arms swinging outward and then hanging down naturally<br>(if the safety protection function is enabled, this triggers the arm's table-avoidance action).<br>- After completing the homing action, the robot automatically enters the idle state<br>(the joint motors are in torque damping mode).</td>
      <td style="border: 1px solid #e0e0e0; padding: 6px 10px; text-align: left; vertical-align: middle;">Effective only in Remote-Control Mode<br>and High-Level Developer Mode</td>
      <td style="border: 1px solid #e0e0e0; padding: 6px 10px; text-align: left; vertical-align: middle;"><code style="background: rgba(22,119,255,0.08); color: #1677ff; padding: 2px 6px; border-radius: 4px; font-family: ui-monospace, SFMono-Regular, Menlo, Consolas, monospace; font-size: 0.9em;">L1+X</code></td>
      <td style="border: 1px solid #e0e0e0; padding: 6px 10px; text-align: left; vertical-align: middle;"></td>
    </tr>
    <tr>
      <td style="border: 1px solid #e0e0e0; padding: 6px 10px; text-align: center; vertical-align: middle;">Enters the idle state directly</td>
      <td style="border: 1px solid #e0e0e0; padding: 6px 10px; text-align: left; vertical-align: middle;">Does not execute the return action.<br>All joint motors enter torque-damping state<br>and slowly move downward.</td>
      <td style="border: 1px solid #e0e0e0; padding: 6px 10px; text-align: left; vertical-align: middle;">Global</td>
      <td style="border: 1px solid #e0e0e0; padding: 6px 10px; text-align: left; vertical-align: middle;"><code style="background: rgba(22,119,255,0.08); color: #1677ff; padding: 2px 6px; border-radius: 4px; font-family: ui-monospace, SFMono-Regular, Menlo, Consolas, monospace; font-size: 0.9em;">L1+ □</code></td>
      <td style="border: 1px solid #e0e0e0; padding: 6px 10px; text-align: left; vertical-align: middle;"></td>
    </tr>
    <tr>
      <td style="border: 1px solid #e0e0e0; padding: 6px 10px; text-align: center; vertical-align: middle;">Emergency Stop Button</td>
      <td style="border: 1px solid #e0e0e0; padding: 6px 10px; text-align: left; vertical-align: middle;">All motor drives are immediately powered off,<br>but battery power and indicator lights remain on.<br>The whole robot will drop.</td>
      <td style="border: 1px solid #e0e0e0; padding: 6px 10px; text-align: left; vertical-align: middle;">Global</td>
      <td style="border: 1px solid #e0e0e0; padding: 6px 10px; text-align: left; vertical-align: middle;">Press the <code style="background: rgba(22,119,255,0.08); color: #1677ff; padding: 2px 6px; border-radius: 4px; font-family: ui-monospace, SFMono-Regular, Menlo, Consolas, monospace; font-size: 0.9em;">left joystick</code> + <code style="background: rgba(22,119,255,0.08); color: #1677ff; padding: 2px 6px; border-radius: 4px; font-family: ui-monospace, SFMono-Regular, Menlo, Consolas, monospace; font-size: 0.9em;">right joystick</code></td>
      <td style="border: 1px solid #e0e0e0; padding: 6px 10px; text-align: left; vertical-align: middle;">Triggering emergency stop in any mode<br>or state immediately cuts power to all motors</td>
    </tr>
    <tr>
      <td style="border: 1px solid #e0e0e0; padding: 6px 10px; text-align: center; vertical-align: middle;">Emergency Stop Release</td>
      <td style="border: 1px solid #e0e0e0; padding: 6px 10px; text-align: left; vertical-align: middle;">Motors power on again</td>
      <td style="border: 1px solid #e0e0e0; padding: 6px 10px; text-align: left; vertical-align: middle;">Emergency Stop State</td>
      <td style="border: 1px solid #e0e0e0; padding: 6px 10px; text-align: left; vertical-align: middle;">Press the <code style="background: rgba(22,119,255,0.08); color: #1677ff; padding: 2px 6px; border-radius: 4px; font-family: ui-monospace, SFMono-Regular, Menlo, Consolas, monospace; font-size: 0.9em;">Right joystick button</code></td>
      <td style="border: 1px solid #e0e0e0; padding: 6px 10px; text-align: left; vertical-align: middle;">Single-clicking has no effect in other states.<br>After release, the robot enters damping state.</td>
    </tr>
    <tr>
      <td style="border: 1px solid #e0e0e0; padding: 6px 10px; text-align: center; vertical-align: middle;">Zero Calibration</td>
      <td style="border: 1px solid #e0e0e0; padding: 6px 10px; text-align: left; vertical-align: middle;">Used to recalibrate joint zero positions</td>
      <td style="border: 1px solid #e0e0e0; padding: 6px 10px; text-align: left; vertical-align: middle;">Idle state</td>
      <td style="border: 1px solid #e0e0e0; padding: 6px 10px; text-align: left; vertical-align: middle;"><code style="background: rgba(22,119,255,0.08); color: #1677ff; padding: 2px 6px; border-radius: 4px; font-family: ui-monospace, SFMono-Regular, Menlo, Consolas, monospace; font-size: 0.9em;">L1+R1</code></td>
      <td style="border: 1px solid #e0e0e0; padding: 6px 10px; text-align: left; vertical-align: middle;">Zero calibration is required only after the main controller has been upgraded or after severe impact causes zero-position loss or position drift.</td>
    </tr>
  </tbody>
</table>

## 4.5 Sole/Wheeled Robot Remote-Control Commands

<table style="border-collapse: collapse; width: 100%;">
  <tbody>
    <tr style="background-color: #f5f5f5;">
      <td style="border: 1px solid #e0e0e0; padding: 6px 10px; text-align: center; vertical-align: middle;"><strong>Command</strong></td>
      <td style="border: 1px solid #e0e0e0; padding: 6px 10px; text-align: center; vertical-align: middle;"><strong>Command Description</strong></td>
      <td style="border: 1px solid #e0e0e0; padding: 6px 10px; text-align: center; vertical-align: middle;"><strong>Prerequisite</strong></td>
      <td style="border: 1px solid #e0e0e0; padding: 6px 10px; text-align: center; vertical-align: middle;"><strong>Button</strong></td>
      <td style="border: 1px solid #e0e0e0; padding: 6px 10px; text-align: center; vertical-align: middle;"><strong>Notes</strong></td>
    </tr>
    <tr>
      <td style="border: 1px solid #e0e0e0; padding: 6px 10px; text-align: center; vertical-align: middle;">Mode Switching</td>
      <td style="border: 1px solid #e0e0e0; padding: 6px 10px; text-align: left; vertical-align: middle;">Cycles through the dual-arm modes.<br>Forward order: Show Mode → VR Teleoperation Mode →<br>High-Level Development Mode → Low-Level Development Mode</td>
      <td style="border: 1px solid #e0e0e0; padding: 6px 10px; text-align: left; vertical-align: middle;">Idle state</td>
      <td style="border: 1px solid #e0e0e0; padding: 6px 10px; text-align: left; vertical-align: middle;"><code style="background: rgba(22,119,255,0.08); color: #1677ff; padding: 2px 6px; border-radius: 4px; font-family: ui-monospace, SFMono-Regular, Menlo, Consolas, monospace; font-size: 0.9em;">R1 + Right</code>: Cycle forward through the modes<br><code style="background: rgba(22,119,255,0.08); color: #1677ff; padding: 2px 6px; border-radius: 4px; font-family: ui-monospace, SFMono-Regular, Menlo, Consolas, monospace; font-size: 0.9em;">R1 + Left</code>: Cycle backward through the modes</td>
      <td style="border: 1px solid #e0e0e0; padding: 6px 10px; text-align: left; vertical-align: middle;">After startup, the robot remains in the mode used before shutdown by default</td>
    </tr>
    <tr>
      <td style="border: 1px solid #e0e0e0; padding: 6px 10px; text-align: center; vertical-align: middle;">Enter Prepared State</td>
      <td style="border: 1px solid #e0e0e0; padding: 6px 10px; text-align: left; vertical-align: middle;">Performs ground-contact/head-lift action</td>
      <td style="border: 1px solid #e0e0e0; padding: 6px 10px; text-align: left; vertical-align: middle;">Idle state</td>
      <td style="border: 1px solid #e0e0e0; padding: 6px 10px; text-align: left; vertical-align: middle;"><code style="background: rgba(22,119,255,0.08); color: #1677ff; padding: 2px 6px; border-radius: 4px; font-family: ui-monospace, SFMono-Regular, Menlo, Consolas, monospace; font-size: 0.9em;">L1+ ○</code></td>
      <td style="border: 1px solid #e0e0e0; padding: 6px 10px; text-align: left; vertical-align: middle;"></td>
    </tr>
    <tr>
      <td style="border: 1px solid #e0e0e0; padding: 6px 10px; text-align: center; vertical-align: middle;">Enters the idle state directly</td>
      <td style="border: 1px solid #e0e0e0; padding: 6px 10px; text-align: left; vertical-align: middle;">Does not execute the return action.<br>All joint motors enter torque-damping state and slowly move downward.</td>
      <td style="border: 1px solid #e0e0e0; padding: 6px 10px; text-align: left; vertical-align: middle;">Global</td>
      <td style="border: 1px solid #e0e0e0; padding: 6px 10px; text-align: left; vertical-align: middle;"><code style="background: rgba(22,119,255,0.08); color: #1677ff; padding: 2px 6px; border-radius: 4px; font-family: ui-monospace, SFMono-Regular, Menlo, Consolas, monospace; font-size: 0.9em;">L1+ □</code></td>
      <td style="border: 1px solid #e0e0e0; padding: 6px 10px; text-align: left; vertical-align: middle;"></td>
    </tr>
    <tr>
      <td style="border: 1px solid #e0e0e0; padding: 6px 10px; text-align: center; vertical-align: middle;">Stand Up in Place</td>
      <td style="border: 1px solid #e0e0e0; padding: 6px 10px; text-align: left; vertical-align: middle;">The robot stands up from ready state</td>
      <td style="border: 1px solid #e0e0e0; padding: 6px 10px; text-align: left; vertical-align: middle;">Ready state</td>
      <td style="border: 1px solid #e0e0e0; padding: 6px 10px; text-align: left; vertical-align: middle;"><code style="background: rgba(22,119,255,0.08); color: #1677ff; padding: 2px 6px; border-radius: 4px; font-family: ui-monospace, SFMono-Regular, Menlo, Consolas, monospace; font-size: 0.9em;">L1+ △</code></td>
      <td style="border: 1px solid #e0e0e0; padding: 6px 10px; text-align: left; vertical-align: middle;"></td>
    </tr>
    <tr>
      <td style="border: 1px solid #e0e0e0; padding: 6px 10px; text-align: center; vertical-align: middle;">Return Action</td>
      <td style="border: 1px solid #e0e0e0; padding: 6px 10px; text-align: left; vertical-align: middle;">- In the sole/wheeled configuration, the return action is squat-and-fold.<br>- After the return action is complete, the robot automatically enters idle state<br>(joint motors are in torque-damping state).</td>
      <td style="border: 1px solid #e0e0e0; padding: 6px 10px; text-align: left; vertical-align: middle;">Effective only in Remote-Control Mode and High-Level Developer Mode</td>
      <td style="border: 1px solid #e0e0e0; padding: 6px 10px; text-align: left; vertical-align: middle;"><code style="background: rgba(22,119,255,0.08); color: #1677ff; padding: 2px 6px; border-radius: 4px; font-family: ui-monospace, SFMono-Regular, Menlo, Consolas, monospace; font-size: 0.9em;">L1+X</code></td>
      <td style="border: 1px solid #e0e0e0; padding: 6px 10px; text-align: left; vertical-align: middle;"></td>
    </tr>
    <tr>
      <td style="border: 1px solid #e0e0e0; padding: 6px 10px; text-align: center; vertical-align: middle;">Forward/Backward Movement</td>
      <td style="border: 1px solid #e0e0e0; padding: 6px 10px; text-align: left; vertical-align: middle;">The robot moves forward/backward according to remote-control commands</td>
      <td style="border: 1px solid #e0e0e0; padding: 6px 10px; text-align: left; vertical-align: middle;">Standing state</td>
      <td style="border: 1px solid #e0e0e0; padding: 6px 10px; text-align: left; vertical-align: middle;"><code style="background: rgba(22,119,255,0.08); color: #1677ff; padding: 2px 6px; border-radius: 4px; font-family: ui-monospace, SFMono-Regular, Menlo, Consolas, monospace; font-size: 0.9em;">Left joystick up/down</code></td>
      <td style="border: 1px solid #e0e0e0; padding: 6px 10px; text-align: left; vertical-align: middle;"></td>
    </tr>
    <tr>
      <td style="border: 1px solid #e0e0e0; padding: 6px 10px; text-align: center; vertical-align: middle;">Left/Right Movement<br>(sole only)</td>
      <td style="border: 1px solid #e0e0e0; padding: 6px 10px; text-align: left; vertical-align: middle;">The robot moves left/right according to remote-control commands</td>
      <td style="border: 1px solid #e0e0e0; padding: 6px 10px; text-align: left; vertical-align: middle;">Standing state</td>
      <td style="border: 1px solid #e0e0e0; padding: 6px 10px; text-align: left; vertical-align: middle;"><code style="background: rgba(22,119,255,0.08); color: #1677ff; padding: 2px 6px; border-radius: 4px; font-family: ui-monospace, SFMono-Regular, Menlo, Consolas, monospace; font-size: 0.9em;">Left joystick left/right</code></td>
      <td style="border: 1px solid #e0e0e0; padding: 6px 10px; text-align: left; vertical-align: middle;"></td>
    </tr>
    <tr>
      <td style="border: 1px solid #e0e0e0; padding: 6px 10px; text-align: center; vertical-align: middle;">Turn in Place</td>
      <td style="border: 1px solid #e0e0e0; padding: 6px 10px; text-align: left; vertical-align: middle;">The robot rotates clockwise/counterclockwise according to remote-control commands</td>
      <td style="border: 1px solid #e0e0e0; padding: 6px 10px; text-align: left; vertical-align: middle;">Standing state</td>
      <td style="border: 1px solid #e0e0e0; padding: 6px 10px; text-align: left; vertical-align: middle;"><code style="background: rgba(22,119,255,0.08); color: #1677ff; padding: 2px 6px; border-radius: 4px; font-family: ui-monospace, SFMono-Regular, Menlo, Consolas, monospace; font-size: 0.9em;">Right joystick left/right</code></td>
      <td style="border: 1px solid #e0e0e0; padding: 6px 10px; text-align: left; vertical-align: middle;"></td>
    </tr>
    <tr>
      <td style="border: 1px solid #e0e0e0; padding: 6px 10px; text-align: center; vertical-align: middle;">Height Adjustment</td>
      <td style="border: 1px solid #e0e0e0; padding: 6px 10px; text-align: left; vertical-align: middle;">The user can adjust body height within the allowed range using the remote controller</td>
      <td style="border: 1px solid #e0e0e0; padding: 6px 10px; text-align: left; vertical-align: middle;">Standing state</td>
      <td style="border: 1px solid #e0e0e0; padding: 6px 10px; text-align: left; vertical-align: middle;">Hold <code style="background: rgba(22,119,255,0.08); color: #1677ff; padding: 2px 6px; border-radius: 4px; font-family: ui-monospace, SFMono-Regular, Menlo, Consolas, monospace; font-size: 0.9em;">R1 + Up/Down buttons</code>.<br>The robot descends/ascends at constant speed and stops when released.</td>
      <td style="border: 1px solid #e0e0e0; padding: 6px 10px; text-align: left; vertical-align: middle;">After power cycling, the robot returns to the default position and does not remember the previous height setting</td>
    </tr>
    <tr>
      <td style="border: 1px solid #e0e0e0; padding: 6px 10px; text-align: center; vertical-align: middle;">Flat-Ground/Stair Mode Switching<br>(Wheeled-Legs recommended)</td>
      <td style="border: 1px solid #e0e0e0; padding: 6px 10px; text-align: left; vertical-align: middle;">Switches between stair mode and flat-ground mode</td>
      <td style="border: 1px solid #e0e0e0; padding: 6px 10px; text-align: left; vertical-align: middle;">Standing state</td>
      <td style="border: 1px solid #e0e0e0; padding: 6px 10px; text-align: left; vertical-align: middle;">Press the <code style="background: rgba(22,119,255,0.08); color: #1677ff; padding: 2px 6px; border-radius: 4px; font-family: ui-monospace, SFMono-Regular, Menlo, Consolas, monospace; font-size: 0.9em;">Share Button</code> for 2 s</td>
      <td style="border: 1px solid #e0e0e0; padding: 6px 10px; text-align: left; vertical-align: middle;">Wheeled-Legs Configuration is recommended for stairs.<br>Sole Configuration requires specific step height, tread depth, and friction, with a high risk of tipping over. Avoid use unless necessary, and always use fall protection when testing.</td>
    </tr>
    <tr>
      <td style="border: 1px solid #e0e0e0; padding: 6px 10px; text-align: center; vertical-align: middle;">Fall Recovery</td>
      <td style="border: 1px solid #e0e0e0; padding: 6px 10px; text-align: left; vertical-align: middle;">Restores the robot to standing after an accidental fall</td>
      <td style="border: 1px solid #e0e0e0; padding: 6px 10px; text-align: left; vertical-align: middle;">Fall detected</td>
      <td style="border: 1px solid #e0e0e0; padding: 6px 10px; text-align: left; vertical-align: middle;"><code style="background: rgba(22,119,255,0.08); color: #1677ff; padding: 2px 6px; border-radius: 4px; font-family: ui-monospace, SFMono-Regular, Menlo, Consolas, monospace; font-size: 0.9em;">L2+ △</code></td>
      <td style="border: 1px solid #e0e0e0; padding: 6px 10px; text-align: left; vertical-align: middle;">This key combination has no effect when the robot is in normal state</td>
    </tr>
    <tr>
      <td style="border: 1px solid #e0e0e0; padding: 6px 10px; text-align: center; vertical-align: middle;">Emergency Stop Button</td>
      <td style="border: 1px solid #e0e0e0; padding: 6px 10px; text-align: left; vertical-align: middle;">All motor drives are immediately powered off,<br>but battery power and indicator lights remain on.<br>The whole robot will drop.</td>
      <td style="border: 1px solid #e0e0e0; padding: 6px 10px; text-align: left; vertical-align: middle;">Global</td>
      <td style="border: 1px solid #e0e0e0; padding: 6px 10px; text-align: left; vertical-align: middle;">Press the <code style="background: rgba(22,119,255,0.08); color: #1677ff; padding: 2px 6px; border-radius: 4px; font-family: ui-monospace, SFMono-Regular, Menlo, Consolas, monospace; font-size: 0.9em;">left joystick</code> + <code style="background: rgba(22,119,255,0.08); color: #1677ff; padding: 2px 6px; border-radius: 4px; font-family: ui-monospace, SFMono-Regular, Menlo, Consolas, monospace; font-size: 0.9em;">right joystick</code></td>
      <td style="border: 1px solid #e0e0e0; padding: 6px 10px; text-align: left; vertical-align: middle;">Triggering emergency stop in any mode or state immediately cuts power to all motors</td>
    </tr>
    <tr>
      <td style="border: 1px solid #e0e0e0; padding: 6px 10px; text-align: center; vertical-align: middle;">Emergency Stop Release</td>
      <td style="border: 1px solid #e0e0e0; padding: 6px 10px; text-align: left; vertical-align: middle;">Motors power on again</td>
      <td style="border: 1px solid #e0e0e0; padding: 6px 10px; text-align: left; vertical-align: middle;">Emergency Stop State</td>
      <td style="border: 1px solid #e0e0e0; padding: 6px 10px; text-align: left; vertical-align: middle;">Press the <code style="background: rgba(22,119,255,0.08); color: #1677ff; padding: 2px 6px; border-radius: 4px; font-family: ui-monospace, SFMono-Regular, Menlo, Consolas, monospace; font-size: 0.9em;">Right joystick button</code></td>
      <td style="border: 1px solid #e0e0e0; padding: 6px 10px; text-align: left; vertical-align: middle;">Single-clicking has no effect in other states.<br>After release, the robot enters damping state.</td>
    </tr>
    <tr>
      <td style="border: 1px solid #e0e0e0; padding: 6px 10px; text-align: center; vertical-align: middle;">Zero Calibration</td>
      <td style="border: 1px solid #e0e0e0; padding: 6px 10px; text-align: left; vertical-align: middle;">Used to recalibrate joint zero positions</td>
      <td style="border: 1px solid #e0e0e0; padding: 6px 10px; text-align: left; vertical-align: middle;">Idle state</td>
      <td style="border: 1px solid #e0e0e0; padding: 6px 10px; text-align: left; vertical-align: middle;"><code style="background: rgba(22,119,255,0.08); color: #1677ff; padding: 2px 6px; border-radius: 4px; font-family: ui-monospace, SFMono-Regular, Menlo, Consolas, monospace; font-size: 0.9em;">L1+R1</code></td>
      <td style="border: 1px solid #e0e0e0; padding: 6px 10px; text-align: left; vertical-align: middle;">Zero calibration is required only after the main controller has been upgraded or after severe impact causes zero-position loss or position drift.</td>
    </tr>
  </tbody>
</table>


<div style="margin: 16px 0; padding: 14px 18px; background-color: #eef9f0; border-left: 4px solid #36a657; border-radius: 6px; color: #245c35; line-height: 1.7;">
  <strong style="color: #267a43;">🔋 Auto-Recharge</strong><br>
  The TRON 2 Wheeled-Legs Configuration supports auto-recharge. For usage instructions, see the <a href="https://www.limxdynamics.com/en/documents/882997113569546240" style="color: #1677ff; text-decoration: none;">TRON 2 Auto-Recharge Base User Manual</a> in the Documentation Center.
</div>

<div style="margin: 16px 0; padding: 14px 18px; background-color: #fff4e5; border-left: 4px solid #d97706; border-radius: 6px; color: #78350f; line-height: 1.7; overflow-wrap: anywhere;">
	<span aria-hidden="true">⚠️</span> <strong>CAUTION</strong>
	<br>After emergency stop is triggered, power to all motors is immediately cut off (confirm the emergency stop state before startup).
	<ul style="margin: 8px 0 0; padding-left: 22px;">
		<li>Body emergency stop: The robot is in emergency stop state when the emergency stop button is pressed, and not in emergency stop state when it is released. After emergency stop is released, the robot must be powered on again to restore its state.</li>
		<li>Remote controller emergency stop: Pressing the <code>left and right joysticks</code> simultaneously enters emergency stop state. Press the <code>right joystick button</code> to exit emergency stop state, and the robot state will automatically recover after a few seconds.</li>
	</ul>
</div>

## 4.6 Web-Based Robot Control

In addition to the remote controller, you can use **Robot Control** on the robot management page (port 8080) to switch modes, home the arms, enter the idle state, and perform zero calibration. When you use this page together with the VR controllers, the remote controller is not required.

### 4.6.1 Robot Control Page

1. Connect your computer to the robot and make sure it can reach the robot IP address `10.192.1.2`. For connection methods, see [6.1](#61-pc-to-dual-arm--wired) or [6.2](#62-pc-to-dual-arm--wireless).
2. Enter [http://10.192.1.2:8080](http://10.192.1.2:8080) in the browser address bar to open the robot management page.
3. Click **Robot Control** in the left menu. The top of the page shows the connection status, current state, and current mode.

<img src="https://oss.limxdynamics.com/uploads/material/%E9%BB%98%E8%AE%A4/TRON%202/pic/8080_en.png" alt="Robot Control page" title="8080_en.png" loading="lazy" style="width: 100%; max-width: 1200px; height: auto; border: 1px solid #e0e0e0; border-radius: 5px;">

**Page Controls**

<table style="border-collapse: collapse; width: 100%;">
  <thead>
    <tr style="background-color: #f6f1fe;">
      <th style="border: 1px solid #e0e0e0; padding: 6px 10px; text-align: center; vertical-align: middle;"><strong>Page Area</strong></th>
      <th style="border: 1px solid #e0e0e0; padding: 6px 10px; text-align: center; vertical-align: middle;"><strong>Button</strong></th>
      <th style="border: 1px solid #e0e0e0; padding: 6px 10px; text-align: center; vertical-align: middle;"><strong>Function</strong></th>
    </tr>
  </thead>
  <tbody>
    <tr>
      <td style="border: 1px solid #e0e0e0; padding: 6px 10px; text-align: center; vertical-align: middle;">Working Mode</td>
      <td style="border: 1px solid #e0e0e0; padding: 6px 10px; text-align: left; vertical-align: middle;">VR Teleoperation / Developer / Low-level Developer / Demo &amp; Teaching Mode</td>
      <td style="border: 1px solid #e0e0e0; padding: 6px 10px; text-align: left; vertical-align: middle;">Switches directly to the selected mode. Modes can be switched only in the idle state.</td>
    </tr>
    <tr>
      <td rowspan="3" style="border: 1px solid #e0e0e0; padding: 6px 10px; text-align: center; vertical-align: middle;">Basic Control</td>
      <td style="border: 1px solid #e0e0e0; padding: 6px 10px; text-align: left; vertical-align: middle;">Home</td>
      <td style="border: 1px solid #e0e0e0; padding: 6px 10px; text-align: left; vertical-align: middle;">Both arms perform the homing action, hang down naturally, and then enter the idle state.</td>
    </tr>
    <tr>
      <td style="border: 1px solid #e0e0e0; padding: 6px 10px; text-align: left; vertical-align: middle;">Idle Mode</td>
      <td style="border: 1px solid #e0e0e0; padding: 6px 10px; text-align: left; vertical-align: middle;">Enters the idle state directly without the homing action. The joint motors enter the torque-damping state and slowly move downward. Use this if homing fails.</td>
    </tr>
    <tr>
      <td style="border: 1px solid #e0e0e0; padding: 6px 10px; text-align: left; vertical-align: middle;">Zero Calibration</td>
      <td style="border: 1px solid #e0e0e0; padding: 6px 10px; text-align: left; vertical-align: middle;">Recalibrates the joint zero positions.</td>
    </tr>
    <tr>
      <td style="border: 1px solid #e0e0e0; padding: 6px 10px; text-align: center; vertical-align: middle;">Top-right corner of the page</td>
      <td style="border: 1px solid #e0e0e0; padding: 6px 10px; text-align: left; vertical-align: middle;">Emergency Stop</td>
      <td style="border: 1px solid #e0e0e0; padding: 6px 10px; text-align: left; vertical-align: middle;">Immediately cuts power to all motors.</td>
    </tr>
  </tbody>
</table>

### 4.6.2 Switching Modes from the Web Page

1. Check the current state and mode at the top of the page. If the robot is already in the required mode, you do not need to switch.
2. If the robot is not in the idle state, click **Home** or **Idle Mode** under **Basic Control** first. Before clicking, make sure the robot is safely supported and keep clear of the arms.

   <video src="https://oss.limxdynamics.com/uploads/material/%E9%BB%98%E8%AE%A4/TRON%202/pic/8080_en.mp4" autoplay loop muted playsinline controls style="width: 100%; max-width: 1200px; border-radius: 6px; border:1px solid #ccc; image-rendering: -webkit-optimize-contrast;"></video>

3. After the current state shows the idle state (`ST_IDLE`), click the required mode under **Working Mode**.
4. Confirm that the current mode at the top of the page and the robot status indicator have changed to the required mode.

### 4.6.3 Demo and Teaching

In Demo &amp; Teaching Mode, you can use the web page to run the preset motion demo, or move the robotic arms by hand to record a trajectory and play it back.

<div style="margin: 16px 0; padding: 14px 18px; background-color: #fff4e5; border-left: 4px solid #d97706; border-radius: 6px; color: #78350f; line-height: 1.7; overflow-wrap: anywhere;">
	<span aria-hidden="true">&#9888;</span> <strong>CAUTION</strong><br>
	Before you run a demo or play back a trajectory, clear all objects within at least 1 m of the robot. The robot can strike nearby objects while it moves. To stop the motion, click <strong>Home</strong> under <strong>Basic Control</strong>. In an emergency, click <strong>Emergency Stop</strong> in the top-right corner of the page.
</div>

Before you start, switch the robot to Demo &amp; Teaching Mode as described in [4.6.2](#462-switching-modes-from-the-web-page).

- **Motion Demo**

Click **Motion Demo** in the lower-right area of the page. The robot performs the preset demo motions.

<img src="https://oss.limxdynamics.com/uploads/material/%E9%BB%98%E8%AE%A4/TRON%202/pic/8080_show_en.png" alt="Motion Demo" title="8080_show_en.png" loading="lazy" style="width: 100%; max-width: 1200px; height: auto; border: 1px solid #e0e0e0; border-radius: 5px;">


- **Drag Teaching**

Click **Drag Teaching** to enter the drag teaching state. The page appears as shown below: the **Saved trajectories** list is on the left, and the control panel is on the right.
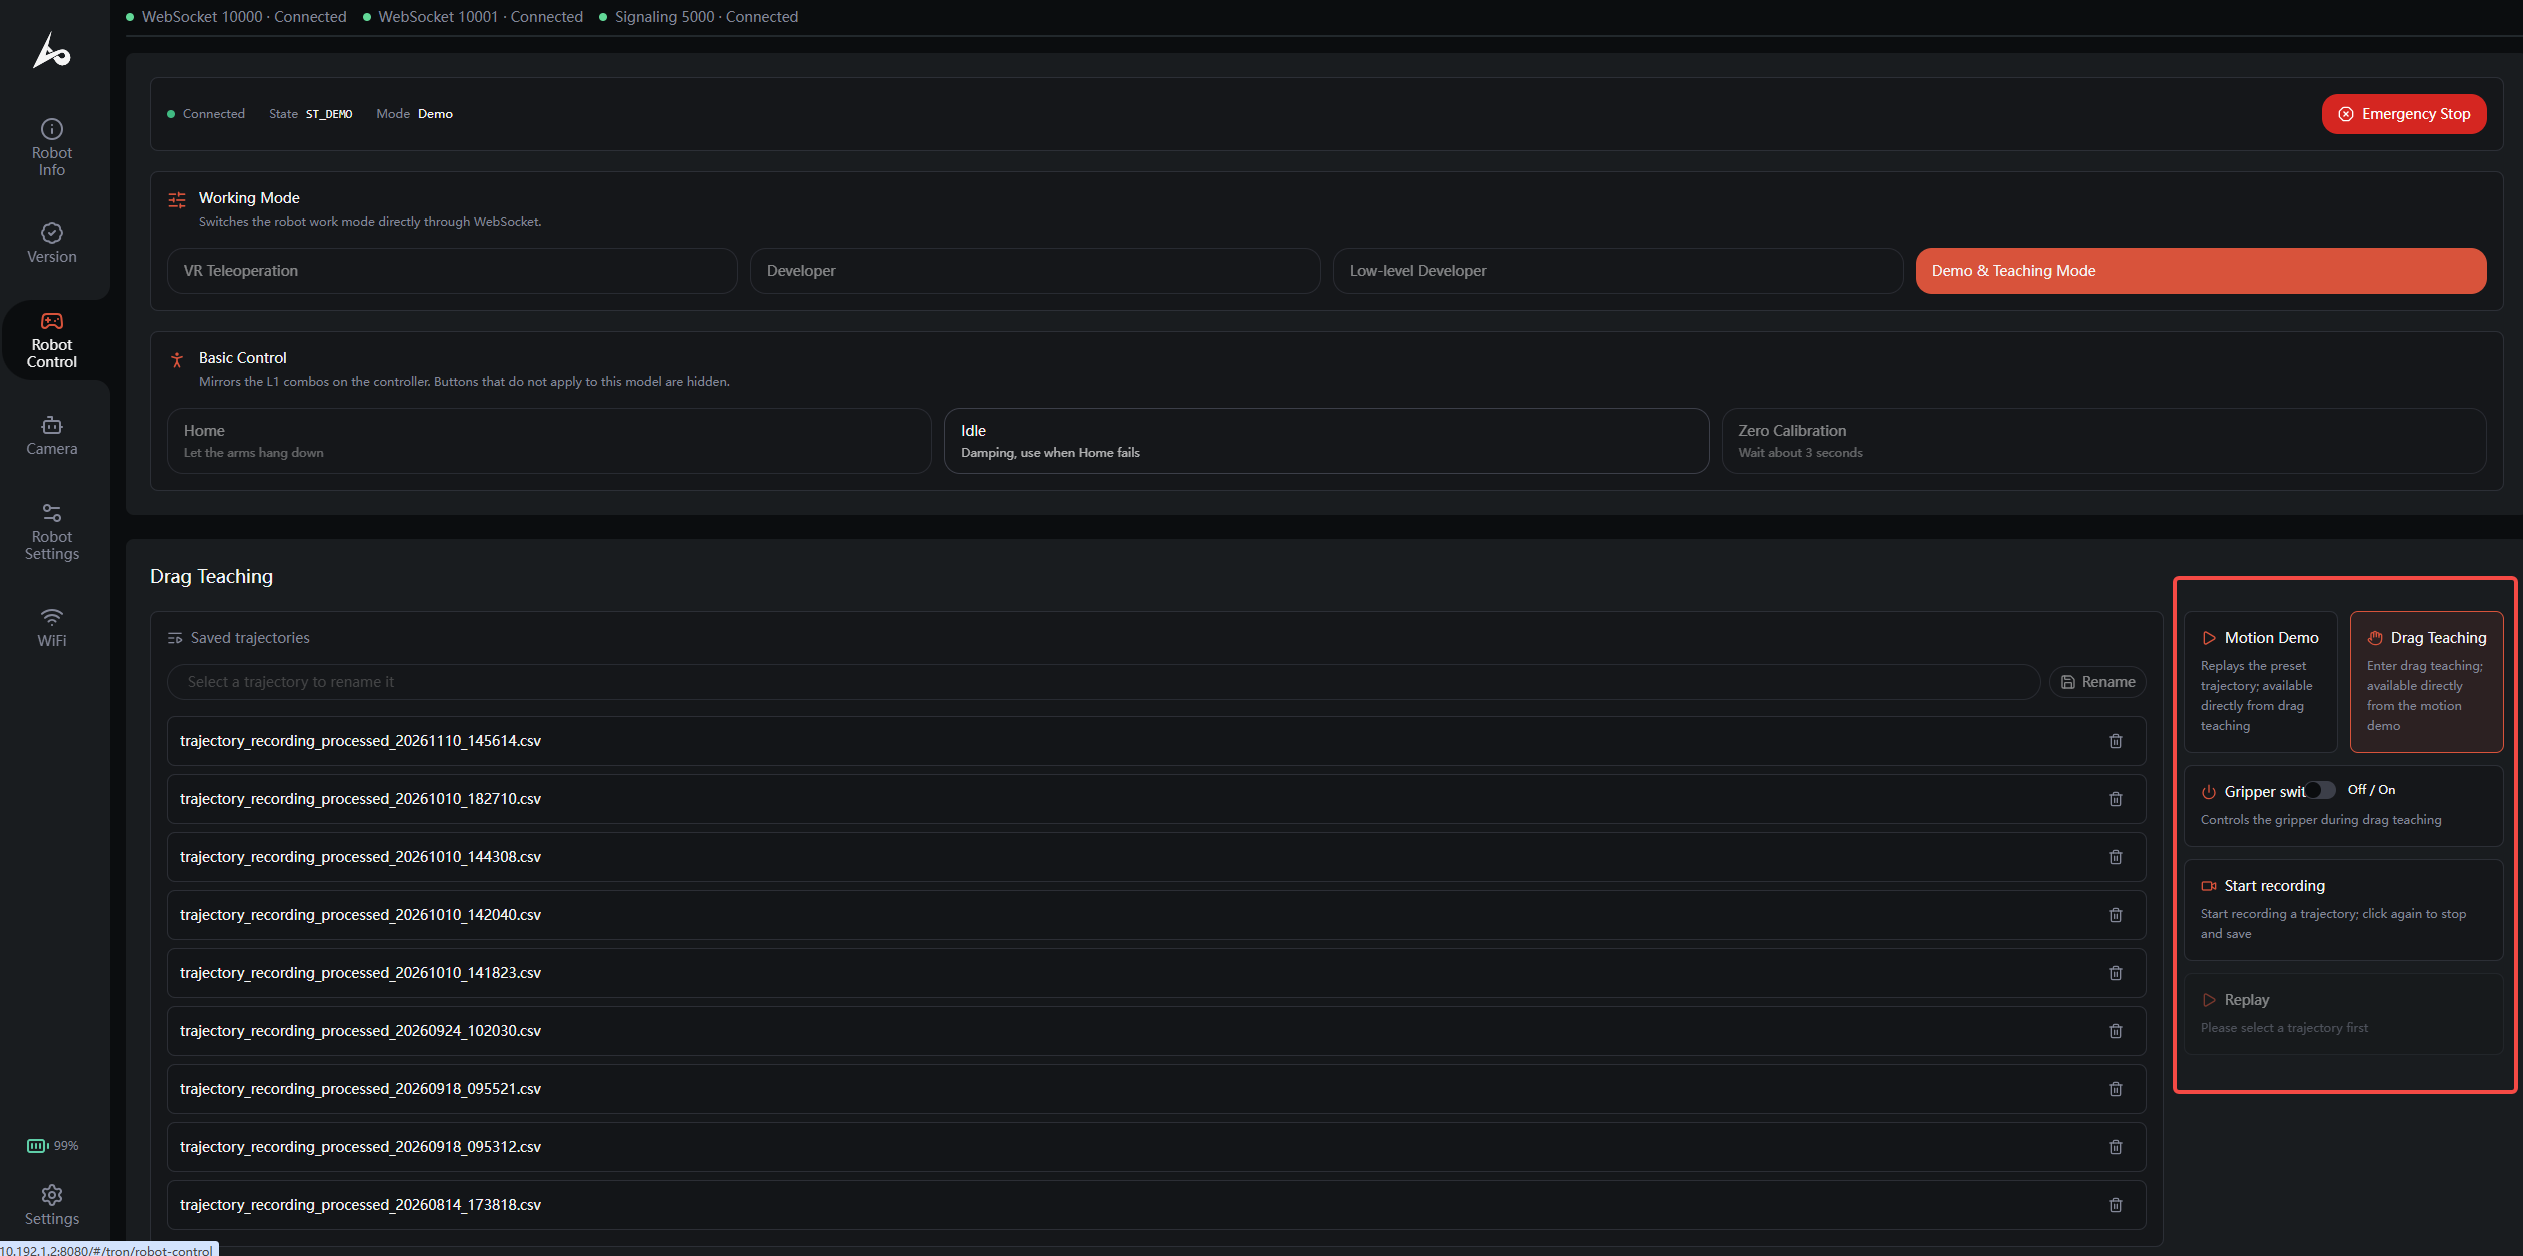
<img src="https://oss.limxdynamics.com/uploads/material/%E9%BB%98%E8%AE%A4/TRON%202/pic/8080_hand_guide_en.png" alt="Drag Teaching" title="8080_hand_guide_en.png" loading="lazy" style="width: 100%; max-width: 1200px; height: auto; border: 1px solid #e0e0e0; border-radius: 5px;">


1. **Record a trajectory:** Click **Start recording**, then move the robotic arms by hand to demonstrate the motion. When you finish, click the button again to stop recording. The trajectory is saved automatically to the list on the left.
2. **Rename a trajectory:** Select the trajectory in the list, enter a new name in the box above the list, and click **Rename**.
3. **Play back a trajectory:** Select the trajectory in the list and click **Replay**. The robot repeats the recorded trajectory once.
4. **Delete a trajectory:** Click the delete icon to the right of the trajectory.
## 5 VR Device and Dual-Arms Teleoperation Instructions


## 5.1 **VR controller Buttons**
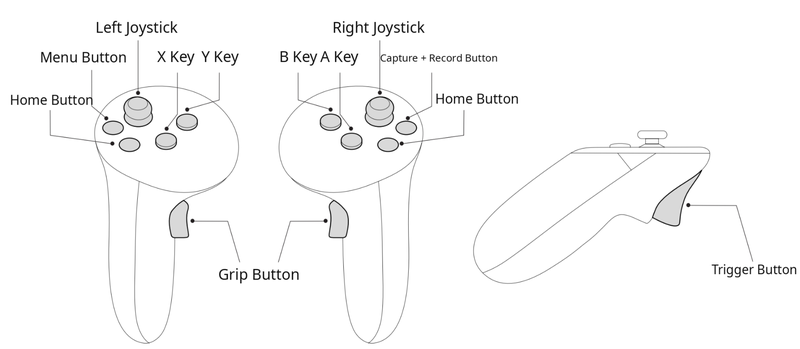
<img src="https://oss.limxdynamics.com/uploads/material/默认/TRON 2/pic/VR_controller_Buttons_info_en.png" alt="" title="power_on_flow.png" loading="lazy" style="width: 100%; max-width: 800px; ">


## 5.2 VR controller Commands

<table style="border-collapse: collapse; width: 100%;">
  <thead>
    <tr style="background-color: #f6f1fe;"> 
      <th scope="col" colspan="4" style="border: 1px solid #e0e0e0; padding: 6px 10px; text-align: center; vertical-align: middle;"><strong>Global Commands</strong></th>
    </tr>
  </thead>
  <tbody>
    <tr>
      <td style="border: 1px solid #e0e0e0; padding: 6px 10px; text-align: center; vertical-align: middle;"><strong>Concept</strong></td>
      <td style="border: 1px solid #e0e0e0; padding: 6px 10px; text-align: center; vertical-align: middle;"><strong>Button</strong></td>
      <td style="border: 1px solid #e0e0e0; padding: 6px 10px; text-align: center; vertical-align: middle;"><strong>Prerequisite</strong></td>
      <td style="border: 1px solid #e0e0e0; padding: 6px 10px; text-align: center; vertical-align: middle;"><strong>State Description</strong></td>
    </tr>
    <tr>
      <td style="border: 1px solid #e0e0e0; padding: 6px 10px; text-align: center; vertical-align: middle;">Start Teleoperation</td>
      <td style="border: 1px solid #e0e0e0; padding: 6px 10px; text-align: left; vertical-align: middle;">Hold the Grip Button on either controller</td>
      <td style="border: 1px solid #e0e0e0; padding: 6px 10px; text-align: left; vertical-align: middle;">VR Teleoperation Mode, or High-Level Development Mode (stationary or during model inference)</td>
      <td style="border: 1px solid #e0e0e0; padding: 6px 10px; text-align: left; vertical-align: middle;">The robot starts responding to the VR controllers. In High-Level Development Mode, holding a Grip Button switches the robot directly to VR Teleoperation Mode.<br>Holding a Grip Button in Show Mode or Low-Level Development Mode does not enter VR Teleoperation Mode.</td>
    </tr>
    <tr>
      <td style="border: 1px solid #e0e0e0; padding: 6px 10px; text-align: center; vertical-align: middle;">End Teleoperation</td>
      <td style="border: 1px solid #e0e0e0; padding: 6px 10px; text-align: left; vertical-align: middle;">Release the Grip Buttons on both controllers</td>
      <td style="border: 1px solid #e0e0e0; padding: 6px 10px; text-align: left; vertical-align: middle;">VR Teleoperation Mode</td>
      <td style="border: 1px solid #e0e0e0; padding: 6px 10px; text-align: left; vertical-align: middle;">Exits VR Teleoperation Mode and returns to the mode used before teleoperation.</td>
    </tr>
    <tr>
      <td style="border: 1px solid #e0e0e0; padding: 6px 10px; text-align: center; vertical-align: middle;">Start Data Collection</td>
      <td style="border: 1px solid #e0e0e0; padding: 6px 10px; text-align: left; vertical-align: middle;">B button on the right controller</td>
      <td style="border: 1px solid #e0e0e0; padding: 6px 10px; text-align: left; vertical-align: middle;">VR Teleoperation Mode or during model inference</td>
      <td style="border: 1px solid #e0e0e0; padding: 6px 10px; text-align: left; vertical-align: middle;">Starts collecting teleoperation data.<br>The Grip Button does not need to be held.</td>
    </tr>
    <tr>
      <td style="border: 1px solid #e0e0e0; padding: 6px 10px; text-align: center; vertical-align: middle;">Stop Data Collection</td>
      <td style="border: 1px solid #e0e0e0; padding: 6px 10px; text-align: left; vertical-align: middle;">Y button on the left controller</td>
      <td style="border: 1px solid #e0e0e0; padding: 6px 10px; text-align: left; vertical-align: middle;">Any mode</td>
      <td style="border: 1px solid #e0e0e0; padding: 6px 10px; text-align: left; vertical-align: middle;">Stops collecting teleoperation data.<br>The Grip Button does not need to be held.</td>
    </tr>
    <tr>
      <td style="border: 1px solid #e0e0e0; padding: 6px 10px; text-align: center; vertical-align: middle;">Cancel Data Collection</td>
      <td style="border: 1px solid #e0e0e0; padding: 6px 10px; text-align: left; vertical-align: middle;">Press the B button on the right controller again</td>
      <td style="border: 1px solid #e0e0e0; padding: 6px 10px; text-align: left; vertical-align: middle;">Data collection in progress</td>
      <td style="border: 1px solid #e0e0e0; padding: 6px 10px; text-align: left; vertical-align: middle;">Cancels the current data collection and deletes the data package just recorded.<br>The Grip Button does not need to be held.</td>
    </tr>
    <tr>
      <td style="border: 1px solid #e0e0e0; padding: 6px 10px; text-align: center; vertical-align: middle;">Emergency Stop</td>
      <td style="border: 1px solid #e0e0e0; padding: 6px 10px; text-align: left; vertical-align: middle;">Press the left and right joystick buttons simultaneously</td>
      <td style="border: 1px solid #e0e0e0; padding: 6px 10px; text-align: left; vertical-align: middle;">Any mode</td>
      <td style="border: 1px solid #e0e0e0; padding: 6px 10px; text-align: left; vertical-align: middle;">Power to all motor drivers is cut immediately; battery power and indicator lights remain on.<br>On robots with a Mobile Base, the Mobile Base also stops immediately.</td>
    </tr>
    <tr>
      <td style="border: 1px solid #e0e0e0; padding: 6px 10px; text-align: center; vertical-align: middle;">Emergency Stop Release</td>
      <td style="border: 1px solid #e0e0e0; padding: 6px 10px; text-align: left; vertical-align: middle;">Click the right joystick button</td>
      <td style="border: 1px solid #e0e0e0; padding: 6px 10px; text-align: left; vertical-align: middle;">Emergency Stop State</td>
      <td style="border: 1px solid #e0e0e0; padding: 6px 10px; text-align: left; vertical-align: middle;">The motors are powered on again, and the robot enters the damping state.<br>Clicking has no effect in other states.</td>
    </tr>
    <tr style="background-color: #f6f1fe;">
      <td colspan="4" style="border: 1px solid #e0e0e0; padding: 6px 10px; text-align: center; vertical-align: middle;"><strong>Head</strong></td>
    </tr>
    <tr>
      <td style="border: 1px solid #e0e0e0; padding: 6px 10px; text-align: center; vertical-align: middle;"><strong>Concept</strong></td>
      <td style="border: 1px solid #e0e0e0; padding: 6px 10px; text-align: center; vertical-align: middle;"><strong>Button</strong></td>
      <td style="border: 1px solid #e0e0e0; padding: 6px 10px; text-align: center; vertical-align: middle;"><strong>Prerequisite</strong></td>
      <td style="border: 1px solid #e0e0e0; padding: 6px 10px; text-align: center; vertical-align: middle;"><strong>State Description</strong></td>
    </tr>
    <tr>
      <td style="border: 1px solid #e0e0e0; padding: 6px 10px; text-align: center; vertical-align: middle;">Head Down/Up</td>
      <td style="border: 1px solid #e0e0e0; padding: 6px 10px; text-align: left; vertical-align: middle;">Hold the Grip Button on at least one controller</td>
      <td style="border: 1px solid #e0e0e0; padding: 6px 10px; text-align: left; vertical-align: middle;">VR Teleoperation Mode, with Head Follow enabled in the VR app</td>
      <td style="border: 1px solid #e0e0e0; padding: 6px 10px; text-align: left; vertical-align: middle;">When the operator wearing the VR headset looks down/up, the robot head follows.</td>
    </tr>
    <tr>
      <td style="border: 1px solid #e0e0e0; padding: 6px 10px; text-align: center; vertical-align: middle;">Head Turn Left/Right</td>
      <td style="border: 1px solid #e0e0e0; padding: 6px 10px; text-align: left; vertical-align: middle;">Hold the Grip Button on at least one controller</td>
      <td style="border: 1px solid #e0e0e0; padding: 6px 10px; text-align: left; vertical-align: middle;">VR Teleoperation Mode, with Head Follow enabled in the VR app</td>
      <td style="border: 1px solid #e0e0e0; padding: 6px 10px; text-align: left; vertical-align: middle;">When the operator wearing the VR headset turns their head left/right, the robot head turns with it.</td>
    </tr>
    <tr>
      <td style="border: 1px solid #e0e0e0; padding: 6px 10px; text-align: center; vertical-align: middle;">Head Recenter</td>
      <td style="border: 1px solid #e0e0e0; padding: 6px 10px; text-align: left; vertical-align: middle;">Hold the Grip Buttons on both controllers + X button + A button</td>
      <td style="border: 1px solid #e0e0e0; padding: 6px 10px; text-align: left; vertical-align: middle;">VR Teleoperation Mode, with Head Follow enabled in the VR app</td>
      <td style="border: 1px solid #e0e0e0; padding: 6px 10px; text-align: left; vertical-align: middle;">The robot head returns to its initial upright, forward-facing posture.</td>
    </tr>
    <tr style="background-color: #f6f1fe;">
      <td colspan="4" style="border: 1px solid #e0e0e0; padding: 6px 10px; text-align: center; vertical-align: middle;"><strong>Dual-Arms (single-arm robots default to the right arm and use only the right controller)</strong></td>
    </tr>
    <tr>
      <td style="border: 1px solid #e0e0e0; padding: 6px 10px; text-align: center; vertical-align: middle;"><strong>Concept</strong></td>
      <td style="border: 1px solid #e0e0e0; padding: 6px 10px; text-align: center; vertical-align: middle;"><strong>Button</strong></td>
      <td style="border: 1px solid #e0e0e0; padding: 6px 10px; text-align: center; vertical-align: middle;"><strong>Prerequisite</strong></td>
      <td style="border: 1px solid #e0e0e0; padding: 6px 10px; text-align: center; vertical-align: middle;"><strong>State Description</strong></td>
    </tr>
    <tr>
      <td style="border: 1px solid #e0e0e0; padding: 6px 10px; text-align: center; vertical-align: middle;">End-Effector Following</td>
      <td style="border: 1px solid #e0e0e0; padding: 6px 10px; text-align: left; vertical-align: middle;">Hold the Grip Button on the left/right controller</td>
      <td style="border: 1px solid #e0e0e0; padding: 6px 10px; text-align: left; vertical-align: middle;">VR Teleoperation Mode</td>
      <td style="border: 1px solid #e0e0e0; padding: 6px 10px; text-align: left; vertical-align: middle;">Hold the left Grip Button to make the left arm end effector follow the left controller; hold the right Grip Button to make the right arm end effector follow the right controller.<br>Uses incremental displacement control.</td>
    </tr>
    <tr>
      <td style="border: 1px solid #e0e0e0; padding: 6px 10px; text-align: center; vertical-align: middle;">End-Effector Lock</td>
      <td style="border: 1px solid #e0e0e0; padding: 6px 10px; text-align: left; vertical-align: middle;">Release the Grip Button on the left/right controller</td>
      <td style="border: 1px solid #e0e0e0; padding: 6px 10px; text-align: left; vertical-align: middle;">VR Teleoperation Mode</td>
      <td style="border: 1px solid #e0e0e0; padding: 6px 10px; text-align: left; vertical-align: middle;">Releasing a controller's Grip Button pauses the corresponding arm end effector.<br>Typical use: hold one arm still during one-handed operation.</td>
    </tr>
    <tr>
      <td style="border: 1px solid #e0e0e0; padding: 6px 10px; text-align: center; vertical-align: middle;">Gripper Grasping</td>
      <td style="border: 1px solid #e0e0e0; padding: 6px 10px; text-align: left; vertical-align: middle;">Hold the Grip Button + pull the Trigger Button on the same side</td>
      <td style="border: 1px solid #e0e0e0; padding: 6px 10px; text-align: left; vertical-align: middle;">VR Teleoperation Mode</td>
      <td style="border: 1px solid #e0e0e0; padding: 6px 10px; text-align: left; vertical-align: middle;"><strong>Adjust opening:</strong> Hold the Grip Button, then pull the trigger. The farther you pull it, the more the gripper closes; release the trigger to open the gripper.<br><strong>Hold opening:</strong> While pulling the trigger, release the Grip Button. The gripper keeps its current opening, and the arm on the same side locks in place.</td>
    </tr>
    <tr>
      <td style="border: 1px solid #e0e0e0; padding: 6px 10px; text-align: center; vertical-align: middle;">Left Arm to Initial Pose</td>
      <td style="border: 1px solid #e0e0e0; padding: 6px 10px; text-align: left; vertical-align: middle;">Long-press the left Grip Button + X button</td>
      <td style="border: 1px solid #e0e0e0; padding: 6px 10px; text-align: left; vertical-align: middle;">VR Teleoperation Mode</td>
      <td style="border: 1px solid #e0e0e0; padding: 6px 10px; text-align: left; vertical-align: middle;">Keep holding both buttons until the left arm returns to the initial teleoperation pose (left elbow bent 90°, forearm horizontal).<br>Hold the buttons until the arm reaches the pose. If you release them midway, the arm stops immediately at its current position.<br>During homing, the left arm does not follow the controller.</td>
    </tr>
    <tr>
      <td style="border: 1px solid #e0e0e0; padding: 6px 10px; text-align: center; vertical-align: middle;">Right Arm to Initial Pose</td>
      <td style="border: 1px solid #e0e0e0; padding: 6px 10px; text-align: left; vertical-align: middle;">Long-press the right Grip Button + A button</td>
      <td style="border: 1px solid #e0e0e0; padding: 6px 10px; text-align: left; vertical-align: middle;">VR Teleoperation Mode</td>
      <td style="border: 1px solid #e0e0e0; padding: 6px 10px; text-align: left; vertical-align: middle;">Keep holding both buttons until the right arm returns to the initial teleoperation pose (right elbow bent 90°, forearm horizontal).<br>Hold the buttons until the arm reaches the pose. If you release them midway, the arm stops immediately at its current position.<br>During homing, the right arm does not follow the controller.</td>
    </tr>
    <tr style="background-color: #f6f1fe;">
      <td colspan="4" style="border: 1px solid #e0e0e0; padding: 6px 10px; text-align: center; vertical-align: middle;"><strong>Mobile Base</strong></td>
    </tr>
    <tr>
      <td style="border: 1px solid #e0e0e0; padding: 6px 10px; text-align: center; vertical-align: middle;"><strong>Concept</strong></td>
      <td style="border: 1px solid #e0e0e0; padding: 6px 10px; text-align: center; vertical-align: middle;"><strong>Button</strong></td>
      <td style="border: 1px solid #e0e0e0; padding: 6px 10px; text-align: center; vertical-align: middle;"><strong>Prerequisite</strong></td>
      <td style="border: 1px solid #e0e0e0; padding: 6px 10px; text-align: center; vertical-align: middle;"><strong>State Description</strong></td>
    </tr>
    <tr>
      <td style="border: 1px solid #e0e0e0; padding: 6px 10px; text-align: center; vertical-align: middle;">Forward/Backward Movement</td>
      <td style="border: 1px solid #e0e0e0; padding: 6px 10px; text-align: left; vertical-align: middle;">Hold the left Grip Button + push the left joystick forward/backward</td>
      <td style="border: 1px solid #e0e0e0; padding: 6px 10px; text-align: left; vertical-align: middle;">VR Teleoperation Mode</td>
      <td style="border: 1px solid #e0e0e0; padding: 6px 10px; text-align: left; vertical-align: middle;">The robot moves forward/backward. The farther you push the joystick, the faster it moves.</td>
    </tr>
    <tr>
      <td style="border: 1px solid #e0e0e0; padding: 6px 10px; text-align: center; vertical-align: middle;">Left/Right Translation</td>
      <td style="border: 1px solid #e0e0e0; padding: 6px 10px; text-align: left; vertical-align: middle;">Hold the left Grip Button + push the left joystick left/right</td>
      <td style="border: 1px solid #e0e0e0; padding: 6px 10px; text-align: left; vertical-align: middle;">VR Teleoperation Mode</td>
      <td style="border: 1px solid #e0e0e0; padding: 6px 10px; text-align: left; vertical-align: middle;">The robot moves left/right without changing its heading. The farther you push the joystick, the faster it moves.</td>
    </tr>
    <tr>
      <td style="border: 1px solid #e0e0e0; padding: 6px 10px; text-align: center; vertical-align: middle;">Diagonal Movement</td>
      <td style="border: 1px solid #e0e0e0; padding: 6px 10px; text-align: left; vertical-align: middle;">Hold the left Grip Button + push the left joystick diagonally</td>
      <td style="border: 1px solid #e0e0e0; padding: 6px 10px; text-align: left; vertical-align: middle;">VR Teleoperation Mode</td>
      <td style="border: 1px solid #e0e0e0; padding: 6px 10px; text-align: left; vertical-align: middle;">The robot moves in the joystick direction without changing its heading. The farther you push the joystick, the faster it moves.</td>
    </tr>
    <tr>
      <td style="border: 1px solid #e0e0e0; padding: 6px 10px; text-align: center; vertical-align: middle;">In-Place Rotation</td>
      <td style="border: 1px solid #e0e0e0; padding: 6px 10px; text-align: left; vertical-align: middle;">Hold the right Grip Button + push the right joystick left/right</td>
      <td style="border: 1px solid #e0e0e0; padding: 6px 10px; text-align: left; vertical-align: middle;">VR Teleoperation Mode</td>
      <td style="border: 1px solid #e0e0e0; padding: 6px 10px; text-align: left; vertical-align: middle;">The robot rotates left/right in place. The farther you push the joystick, the faster it rotates.</td>
    </tr>
    <tr>
      <td style="border: 1px solid #e0e0e0; padding: 6px 10px; text-align: center; vertical-align: middle;">Parking State</td>
      <td style="border: 1px solid #e0e0e0; padding: 6px 10px; text-align: left; vertical-align: middle;">Long-press the right joystick button for 1 s</td>
      <td style="border: 1px solid #e0e0e0; padding: 6px 10px; text-align: left; vertical-align: middle;">VR Teleoperation Mode</td>
      <td style="border: 1px solid #e0e0e0; padding: 6px 10px; text-align: left; vertical-align: middle;">Use this when the robot must remain at a fixed position for a long time (for example, when parked or performing fixed-table tasks). The four wheels lock in an X-shaped four-wheel steering configuration.<br>Mobile Dual-Arms robots only.</td>
    </tr>
    <tr style="background-color: #f6f1fe;">
      <td colspan="4" style="border: 1px solid #e0e0e0; padding: 6px 10px; text-align: center; vertical-align: middle;"><strong>Lift Stand</strong></td>
    </tr>
    <tr>
      <td style="border: 1px solid #e0e0e0; padding: 6px 10px; text-align: center; vertical-align: middle;"><strong>Concept</strong></td>
      <td style="border: 1px solid #e0e0e0; padding: 6px 10px; text-align: center; vertical-align: middle;"><strong>Button</strong></td>
      <td style="border: 1px solid #e0e0e0; padding: 6px 10px; text-align: center; vertical-align: middle;"><strong>Prerequisite</strong></td>
      <td style="border: 1px solid #e0e0e0; padding: 6px 10px; text-align: center; vertical-align: middle;"><strong>State Description</strong></td>
    </tr>
    <tr>
      <td style="border: 1px solid #e0e0e0; padding: 6px 10px; text-align: center; vertical-align: middle;">Raise/Lower</td>
      <td style="border: 1px solid #e0e0e0; padding: 6px 10px; text-align: left; vertical-align: middle;">Hold the right Grip Button + push the right joystick forward/backward</td>
      <td style="border: 1px solid #e0e0e0; padding: 6px 10px; text-align: left; vertical-align: middle;">VR Teleoperation Mode</td>
      <td style="border: 1px solid #e0e0e0; padding: 6px 10px; text-align: left; vertical-align: middle;">Raises/lowers the robot torso. The farther you push the joystick, the faster it moves.<br>The travel range is limited by the robot's configured upper and lower limits.</td>
    </tr>
  </tbody>
</table>

<div style="margin: 16px 0; padding: 14px 18px; background-color: #eff6ff; border-left: 4px solid #2563eb; border-radius: 6px; color: #1e3a8a; line-height: 1.7; overflow-wrap: anywhere;">
	<span aria-hidden="true">💡</span> <strong>Tip</strong>
	<ul style="margin: 8px 0 0; padding-left: 22px;">
		<li>VR teleoperation works the same way for local network teleoperation, remote internet teleoperation, and manual takeover during autonomous inference.</li>
		<li>The Grip Button is the master enable for its controller. All VR controls require at least one Grip Button to be held, except the data collection buttons.</li>
		<li>The left and right joysticks and buttons work independently and can be used at the same time. For example, move forward while rotating to turn as you move.</li>
		<li>Arm homing interrupts autonomous inference and switches the robot to VR Teleoperation Mode.</li>
	</ul>
</div>


## 5.3 Teleoperation Preparation

### 5.3.1 Dual-Arms Zero Calibration

<div style="margin: 16px 0; padding: 14px 18px; background-color: #fff4e5; border-left: 4px solid #d97706; border-radius: 6px; color: #78350f; line-height: 1.7; overflow-wrap: anywhere;">
	<span aria-hidden="true">⚠️</span> <strong>NOTICE</strong>
	<ul style="margin: 8px 0 0; padding-left: 22px;">
		<li>Zero calibration is required only after the main controller has been upgraded or after severe impact causes zero-position loss or position drift.</li>
		<li>In the mobile chassis configuration, raise the robot to the highest point before performing zero calibration.</li>
		<li>After zero calibration is complete, wait about 5 seconds while the robot refreshes the new zero-position information before performing other operations.</li>
	</ul>
</div>

1. Press `L1+X` on the remote controller (or click **Home** on the **Robot Control** page of the 8080 web page) to make sure both arms are in the idle state and hanging naturally.
2. Press `L1+R1` on the remote controller (or click **Zero Calibration** on the 8080 web page) to start automatic zero calibration. After calibration ends, both arms should hang naturally.
3. If the indicator turns red during the process, zero calibration has failed. Try calibrating again.

### 5.3.2 Switching the TRON2 Robot to Teleoperation Mode

Use either of the following methods to switch to VR Teleoperation Mode:

- Method 1 – **Remote controller:** Press `L1+□`. After the screen shows `Idle`, press `R1+Right` or `R1+Left` to cycle through the modes until the bottom bar shows `Teleop` and `Active`.
- Method 2 – **8080 web page:** On the **Robot Control** page, click **Idle Mode**. After the current state shows `ST_IDLE`, click **VR Teleoperation** under **Working Mode**. For details, see [4.6](#46-web-based-robot-control).

After switching, start the teleoperation app on the VR device and complete the preparation steps in the following sections.

<div style="margin: 16px 0; padding: 14px 18px; background-color: #f5f3ff; border-left: 4px solid #7c3aed; border-radius: 6px; color: #4c1d95; line-height: 1.7; overflow-wrap: anywhere;">
	<span aria-hidden="true">💡</span> <strong>Tip</strong>
	<br>If you are using the remote controller and the screen shows <code>Idle</code> but the mode does not change, press <code>L1+□</code> once more and try again. Before doing so, make sure the robot is safely supported.
</div>

### 5.3.3 **Starting the Teleoperation App on the VR Device**

<div style="margin: 16px 0; padding: 14px 18px; background-color: #fff4e5; border-left: 4px solid #d97706; border-radius: 6px; color: #78350f; line-height: 1.7; overflow-wrap: anywhere;">
	<span aria-hidden="true">⚠️</span> <strong>NOTICE</strong>
	<br>Do not remove the protective sticker covering the detection sensor before teleoperation use (otherwise the headset may frequently enter sleep mode).
	<br><img src="https://oss.limxdynamics.com/uploads/material/默认/TRON 2/pic/vr_sensor_sticker_en.png" alt="" title="vr_sensor_sticker.png" loading="lazy" style="width: 100%; max-width: 700px; height: 100%; max-height: 500px; border-radius: 5px; border: 1px solid #e0e0e0;">
</div>

- When connecting the VR device to the robot for the first time, **wear the VR Headset** and complete the following settings in the VR interface.
- Tip: Point with the right-hand controller. Short-press the Trigger Button on the right-hand controller to select or confirm.

| Step | Operation | Illustration |
|---|---|---|
| 1. Power on the VR device | Press and hold the Power Button on the right side of the Headset for approximately 3 seconds to power on, then **put on the Headset** to enter the system home screen | <img src="https://oss.limxdynamics.com/uploads/material/默认/TRON 2/pic/k12_vr_power_on.png" style="width: 100%; max-width: 800px;  border-radius: 6px; border:1px solid #ccc;"> |
| 2. Connect to the robot Wi-Fi | In the quick panel / Settings, connect to `TRON2A_XXX_2.4G` or `TRON2A_XXX_5G` with password `12345678` | <video src="https://oss.limxdynamics.com/uploads/material/%E9%BB%98%E8%AE%A4/TRON%202/video/k11_wifi_password.mp4" autoplay loop muted playsinline controls style="width: 100%; max-width: 800px; border-radius: 6px; border:1px solid #ccc; image-rendering: -webkit-optimize-contrast;"></video> |
| 3. Start the teleoperation app | Library > Unknown Sources > `Limx_teleop` | <video src="https://oss.limxdynamics.com/uploads/material/%E9%BB%98%E8%AE%A4/TRON%202/video/k18_open_limx_teleop.mp4" autoplay loop muted playsinline controls style="width: 100%; max-width: 800px; border-radius: 6px; border:1px solid #ccc; image-rendering: -webkit-optimize-contrast;"></video> |
| 4. Configure and connect | Select `Tron2`, enter `10.192.1.2` as the IP, and click **Connect** | <img src="https://oss.limxdynamics.com/uploads/material/%E9%BB%98%E8%AE%A4/TRON%202/pic/Limx_teleop_config_en.png" alt="Limx_teleop_config_en.png" style="width: 600px; height: auto;border-radius: 6px; border:1px solid #ccc;" />|
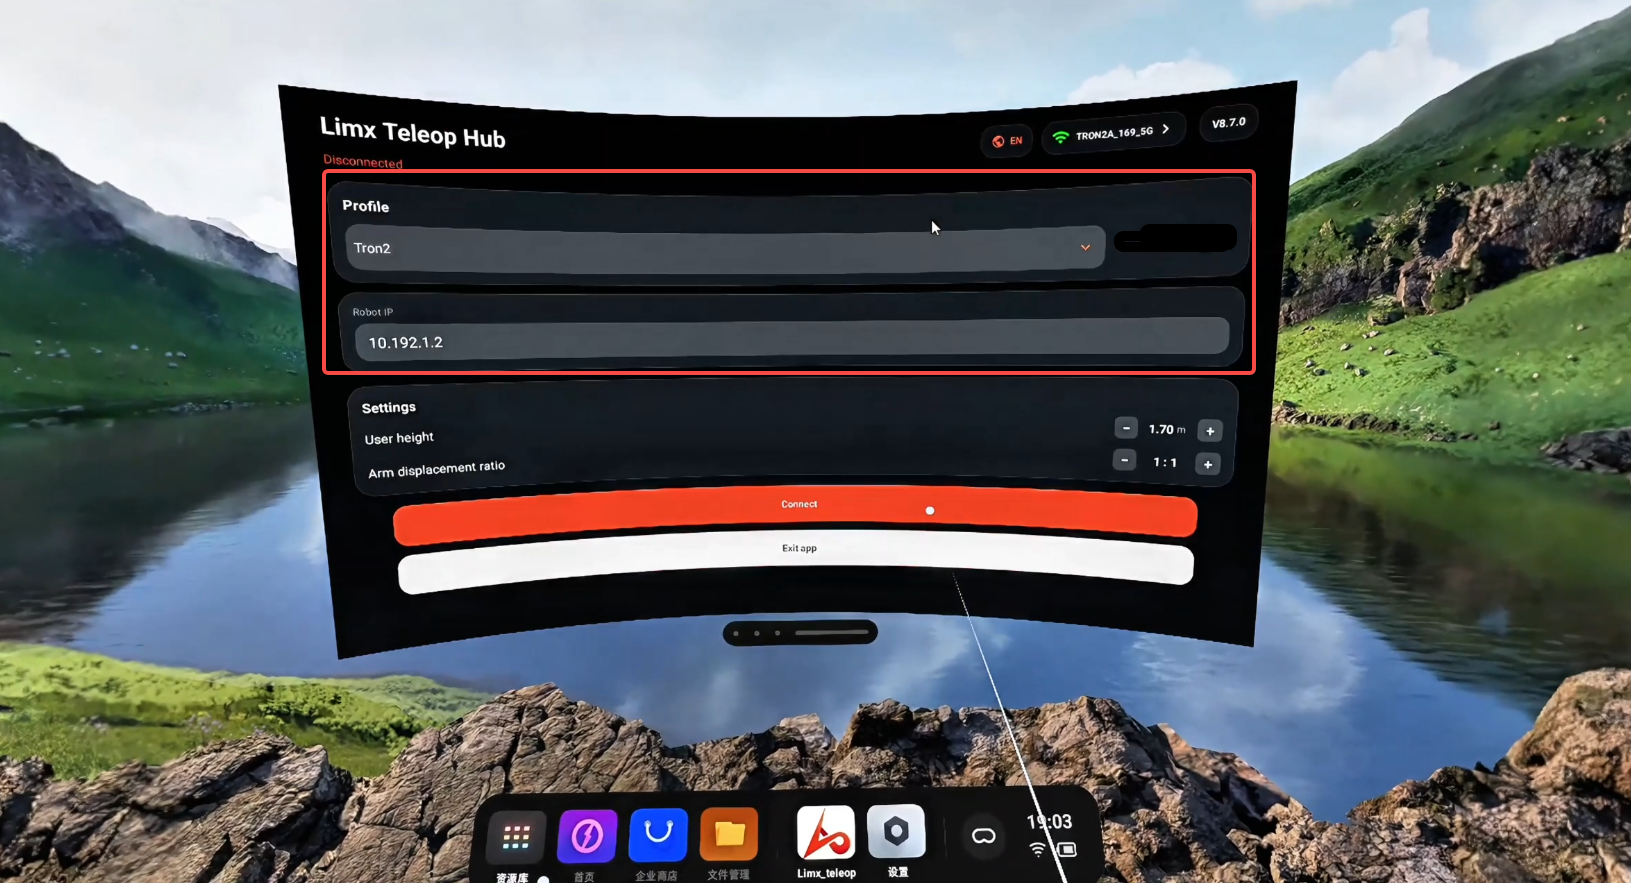

**NOTICE: For local teleoperation, we recommend disconnecting the robot from external Wi-Fi networks. Keep only the robot's 5 GHz Wi-Fi network enabled for the VR device.**
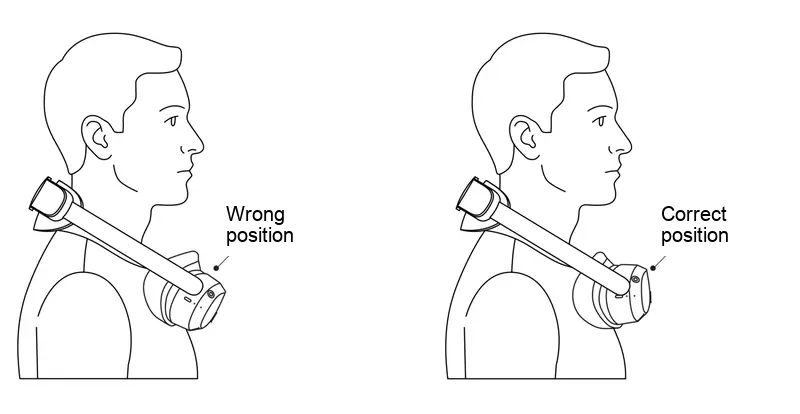
<div style="margin: 16px 0; padding: 14px 18px; background-color: #fff4e5; border-left: 4px solid #d97706; border-radius: 6px; color: #78350f; line-height: 1.7; overflow-wrap: anywhere;">
	<span aria-hidden="true">⚠️</span> <strong>NOTICE</strong>
	<br>If the VR device is connected to the robot's 5 GHz Wi-Fi network while the robot is also connected to an external 5 GHz Wi-Fi network, the two networks may interfere with each other. This can cause video latency, sluggish controls, or jitter. If the robot needs to connect to an external network, use a 2.4 GHz Wi-Fi network and keep the VR device connected to the robot's 5 GHz Wi-Fi network.
</div>

- **Full walkthrough:** The following video shows the complete process: opening Limx_teleop, connecting to the robot's network, selecting PICO Controllers, enabling Head Follow (the robot's head camera follows the VR headset), and turning on the left and right wrist camera feeds.

<video src="https://oss.limxdynamics.com/uploads/material/%E9%BB%98%E8%AE%A4/TRON%202/pic/vr_collector_en1106.mp4" controls preload="metadata" playsinline style="width: 100%; max-width: 1200px; border-radius: 6px; border:1px solid #ccc;"></video>

<div style="margin: 16px 0; padding: 14px 18px; background-color: #eff6ff; border-left: 4px solid #2563eb; border-radius: 6px; color: #1e3a8a; line-height: 1.7; overflow-wrap: anywhere;">
	<span aria-hidden="true">💡</span> <strong>Tip</strong>
	<br>If you are prompted to enable body following, select No.
</div>


1. Hang the VR headset horizontally around your neck, as shown below. Hold the VR controllers in your hands, ready for teleoperation.

<img src="https://oss.limxdynamics.com/uploads/material/默认/TRON 2/pic/vr_headset_position_en.png" alt="" title="vr_headset_position.png" loading="lazy" style="width: 100%; max-width: 700px; ">

## 5.4 Using Teleoperation

<div style="margin: 16px 0; padding: 14px 18px; background-color: #eff6ff; border-left: 4px solid #2563eb; border-radius: 6px; color: #1e3a8a; line-height: 1.7; overflow-wrap: anywhere;">
	<span aria-hidden="true">💡</span> <strong>Starting Teleoperation</strong>
	<br>Make sure the robot is in VR Teleoperation Mode (see <a href="#532-switching-the-tron2-robot-to-teleoperation-mode" style="color: #1677ff; text-decoration: none;">5.3.2</a>). Hold the controllers with both hands and match your arm posture to the robot's arms before you begin.
</div>

<div style="margin: 16px 0; padding: 14px 18px; background-color: #fff4e5; border-left: 4px solid #d97706; border-radius: 6px; color: #78350f; line-height: 1.7; overflow-wrap: anywhere;">
	<span aria-hidden="true">⚠️</span> <strong>CAUTION</strong>
	<ul style="margin: 8px 0 0; padding-left: 22px;">
		<li>When operating for the first time, use small, slow movements. Avoid sudden large controller movements, which can cause the robotic arms to swing rapidly or strike nearby objects. The teleoperation link has a latency of about 100 ms, so anticipate your movements.</li>
		<li>Release the Grip Buttons before you walk. Otherwise, both arms will move with your body.</li>
	</ul>
</div>

### 5.4.1 Dual-Arm Zero Return

To return the left arm, long-press `left Grip Button + X button`. To return the right arm, long-press `right Grip Button + A button`. The corresponding arm returns to the initial teleoperation pose (elbow bent 90°, forearm horizontal).

Keep holding the buttons until the arm reaches the pose. If you release them midway, the arm stops immediately at its current position; long-press again to continue. During zero return, the arm does not follow the controller.

### 5.4.2 Arm Following and Unlocking

- **Unlock and follow:** Hold the Grip Button on the left/right controller to unlock the corresponding arm. Its end effector then follows the controller, moving from its current position by the same direction and distance as the controller (incremental displacement control).
- **Lock:** Release the Grip Button to lock the corresponding arm at its current position immediately. During one-handed operation, release the Grip Button on the other controller to hold that arm still.
- **Move in segments:** When you hold the Grip Button again after releasing it, the arm does not jump to the controller's position. It continues following from its current position. To move the arm a long distance, release the Grip Button, bring the controller back, and then hold the Grip Button again to continue.

<video src="https://oss.limxdynamics.com/uploads/material/%E9%BB%98%E8%AE%A4/TRON%202/pic/k26b_arm_follow_crop.mp4" autoplay loop muted playsinline controls style="width: 100%; max-width: 600px; border-radius: 6px; border:1px solid #ccc; image-rendering: -webkit-optimize-contrast;"></video>

### 5.4.3 Gripper Grasping

After you hold the Grip Button on the same side to start teleoperation, release the trigger once, then pull the `left/right Trigger Button` to control the left/right gripper. Gripper closure is proportional to trigger travel: the farther you pull the trigger, the more the gripper closes. Release the trigger to open the gripper.

### 5.4.4 Mobile Base and Lift Stand Control

At this point, the Mobile Base and Lift Stand can be controlled normally according to the [VR controller commands](#52-vr-controller-commands).

## 6 Robot Network Connection

## 6.1 PC to dual-arm – Wired

1. Use an Ethernet cable to connect the Gigabit Ethernet port on the robot's rear side to the PC Ethernet port.
2. Modify the IP address of the personal computer to the same network segment as the robot to access the system. The robot IP address is 10.192.1.2. For example, set the PC address to 10.192.1.120.

<img src="https://oss.limxdynamics.com/uploads/material/默认/TRON 2/pic/net_pc_ip_setting.png" alt="" title="net_pc_ip_setting.png" loading="lazy" style="width: 100%; max-width: 900px;  border-radius: 5px; border: 1px solid #e0e0e0;">


## 6.2 PC to dual-arm – Wireless

1. After the robot startup is complete, use a personal computer to connect to the robot Wi-Fi. The name format is usually "TRON2A_XXX_2.4G" or "TRON2A_XXX_5G".
2. Enter the Wi-Fi password: `12345678`.

## 6.3 dual-arm to an External Network
1. After the PC is connected to the dual-arm, open a browser and access the dual-arm management page at `http://10.192.1.2:8080`.
2. Click the Wi-Fi icon on the right, and enter the Wi-Fi information required for the dual-arm to connect, including Wi-Fi Band, Wi-Fi SSID, Wi-Fi Password, and Router Admin Password.

## 6.4 Remote Teleoperation Configuration

After completing the following settings, you can use a VR device to teleoperate a bound robot over an external network.
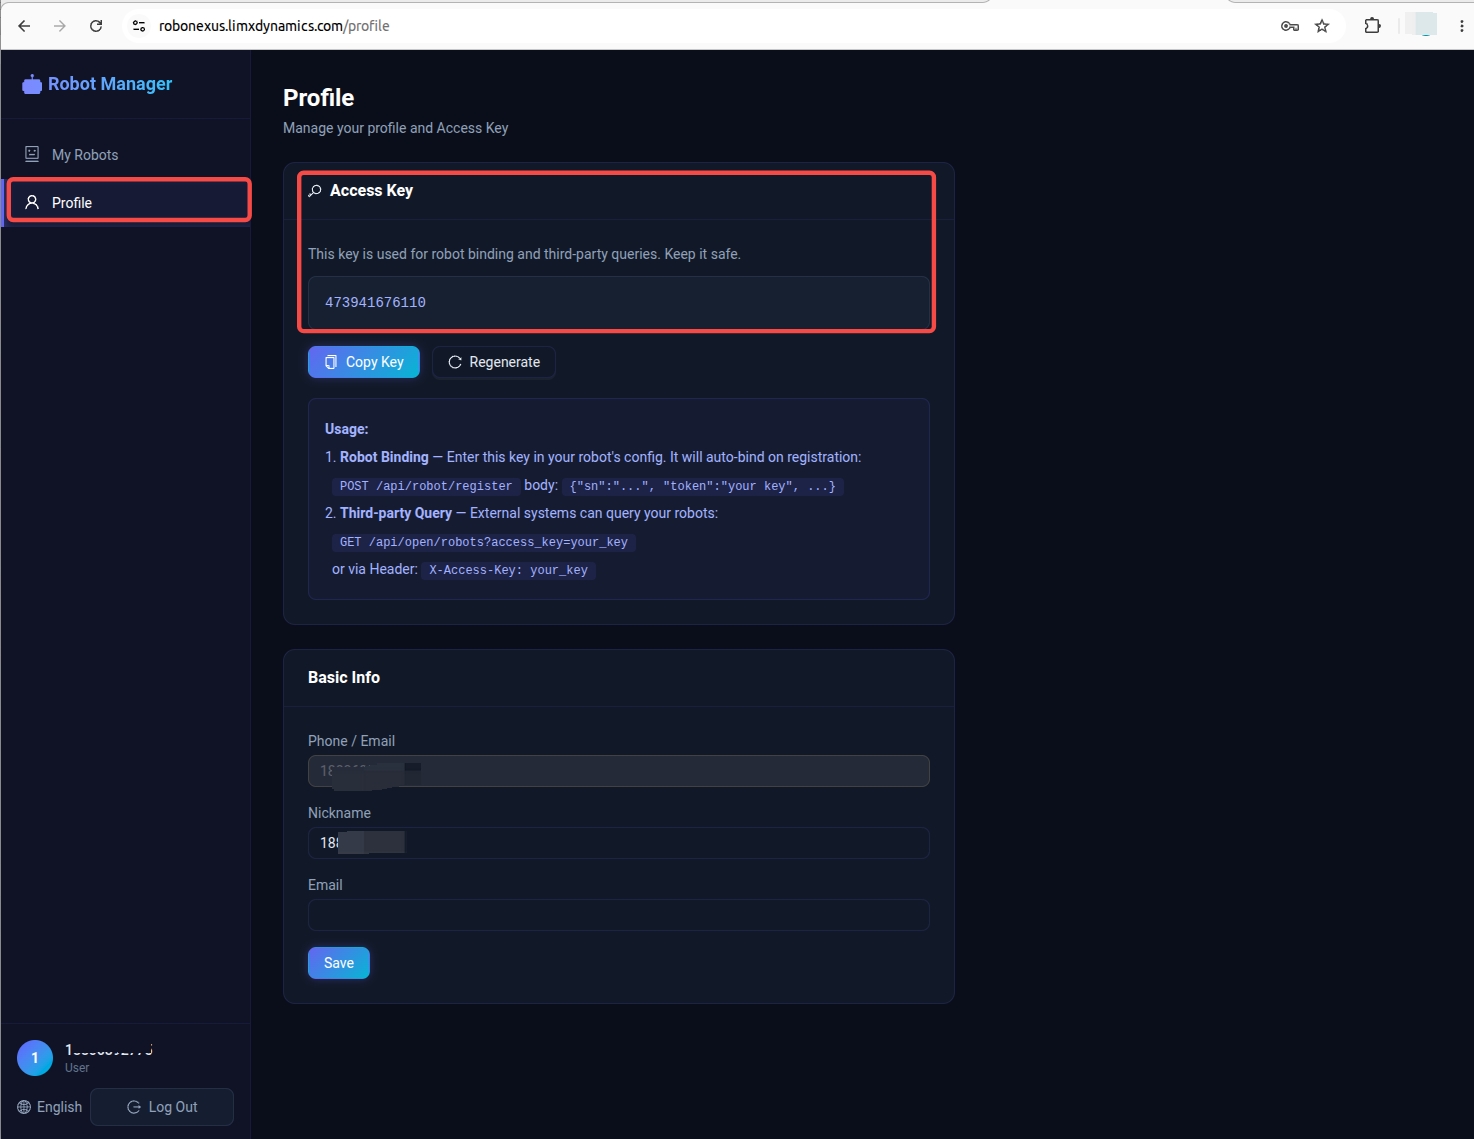
<div style="margin: 16px 0; padding: 14px 18px; background-color: #eff6ff; border-left: 4px solid #2563eb; border-radius: 6px; color: #1e3a8a; line-height: 1.7; overflow-wrap: anywhere;">
	<span aria-hidden="true">💡</span> <strong>Tip</strong>
	<br>Before proceeding, complete the settings in <a href="#63-dual-arm-to-an-external-network" style="color: #1677ff; text-decoration: none;">6.3 dual-arm to an External Network</a>, and make sure both the robot and the VR device are connected to an external network.
</div>

### 6.4.1 Binding the Robot

1.Access the Robot Management Platform at http://robonexus.limxdynamics.com/ over the external network. Register and log in to your account, then obtain the Access Key on the personal information page.


<img src="https://oss.limxdynamics.com/uploads/material/默认/TRON 2/pic/robot_platform_personal_info_en.jpg" style="width: 100%; max-width: 900px;">

2.Connect to the robot via Wi-Fi or the Ethernet port, then access the Remote Teleoperation Configuration page at http://10.192.1.2:9191 in a browser. Enter the platform address `http://robonexus.limxdynamics.com/` and your account's Access Key, then save and apply the configuration.
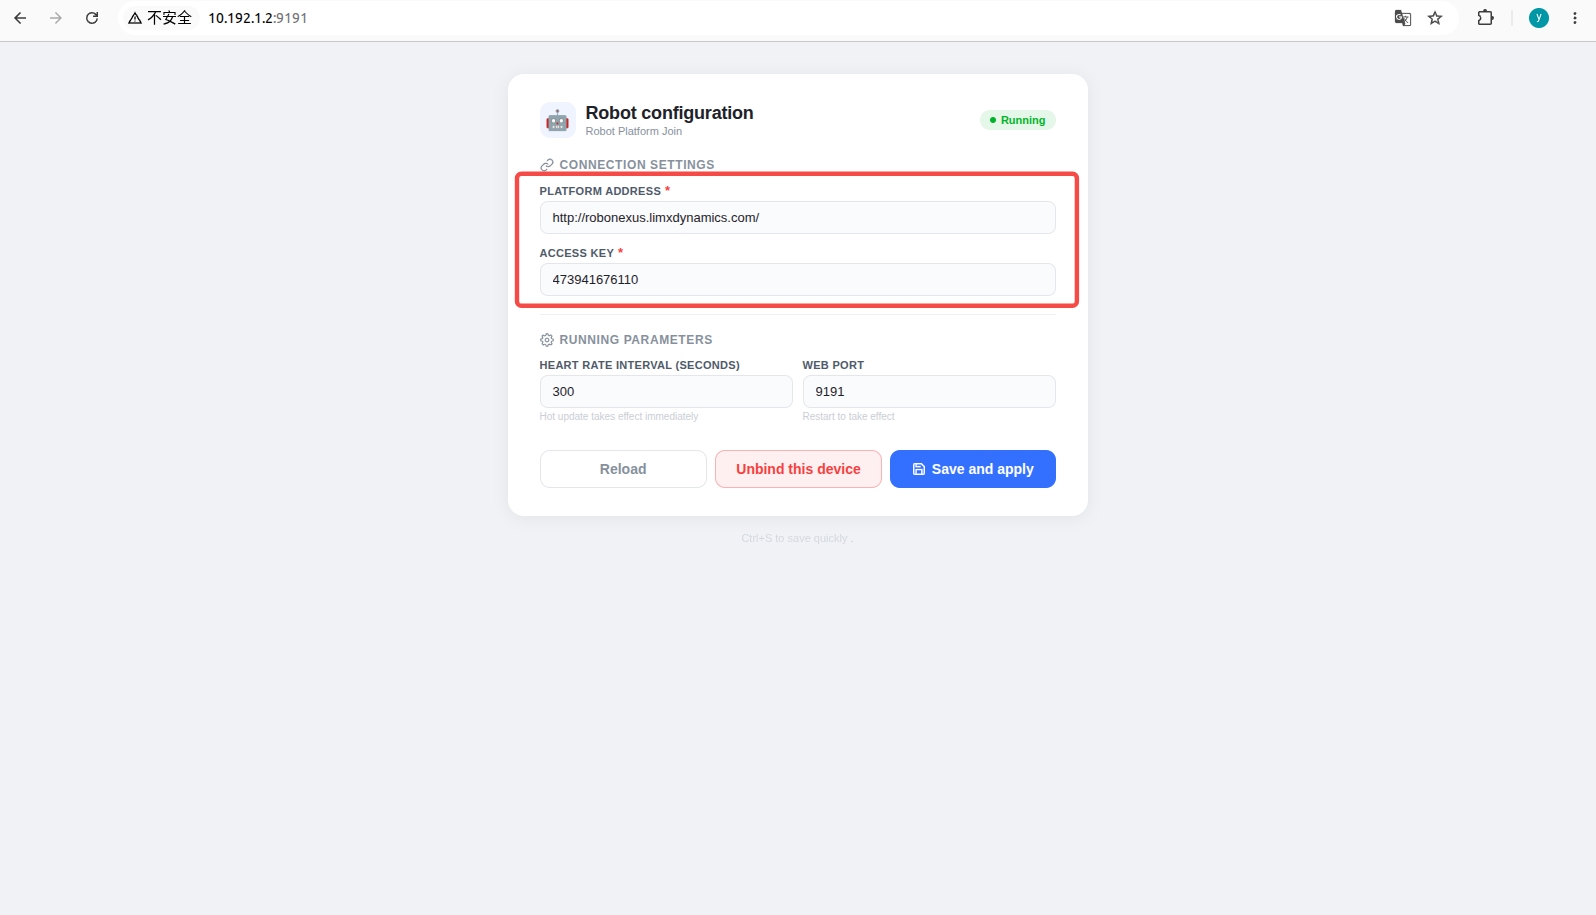

<img src="https://oss.limxdynamics.com/uploads/material/默认/TRON 2/pic/robot_config_remote_teleop_en.jpg" style="width: 100%; max-width: 900px;">
3.Access the robot management page at http://10.192.1.2:8080, and record the robot's Serial Number (SN) under "Robot Information".
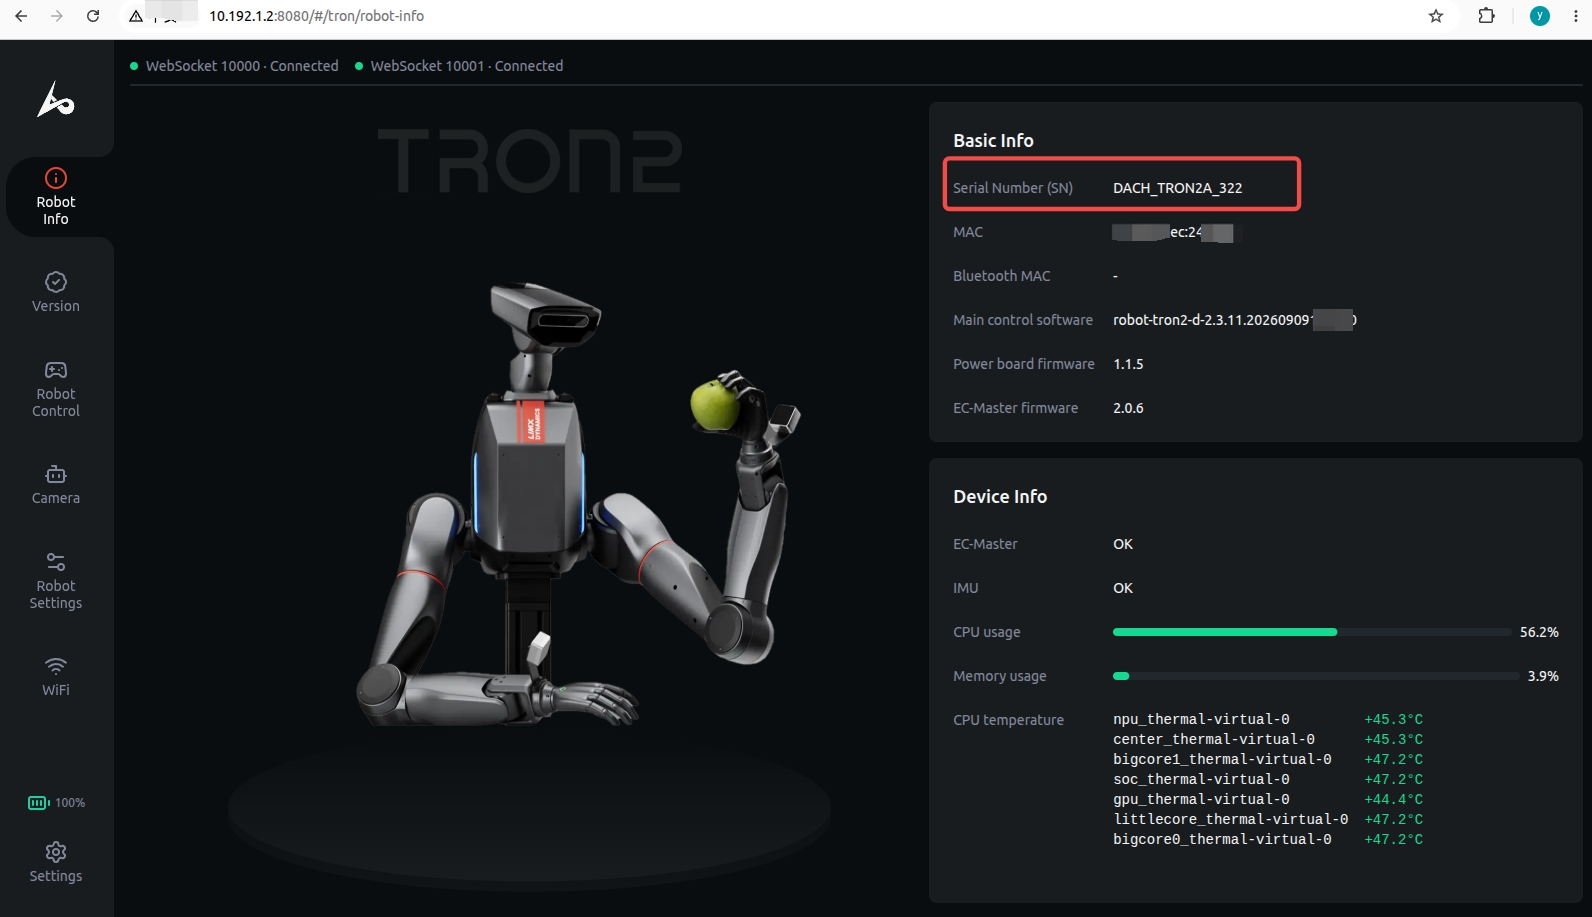
<img src="https://oss.limxdynamics.com/uploads/material/默认/TRON 2/pic/Robot_Information_en.jpg" style="width: 100%; max-width: 900px;">


### 6.4.2 Connecting the VR Device

1. Open the teleoperation app on the VR device and select connection via an external network.
2. Select `tron2-online` as the configuration, enter your account's Access Key and the robot's serial number, then click "Connect".
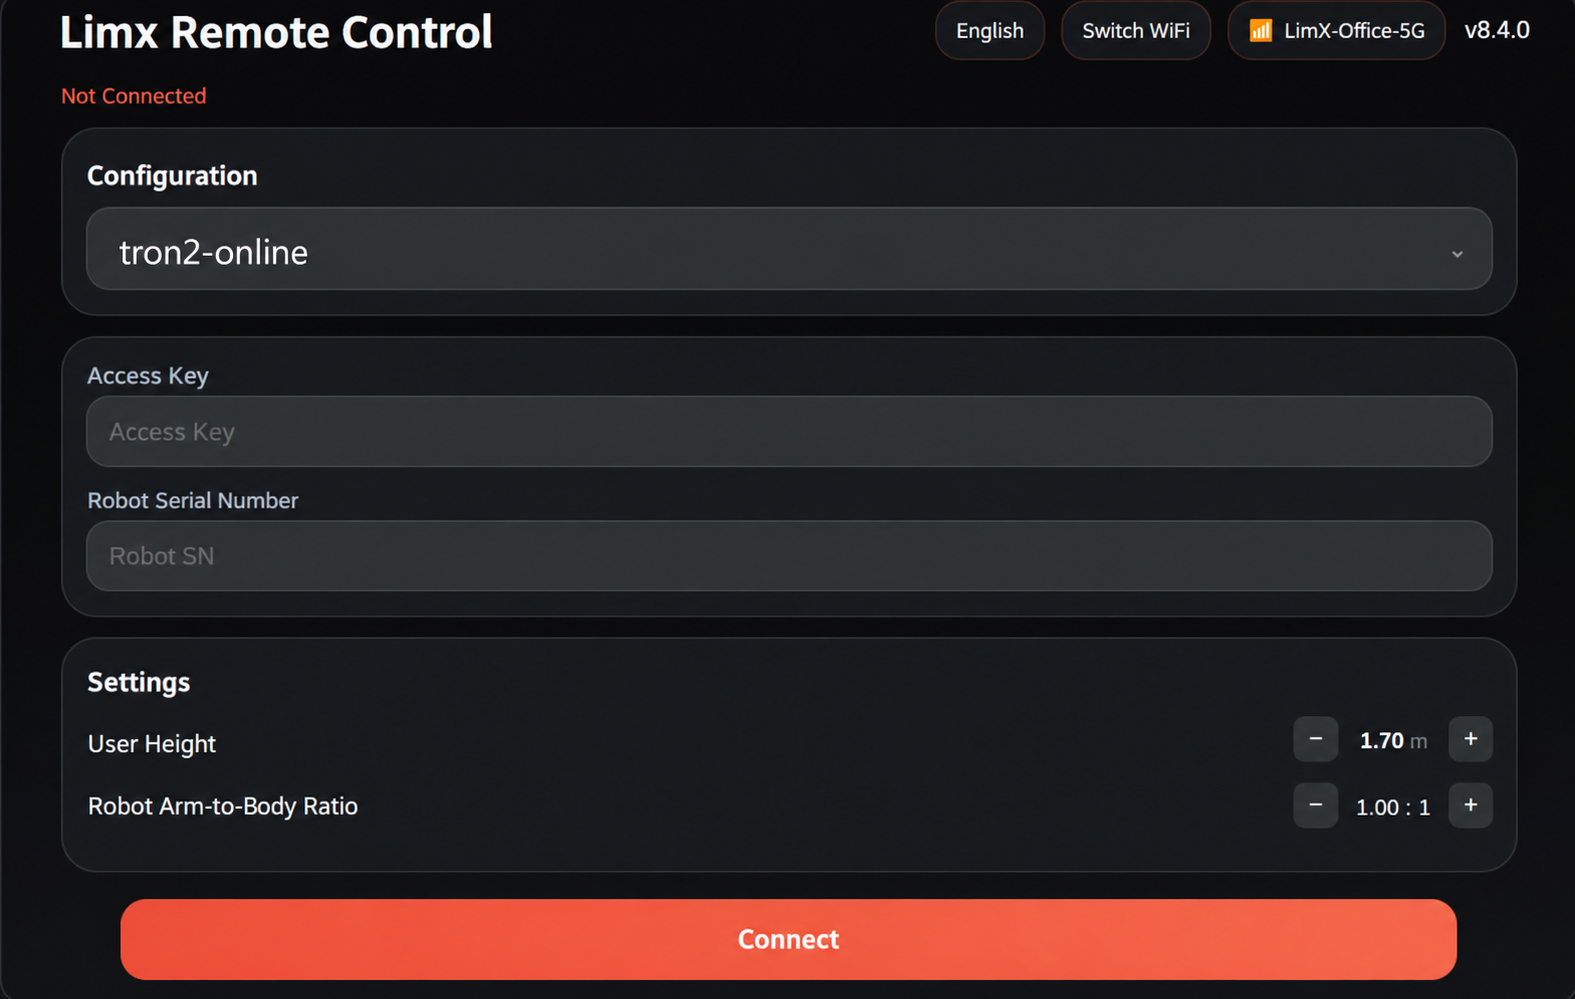

<img src="https://oss.limxdynamics.com/uploads/material/默认/TRON 2/pic/vr_teleop_config_en.png" style="width: 100%; max-width: 700px;">
3.After the connection succeeds, the Robot Management Platform displays the robots currently available for remote teleoperation.
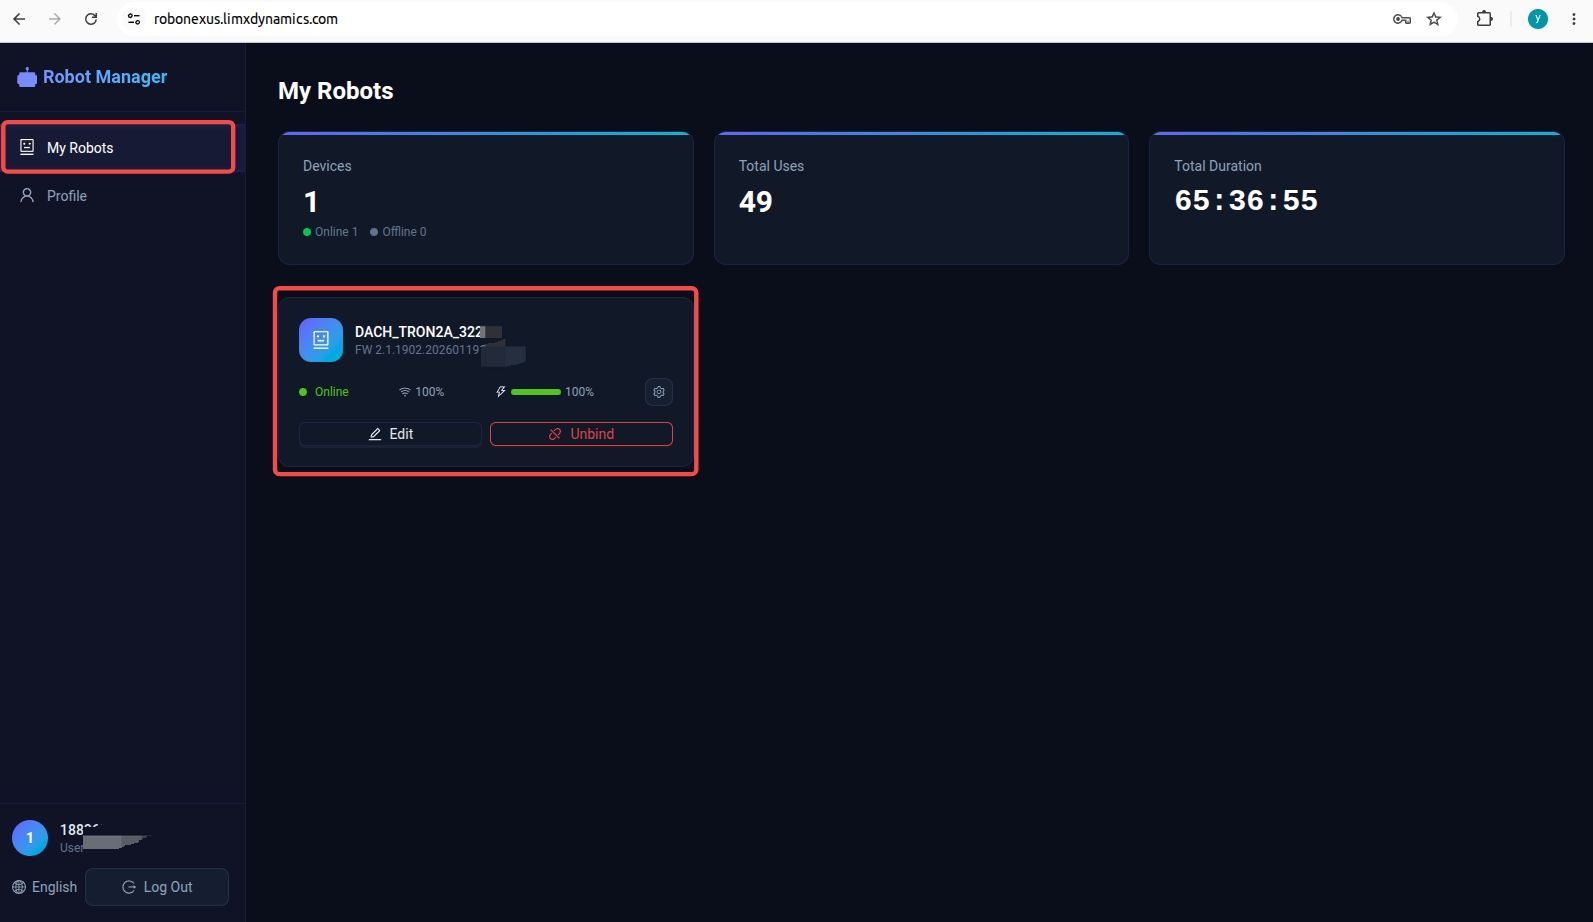

<img src="https://oss.limxdynamics.com/uploads/material/默认/TRON 2/pic/robot_platform_device_mgmt_en.jpg" style="width: 100%; max-width: 900px;">


## 7 Robot Software Upgrade

## 7.1 Robot Body Firmware Upgrade
Use a browser to enter the robot management page and select the robot software version downloaded locally in advance for upgrade. The steps are as follows:

1. Connection and IP settings:
   a. Connect a personal computer to the robot.
   b. Use the Shell command `ping 10.192.1.2` to ensure the connection is normal.
2. Access the management page: enter the following in the browser address bar:[http://10.192.1.2:8080](http://10.192.1.2:8080/) to enter the robot management page.
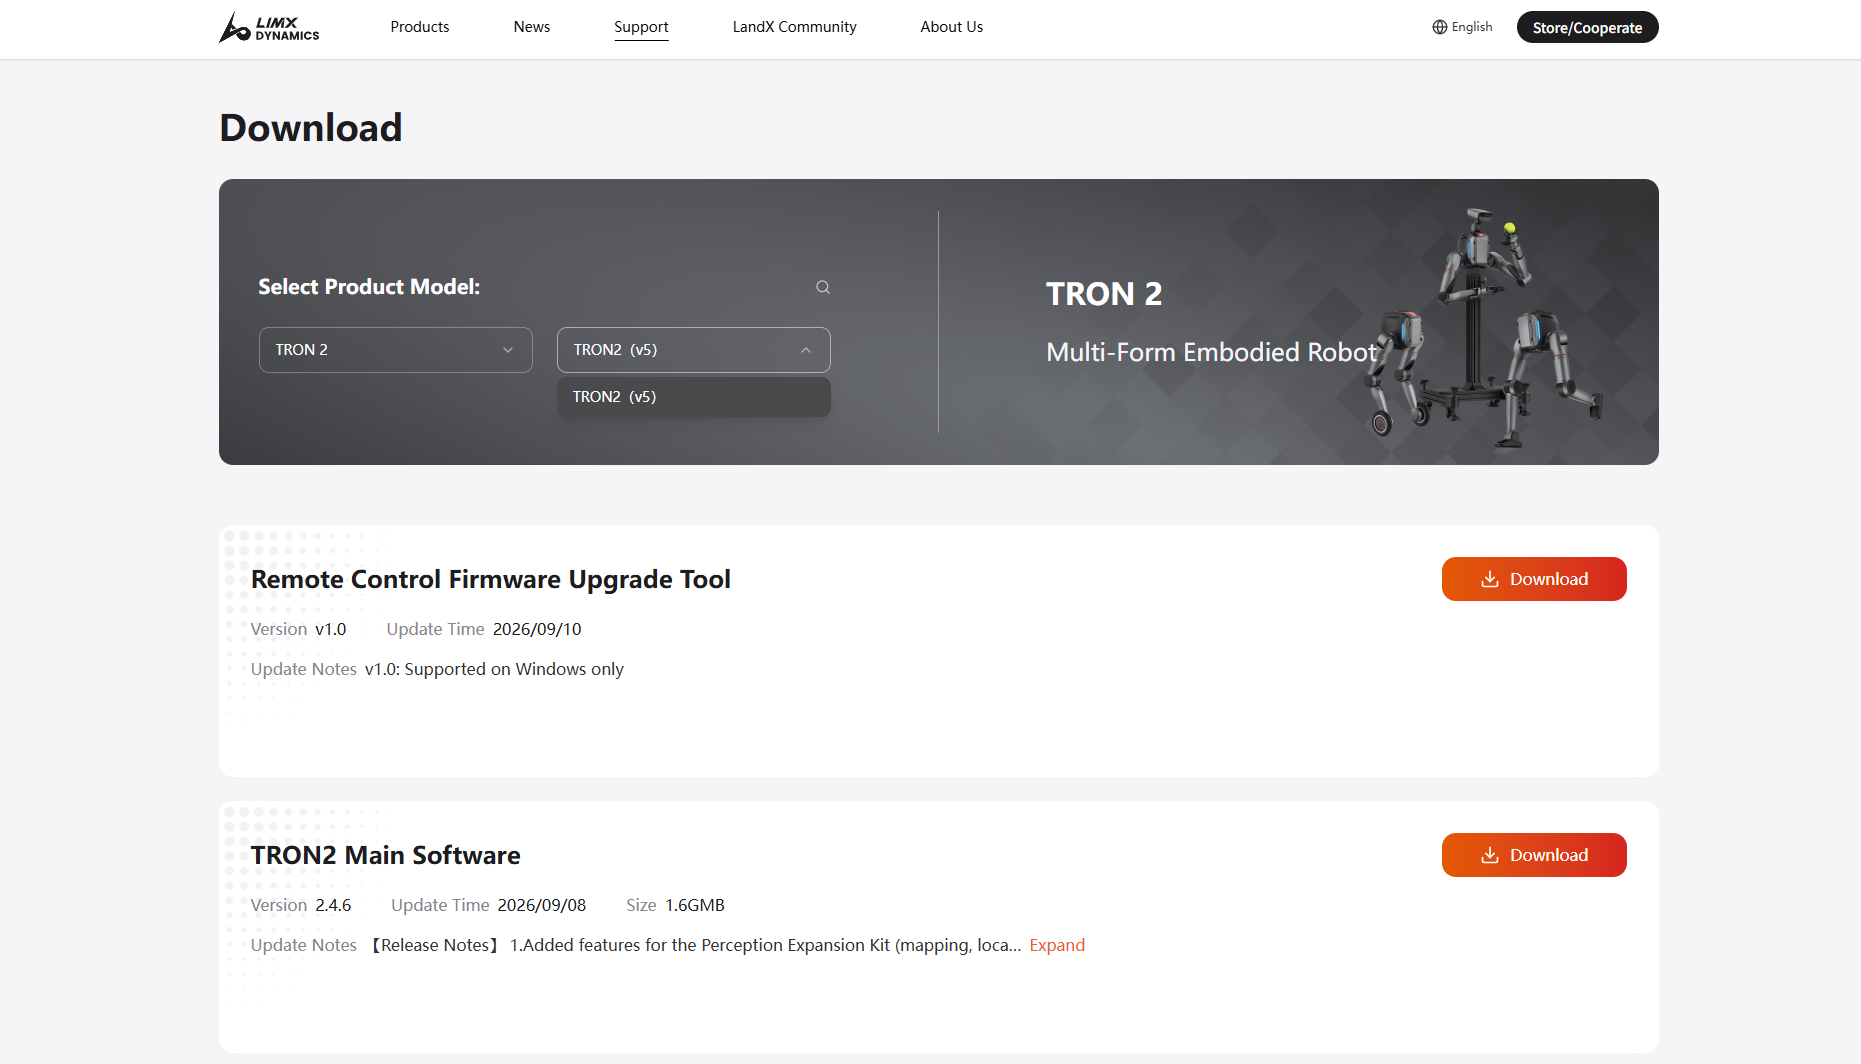
   <img src="https://oss.limxdynamics.com/uploads/material/默认/TRON 2/pic/Robot_Information_en.jpg" style="width: 100%; max-width: 900px;">
3. Select and upgrade software:
   a. Go to the LimX Dynamics official website → Downloads ，at  https://www.limxdynamics.com/en/downloads. Select the product model **TRON2**, choose the firmware type and version you need, and download the firmware package to your local computer.
   <img src="https://oss.limxdynamics.com/uploads/image/2026/09/20/1789870774898_image.png" alt="image.png" style="width: 900px; height: auto;" />

  b. On the robot management page, go to the **Version** Management section. Select the firmware type you wish to upgrade, click **Select file** to upload the firmware package, then click the **Upgrade** button after the upload is complete. Wait patiently for the upgrade to finish.
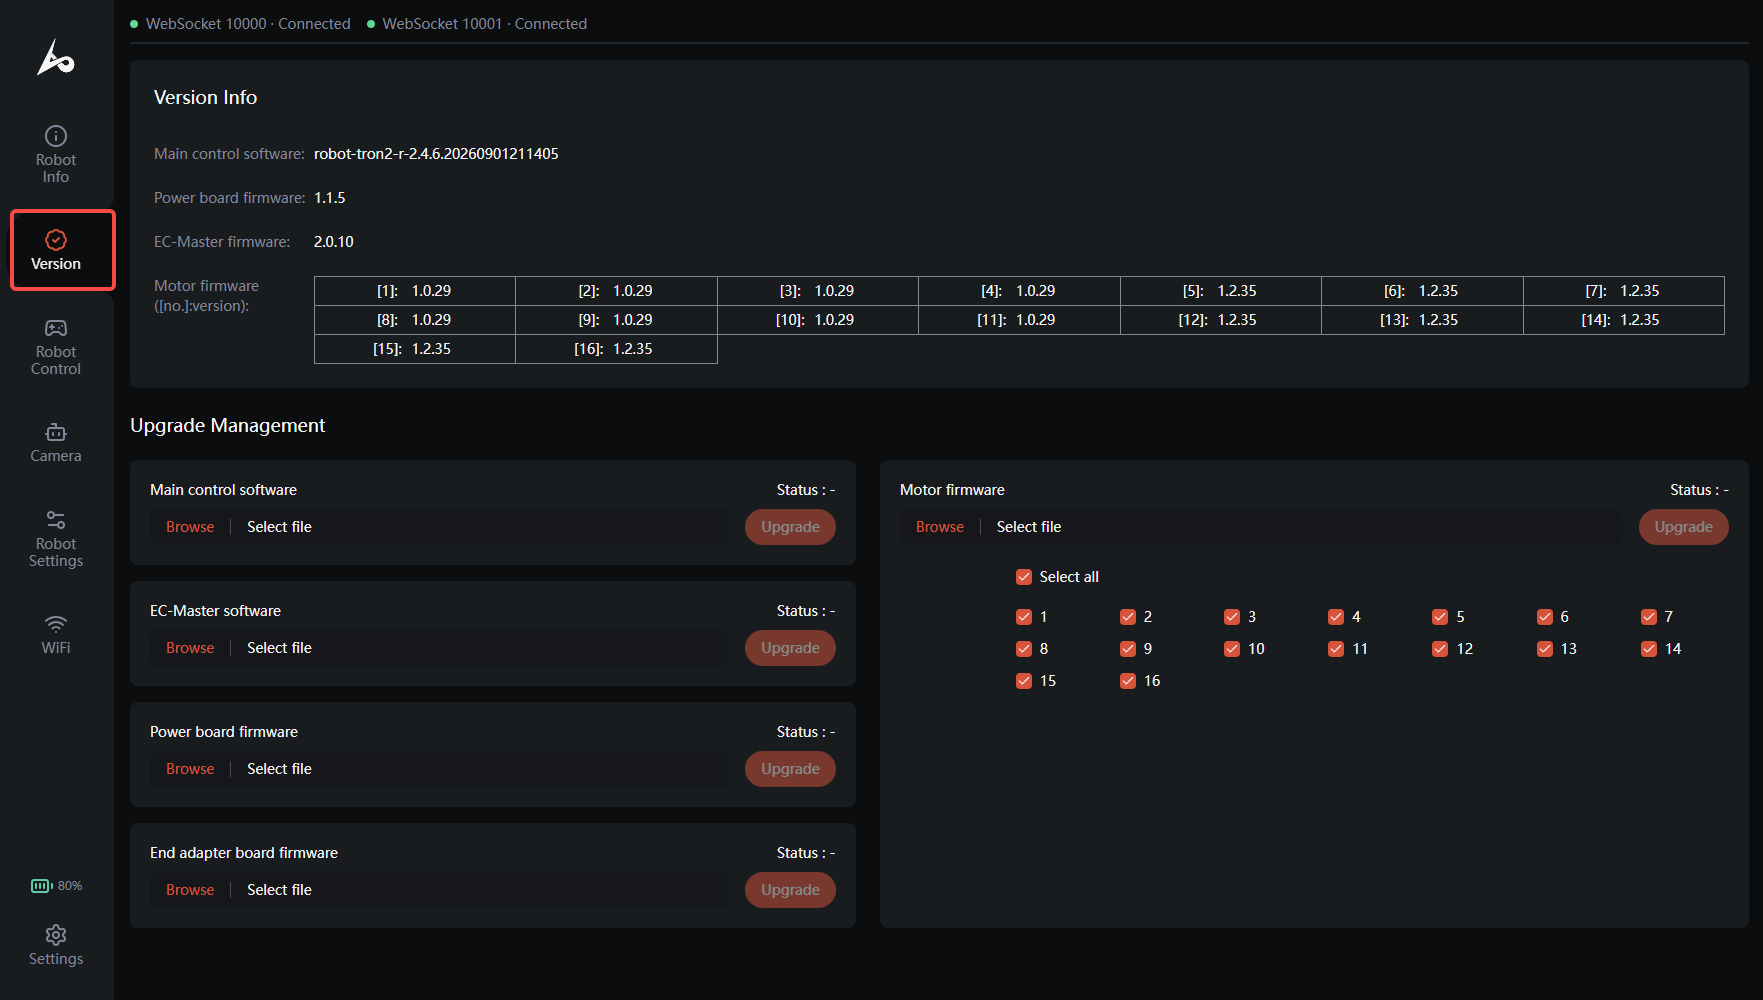
  <img src="https://oss.limxdynamics.com/uploads/image/2026/09/20/1789870966053_image.png" alt="image.png" style="width: 900px; height: auto;" />

  c. Note: Upgrading the motor driver firmware must be done in two steps (this applies to both the dual-arm configuration and the bipedal/wheeled-leg configuration).  First, select all motors, choose the downloaded **"TRON2 – Motor Driver Firmware"**, and click **Upgrade**.  
Then, select all motors again, choose the downloaded **"TRON2 – Motor Driver Firmware Supplementary Package"**, and click **Upgrade**.
  d. Note: The robot will automatically restart after certain firmware upgrades are completed.


## 7.2 Upgrading the VR Device App Online

Before proceeding, make sure the VR device is connected to an external network.

1. Open the Library from the bottom menu of the VR device and find the teleoperation app. Press and hold the Grip Button on the controller, then select "Uninstall" in the pop-up window.
2. Open the browser on the VR device, search for "[LimX Dynamics](https://www.limxdynamics.com/en/downloads)", and go to the LimX Dynamics official website.
3. Go to "Support > Downloads", select `TRON 2`, and download the latest VR device app.
4. When the download is complete, select "Install app" in the pop-up installation prompt and wait for the installation to finish.
5. After installation, you can find the teleoperation app in the Library.

**Operation Video**

<video controls playsinline preload="metadata" style="width: 100%; max-width: 900px; height: auto; border-radius: 6px; border: 1px solid #ccc; image-rendering: -webkit-optimize-contrast;">
  <source src="https://oss.limxdynamics.com/uploads/material/%E9%BB%98%E8%AE%A4/TRON%202/video/Update_the_VR_Device_App_Online_en.mp4" type="video/mp4">
</video>


## 7.3 The remote controller firmware upgrade
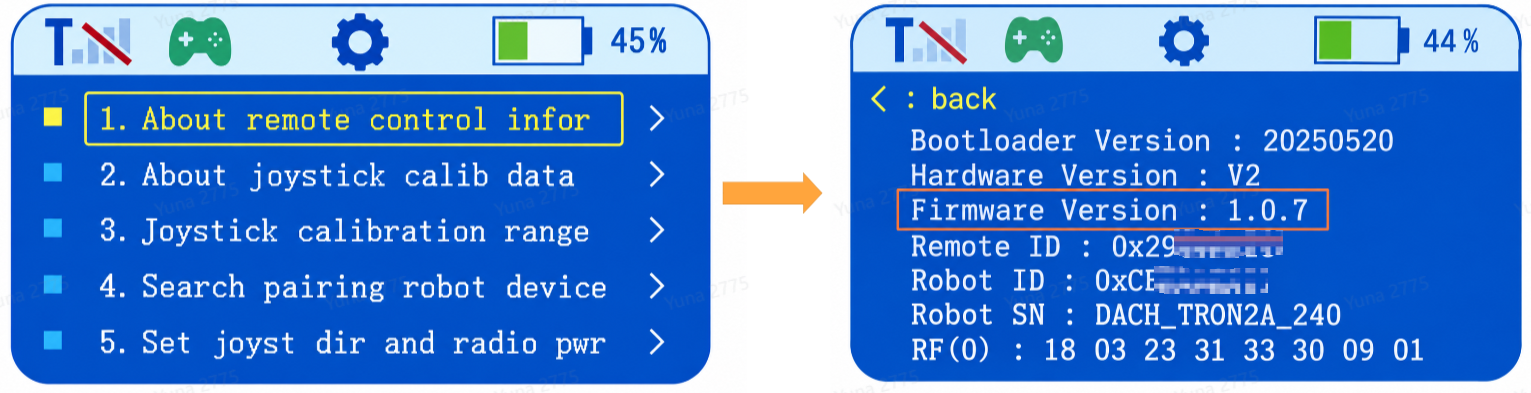
<div style="margin: 16px 0; padding: 14px 18px; background-color: #eff6ff; border-left: 4px solid #2563eb; border-radius: 6px; color: #1e3a8a; line-height: 1.7; overflow-wrap: anywhere;">
	<span aria-hidden="true">💡</span> <strong>Tip</strong>
	<br>The remote controller firmware upgrade tool runs on Windows only.
</div>

1. Download the remote controller firmware upgrade tool from the official website, unzip it, and open the software.
2. Take out the remote controller charging cable and connect the remote controller to be upgraded to a Windows PC.
3. With the remote controller powered off, press and hold the Left Joystick + Power button. The remote controller will enter Boot state.
4. In the "COM" field, select the device number of the remote controller, then click "OPEN COM" to open the remote controller serial port.
5. After the serial port is opened, the remote controller log information will be displayed, and the status shown on the remote controller screen will switch to "BootUSB".
6. Download the latest remote controller firmware from the official website and save it locally. Click "OPEN FILE" and select the downloaded new firmware.
7. Click "UPGRADING" to start the firmware upgrade. A prompt will pop up after the upgrade is successful.


**Operation Video**

<video controls playsinline preload="metadata" style="width: 100%; max-width: 900px; height: auto; border-radius: 6px; border: 1px solid #ccc; image-rendering: -webkit-optimize-contrast;">
  <source src="https://oss.limxdynamics.com/uploads/material/%E9%BB%98%E8%AE%A4/TRON%202/video/13remote_control_firmware_upgrade_EN_output.mp4" type="video/mp4">
</video>

Long press the power button to turn off the remote controller. After restarting, you can verify the upgraded firmware version: double-click the Power button to enter the settings page, use the Up/Down buttons to select the first item, then press the Right button to enter. The remote controller information will be displayed, where "Firmware Version" is the current firmware version.

<img src="https://oss.limxdynamics.com/uploads/image/2026/09/21/1789962618290_image.png" alt="image.png" style="width: 800px; height: auto;" />


## 8 Log Export

1. Connect to the robot Wi-Fi. Password: `12345678`.
2. Enter the following in the browser address bar:[http://10.192.1.2:8090](http://10.192.1.2:8090/)  to enter the log management interface.
3. Export the log files and bag files from the time when the issue occurred.

## 9 Routine Care and Maintenance

## 9.1 Cleaning and Storage

- Clean the surface regularly or after operation in dusty environments using a clean microfiber cloth.
- Use the transport case designed specifically for the TRON 2 robot for storage and transport to prevent impact and vibration.

## 9.2 Inspection and Maintenance

- Exterior maintenance: Clean dust from joint areas and check whether screws are loose.
- Software updates: Upgrade official firmware in a timely manner to fix potential system vulnerabilities and optimize motion algorithms.
- Battery pack: Charge to 50%-60% before storage (avoid full charge or deep discharge), and recharge to the same range every 3 months.
- Remote controller: Keep interfaces clean, ensure the joysticks are not subjected to external force during storage, and regularly check anti-interference performance.